 English
 Deutsch
 Español
 Italiano
 Français
 Português do Brasil
 Tiếng Việt
 ไทย
 Bahasa Indonesia
 Русский
 العربية
 हिन्दी

Somewhere between the first prompt and the first email from App Review, an AI coding agent stops being a toy and becomes a tool you ship with. This guide is about how to use OpenCode to get from one to the other: installing it on a clean Mac, choosing what to pay for the model doing the thinking, running models on your own machine with Ollama, giving the agent real hands with MCP servers, teaching it your habits with skills, and then walking an iPhone app through TestFlight and App Review without losing a week to paperwork.
I don’t come from a coding background. I run a small IT company in Germany, and I build software with AI agents. Two of the results went live on the App Store this autumn: Stash, which remembers where you put things, and PingAtlas, which measures network latency from your own device. They come up in this guide where they’re genuinely useful as examples, and nowhere else.
Everything below was checked against official documentation, release notes, pricing pages and the App Store itself on 7 November 2026. AI coding moves fast: OpenCode shipped at least ten version 2 releases between 20 and 30 October alone, Ollama and MiniMax have both rebuilt their plans since the end of August, and Apple rewrote parts of its review guidelines at least twice this year. Volatile numbers are flagged where they appear. Check them before you buy anything.
Disclosure: Stash and PingAtlas are my own apps, published by my company, Graham Miranda UG (haftungsbeschränkt). Both are free and show no ads. This article contains one affiliate link: the Z.ai GLM Coding Plan link in Part 2 gives you 10% off and pays me a commission if you subscribe. OpenCode’s team at Anomaly, Ollama, Apple, Expo, Z.ai and every other company mentioned here have not sponsored, reviewed or approved this article.
TL;DR — The Whole Journey in Ten Bullets
- OpenCode is a free, open-source (MIT) coding agent that works with almost any model: cloud subscriptions, pay-per-token APIs or models running on your own Mac. It’s at version 2.2.6 (6 November 2026), with a terminal app, a desktop app, a web and phone interface, and an ACP mode that runs inside Xcode 27.
- You pay for the model, not the agent. “Coding plans” are flat monthly subscriptions for model time. For most people starting out, OpenCode Go ($10 a month) plus Ollama (free locally, $20 a month for Pro cloud credits) is the setup I recommend: cheap, model-agnostic, zero-retention by default for most models, and no grey areas in anyone’s terms of service.
- The alternatives are real. ChatGPT Plus and Pro, GitHub Copilot and the Z.ai GLM Coding Plan all plug into OpenCode through built-in providers. Claude subscriptions now work again through OpenCode 2.2.3’s new Claude Agent provider, but Anthropic hasn’t publicly endorsed that route, so read Part 2 before you rely on it.
- Ollama is one engine for local and cloud models.
ollama launch opencodewires them together, local models need at least a 64K context window, and a 32 GB Mac can run solid coding models such asqwen3.8:27b(an 18 GB download). - MCP servers give the agent hands. For app work, the shortlist is Xcode’s own MCP bridge (
xcrun mcpbridge), XcodeBuildMCP, the Expo MCP server, Context7 for current documentation and Sentry for crashes. Add only what you use: every server costs context. - Skills give the agent your playbook. A skill is a folder with a
SKILL.mdfile. OpenCode reads them from.opencode/skillsand also from.claude/skillsand.agents/skills, so skills written for other agents work too. Expo publishes 23 official ones, and the App Store Connect CLI (asc) comes with more than twenty. - Let the agent do the paperwork, never the submission. The
ascCLI and its skills can upload builds, manage TestFlight, sync metadata and screenshots, and check review status. Deny the submit command in OpenCode’s permissions and press the button yourself. - Apple’s 2026 rules matter for AI-built apps. Copycat apps in saturated categories now get rejected (guideline 4.3(b), June), hidden or dormant features are banned (new 2.5.19, October), builds need Xcode 26 or later, and from April 2027 apps built with the iOS 27.1 SDK need iPhone Duo screenshots.
- First-year cost: $99 if you run everything locally and only pay Apple, about $419 on the setup I recommend (Apple + OpenCode Go + Ollama Pro on annual billing), and around $1,779 for a power setup. All prices exclude VAT.
- The rule that matters most: “done” is a claim, not a fact. Run it on a real iPhone, in airplane mode, in dark mode, at the largest text size, with VoiceOver on. Then believe it.
The Journey at a Glance
| Stage | What you do | What OpenCode does | Tools |
|---|---|---|---|
| 1. Set up | Install, choose a coding plan, connect models | Nothing yet | OpenCode, OpenCode Go, Ollama |
| 2. Teach | Write AGENTS.md, add skills, connect MCP servers | Reads them every session | AGENTS.md, skills, MCP |
| 3. Plan | Write the brief, argue with the plan | Turns the brief into a plan and a roadmap | plan agent, /goal |
| 4. Build | Review every diff, test on a device | Writes code in small slices, builds, runs tests, takes screenshots | build agent, Xcode MCP, XcodeBuildMCP or Expo MCP |
| 5. Beta | Invite testers, read feedback | Archives, uploads, manages TestFlight groups | Xcode, asc or EAS |
| 6. Paperwork | Answer the legal and privacy questions honestly | Drafts metadata, audits data flows, resizes screenshots | asc skills |
| 7. Submit | You press “Submit for Review” | Checks review status, triages rejections | App Store Connect |
| 8. Launch | Respond to users, plan updates | Localises, writes release notes, triages crashes | asc, Sentry, your website |
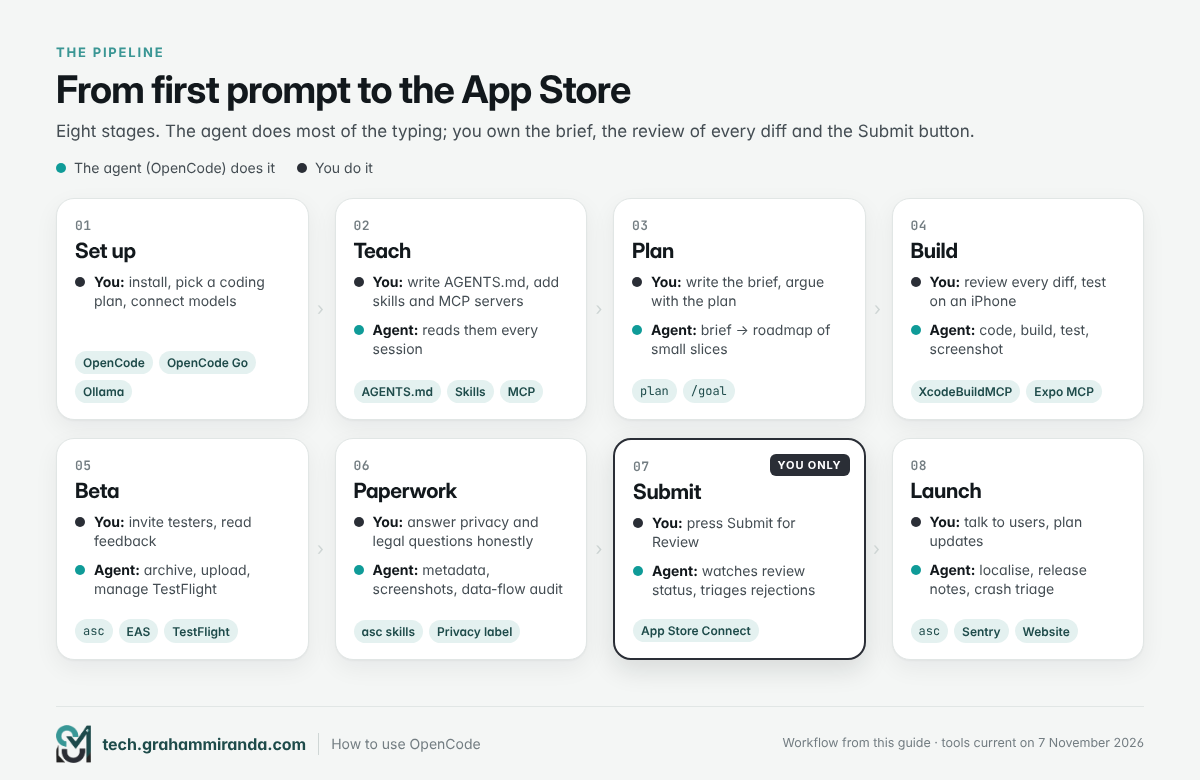
Table of Contents
- Part 1 — What OpenCode Is in November 2026, and Why I Recommend It
- Part 2 — Coding Plans, Explained (and the Two I Recommend)
- Part 3 — Ollama: One Engine for Local and Cloud Models
- Part 4 — How to Use OpenCode: Install It and Connect Your Models, Step by Step
- Part 5 — Agents, Commands, Permissions and Goal Mode: Making OpenCode Yours
- Part 6 — MCP Servers: Giving the Agent Hands
- Part 7 — Skills: Write Your Playbook Once
- Part 8 — Building the App: From Idea to a Build You Trust
- Part 9 — Publishing to the App Store: Let OpenCode Do the Paperwork, Then Press Submit Yourself
- Part 10 — Launch: The Listing, Screenshots, ASO and Life After Approval
- Part 11 — What It Costs: Four First-Year Budgets
- Part 12 — Fifteen Mistakes to Avoid
- Part 13 — Which Setup Should You Choose? Six Scenarios
- Frequently Asked Questions
- The Bottom Line
Part 1 — What OpenCode Is in November 2026, and Why I Recommend It
OpenCode is an open-source AI coding agent. You start it in a project folder, describe what you want, and it works the way a developer does: it reads your files, makes a plan, edits code, runs commands, reads the errors and keeps going until the job is done or it needs you. It’s published under the MIT licence by Anomaly, the team behind it, and it doesn’t care which model you give it.
The project’s homepage claims more than 220,000 GitHub stars, 1,089 contributors and 22 million monthly developers. Those are the project’s own numbers and they move every week, but they explain why OpenCode has become the best-known model-agnostic alternative to the model makers’ own agents, Claude Code and Codex.
Where it runs
OpenCode isn’t one app any more. Since the 2.0 rewrite, a background service runs on your machine and every interface talks to it, so a session you start in one place shows up in the others.
| Interface | What it is | Good for |
|---|---|---|
| Terminal (TUI) | The classic full-screen terminal app | Fast keyboard-driven work, SSH sessions, servers |
| Desktop app | An Electron app for macOS (Apple silicon and Intel), Windows (x64 and ARM64) and Linux (.deb, .rpm, AppImage), with tabs, diffs, terminals and a built-in browser | People who don’t live in a terminal |
| Web and phone | opencode pair prints a one-time link (it expires after five minutes) that opens your local sessions in a browser; 2.2.6 added a phone- and tablet-friendly composer |
Checking on a long task from the sofa |
| Inside Xcode 27 | OpenCode speaks the Agent Client Protocol, so opencode acp can be added as an agent in Xcode’s Intelligence settings |
Native Swift developers who want to stay in Xcode |
| SDK and scripts | opencode run for one-off tasks, plus a JavaScript SDK |
Automation and CI |
What changed since 2.0
OpenCode 2.0 was a ground-up rebuild: according to the team’s announcement in July, the runtime moved from Bun to Node.js to cut memory use, the desktop app moved from Tauri to Electron, the API was redesigned, and OpenCode began running as a service by default. Version 2.0.0 shipped on 11 September 2026. The releases since then have mostly added the features that matter for long, real projects:
| Version | Date | What it added |
|---|---|---|
| 2.2.0 | 27 Oct | Experimental desktop plugins, a refreshed desktop app, image and decision APIs for plugins |
| 2.2.1 | 29 Oct | Goal mode (/goal <objective>, with pause, resume and clear), opt-in scheduled prompts, image generation |
| 2.2.2 | 29 Oct | Image generation on by default when a connected provider supports it; a worktree picker from the Git branch |
| 2.2.3 | 30 Oct | The Claude Agent provider (more on that in Part 2) |
| 2.2.4 | 30 Oct | Guided Claude Agent setup, schedules that run under opencode serve, persistent desktop terminals |
| 2.2.5 | 30 Oct | Worktree and shell-mode shortcuts, a percentage-based compaction buffer |
| 2.2.6 | 6 Nov | opencode run --worktree for scripted runs, a mobile composer dock, shared MCP connections |
Source: OpenCode’s changelog, checked 7 November 2026. Expect a newer version by the time you read this.
Why it’s the agent I recommend
- It’s loyal to no model. OpenCode connects to subscriptions, pay-per-token APIs and local models through one
/connectcommand. When a better model ships next month, you change one line in a config file, not your whole workflow. - Its permissions work like a firewall. Every action (reading, editing, running a shell command, loading a skill, calling an MCP tool) passes through an ordered list of
allow,askanddenyrules where the last match wins. “Never rungit push” and “never submit to the App Store” are one line each. - It speaks everyone’s formats. It reads
AGENTS.md(and falls back toCLAUDE.md), loads skills from.claude/skillsand.agents/skillsas well as its own folders, and connects to any MCP server. The ecosystem other agents built works here too. - It goes where you are. Terminal on a server, desktop app on a Mac, a browser on your phone, or inside Xcode.
- It costs nothing. OpenCode is free, and it even includes a rotating set of free models you can use without an account.
Where it isn’t the best choice
Honesty first: OpenCode isn’t the top scorer on coding leaderboards, because it isn’t one model. The harnesses that top them are vendor pairs: Claude Code with Anthropic’s best model, Codex with OpenAI’s. They’re tuned together and they’re excellent. I compared twenty-eight of them in my AI coding harness comparison, and if you already pay for one of those subscriptions and love it, nothing in this guide requires you to switch.
There are also rough edges. OpenCode ships releases almost daily, so things move under your feet. The old version 1 documentation still exists at docs.opencode.ai (with a banner pointing to v2), and plenty of third-party guides, including Ollama’s own OpenCode page, still show the v1 installer address. Several of the newest features are marked experimental. And Windows package managers aren’t supported for the v2 command-line tool; Windows users get the desktop app or a standalone zip.
Part 2 — Coding Plans, Explained (and the Two I Recommend)
OpenCode is free. The model doing the thinking isn’t. There are three ways to pay for it, and most confusion about “AI coding plans” comes from mixing them up.
- Run it yourself. Open-weight models on your own Mac through Ollama. You pay with hardware and patience, not money. Your code never leaves the machine.
- Subscribe to a coding plan. A flat monthly fee buys a usage allowance, usually measured in five-hour and weekly windows. This is where OpenCode Go, Ollama Pro, the GLM Coding Plan, ChatGPT and Claude subscriptions live.
- Pay per token. Bring an API key from any provider and pay for exactly what you use. Ideal for the occasional hard problem; dangerous for a long debugging session without a budget alert.
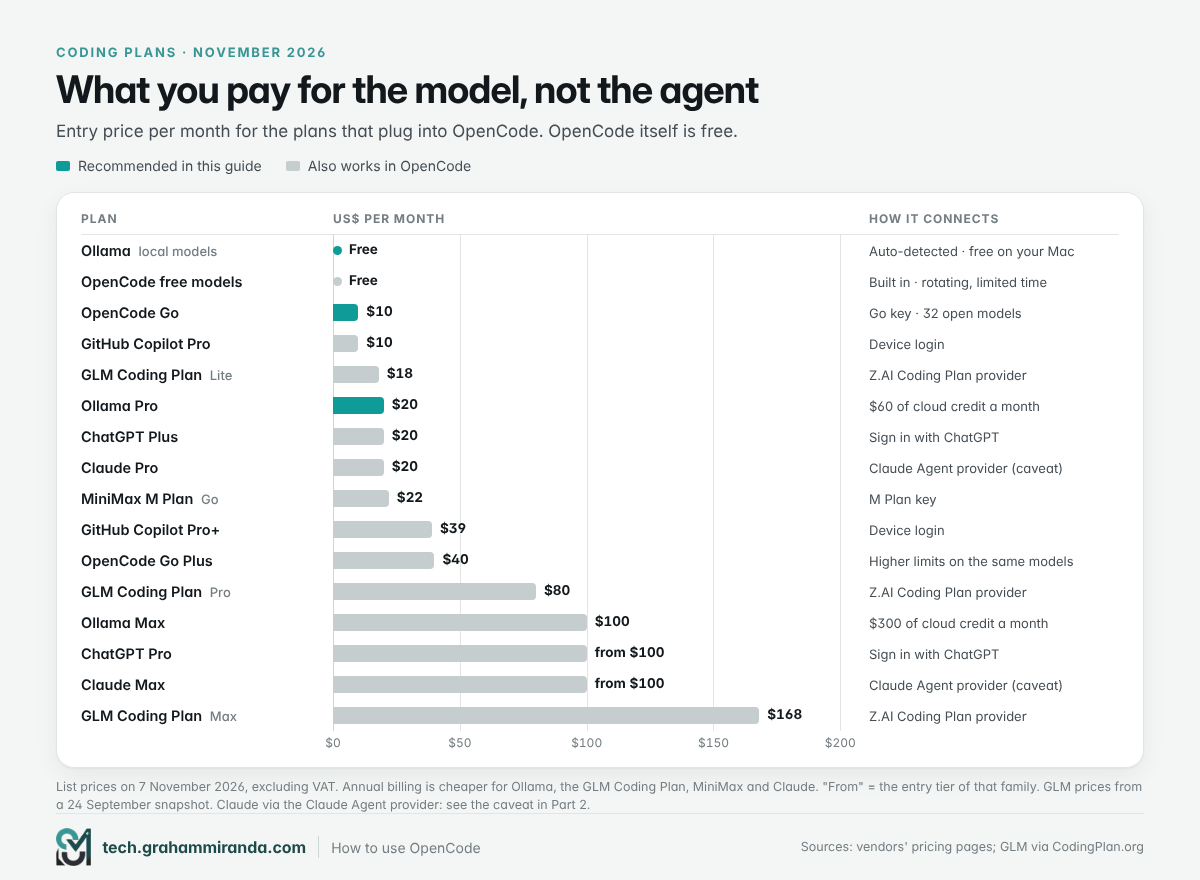
The coding plans that work in OpenCode (November 2026)
| Plan | Monthly price (USD) | What you get | How it connects to OpenCode |
|---|---|---|---|
| OpenCode free models | $0 | A rotating set of limited-time free models | Built in, no account needed |
| Ollama, local | $0 | Any open-weight model your Mac can hold | Detected automatically, or ollama launch opencode |
| OpenCode Go ⭐ | $10 · Go Plus $40 · Go Teams $20 per member | 32 open models, including GLM-5.3, GLM-5.3-Flash, Kimi K3 and K3.1 Pro, MiniMax M3.1 Flash, DeepSeek V4.1 Flash and Qwen3.8 Max | /connect → OpenCode Go → paste your key |
| Ollama Pro / Max ⭐ | $20 ($200 a year) · Max $100 | $60 (Pro) or $300 (Max) of cloud-model credits a month, plus unlimited local use | Same as local Ollama; cloud models appear alongside local ones |
| GLM Coding Plan (Z.ai) | Lite $18 · Pro $80 · Max $168 (20% off quarterly, 30% off yearly) | GLM-5.3 and GLM-5.3-Flash, both with 1M-token context | /connect → the Z.AI Coding Plan provider |
| MiniMax M Plan | Go $22 · Explore $55 · Build $132 (two months free on annual billing) | MiniMax M3.1 Flash, plus image, audio and (from Explore) video models | MiniMax’s coding-plan provider, with an M Plan key |
| ChatGPT | Plus $20 · Pro from $100 | OpenAI’s GPT-6 family through your ChatGPT plan | /connect → OpenAI → “Sign in with ChatGPT” |
| GitHub Copilot | Pro $10 · Pro+ $39 · Max $100 | Copilot’s model pool, metered in GitHub AI Credits | /connect → GitHub Copilot → device login |
| Claude | Pro $20 · Max from $100 | Anthropic’s models through Claude Code | /connect → Claude Agent (OpenCode 2.2.3+, Claude Code installed); see the caveat below |
| Pay per token | What you use | Any provider’s API, including OpenCode’s own pay-as-you-go gateway | /connect → the provider → API key |
List prices on 7 November 2026, excluding VAT. ⭐ = what this guide recommends. Prices, quotas and model rosters change constantly, so check each vendor’s page before you subscribe. GLM prices are from a 24 September snapshot and Z.ai’s “plans from $18” headline; Kimi’s membership (from $19) is left out because I couldn’t confirm an official OpenCode route for it.
How the limits actually work
The headline price tells you very little. The allowance is what you live with.
- OpenCode Go gives every model its own monthly dollar allowance, and you can spend 20% of it in any five-hour window and 50% in any week. On the $10 plan, for example, GLM-5.3-Flash gets $60 a month, DeepSeek V4.1 Flash $100 and Kimi K3 $15, so cheap, efficient models stretch much further than heavyweight ones. When you hit a limit, requests are blocked unless you’ve turned on Extra Usage, which falls back to pay-as-you-go credit. Free models keep working either way.
- Ollama moved to credits: Pro includes $60 of cloud usage a month and Max $300, both billed at per-token rates, and unused credit doesn’t roll over. Pro allows three requests at once, Max ten. Prices drop outside 12:00 to 18:00 UTC on weekdays and all weekend, which suits European evenings nicely. Local models are unlimited on every plan, including the free one.
- The GLM Coding Plan uses credits per five-hour and weekly window, and off-peak use (outside 14:00 to 18:00 China time on weekdays) costs half the credits.
- ChatGPT and Copilot meter through their own systems: ChatGPT in five-hour message estimates per model, Copilot in AI Credits. Inside OpenCode, ChatGPT sign-ins show no cost per request because usage counts against your plan, and OpenCode caps the input context for them by default (500,000 tokens on the newest GPT models).
Privacy and data retention
Your prompts contain your code. Where they go matters, especially for client work under EU data-protection terms.
- OpenCode Go blocks paid endpoints that train on your data by default. Most models (GLM, Kimi, MiniMax, Qwen, MiMo and more) are served with zero retention; a few (Grok, GPT Luna models, Claude Haiku and two free promotional models) keep logs for 30 days. Discounted “Contributor” models do train on your prompts and must be switched on deliberately. Default regions are Europe and the United States, and DeepSeek’s models require opting in to global routing, with a zero-retention agreement that runs until 30 November 2026.
- Ollama Cloud says plainly: “Prompt or response data is never logged or trained on.” Models run mainly in the United States, with overflow capacity possibly routed to Europe.
- OpenCode’s free models are a different deal: the docs note that some free models may use your data to improve the model. Fine for experiments, not for client code. Set
OPENCODE_DISABLE_FREE_MODELS=1to hide them. - Local models never leave your machine. For anything under a strict data-processing agreement, that’s still the cleanest answer.
The Claude question
Claude subscriptions have had a rocky year in third-party tools. In January, Anthropic tightened its checks so Claude Pro and Max logins stopped working in harnesses like OpenCode, and in March OpenCode removed its sign-in option at Anthropic’s request. On 30 October, OpenCode 2.2.3 brought subscriptions back by a different route: a built-in Claude Agent provider that drives your locally installed Claude Code (version 2.1.248 or later) through Anthropic’s official Agent SDK, after you sign in with claude auth login.
The facts you need before using it:
- OpenCode doesn’t read Claude Code’s saved login; the real
claudeprogram sends the requests. - Claude Code’s own tools, settings,
CLAUDE.mdfiles, hooks, MCP servers and skills are switched off. Claude works through OpenCode’s tools and permission prompts instead. - Anthropic’s Agent SDK documentation says third-party developers may not offer claude.ai login or subscription limits in their products unless Anthropic has approved it. At the time of writing, Anthropic hadn’t commented publicly on OpenCode’s provider, and nobody can tell you for certain whether it puts your account at risk.
My advice: if you already pay for Claude and want to try it, use it for personal projects and watch for an official statement. For business work, use an Anthropic API key, the one route Anthropic’s documentation names.
What I recommend, and why
Start with OpenCode Go and Ollama. Here’s the reasoning:
- Price. $10 a month buys access to 32 strong open models. Add Ollama Pro at $20 if you want more cloud headroom; skip it if your Mac runs local models well.
- Choice without lock-in. Go and Ollama Cloud carry the same open-weight families (GLM, Kimi, MiniMax, DeepSeek and more), so you can compare models on your own project instead of trusting a leaderboard.
- Privacy by default. Zero retention for most Go models, a no-logging policy at Ollama, and the option to go fully local for sensitive work.
- No grey zones. Both are designed for exactly this use, inside OpenCode.
- The local fallback is free. When the five-hour window runs dry at 11 p.m., a local model on Ollama keeps you moving on the small jobs.
When to choose something else. If you already pay for ChatGPT Plus or Copilot, connect it first; it costs you nothing extra. If GLM is going to be your daily driver, the GLM Coding Plan’s allowance can make more sense than Go’s per-model limits, and you can get 10% off the GLM Coding Plan through my affiliate link (affiliate link, see the disclosure at the top). Coding Plan keys and standard Z.ai API keys aren’t interchangeable, so pick the Coding Plan provider in /connect. And if your work needs the very top of the leaderboard, a frontier model by API key for the hardest tasks is money well spent.
Part 3 — Ollama: One Engine for Local and Cloud Models
Ollama runs open-weight models on your own computer and serves them through a simple local API. Since last year it also runs bigger models in its own cloud, through the same app and the same API, so to OpenCode a cloud model looks exactly like a local one. That’s the whole appeal: one engine, one setup, and a switch between “private and free” and “big and fast” that’s just a model name.
Install Ollama (step by step)
- Download it from ollama.com/download. On a Mac, open the download and drag Ollama into Applications. On Windows, run the installer. On Linux, the official one-liner is:
curl -fsSL https://ollama.com/install.sh | sh - Start it. Open the app, or type
ollamain a terminal. Since version 0.40.15 (early November), runningollamawith no arguments opens a welcome launcher. - Sign in if you want cloud models. The app prompts you during setup. Local models work without an account; your cloud usage is at ollama.com/settings/usage.
- Pull a model to check everything works:
ollama pull qwen3.8:27b
ollama run qwen3.8:27b "Say hello in Swift"
Connect Ollama to OpenCode
You have three options, from easiest to most flexible.
Option 1: let OpenCode find it. OpenCode v2 checks the default local Ollama address on start-up and adds every model that can write text to /models. No account, no config. Embedding-only models are skipped.
Option 2: let Ollama set it up.
ollama launch opencode            # configure OpenCode for Ollama and start it
ollama launch opencode --config   # configure only, don't start a session
ollama launch has worked with OpenCode v2 since Ollama 0.40.12 (27 October). It doesn’t overwrite your ~/.config/opencode/opencode.json, so your own settings still apply. One quirk: models you’ve defined only in OpenCode’s config don’t appear in Ollama’s launch picker.
Option 3: point OpenCode at an Ollama server somewhere else. If Ollama runs on a Mac mini in the cupboard or a server, add it as a provider with its address. The /v1 at the end matters:
{
  "$schema": "https://opencode.ai/config.json",
  "providers": {
    "ollama": {
      "settings": {
        "baseURL": "https://ollama.example.com/v1",
        "apiKey": "{env:OLLAMA_API_KEY}"   // optional, sent as a bearer token
      }
    }
  }
}
The setting that breaks most local setups: context length
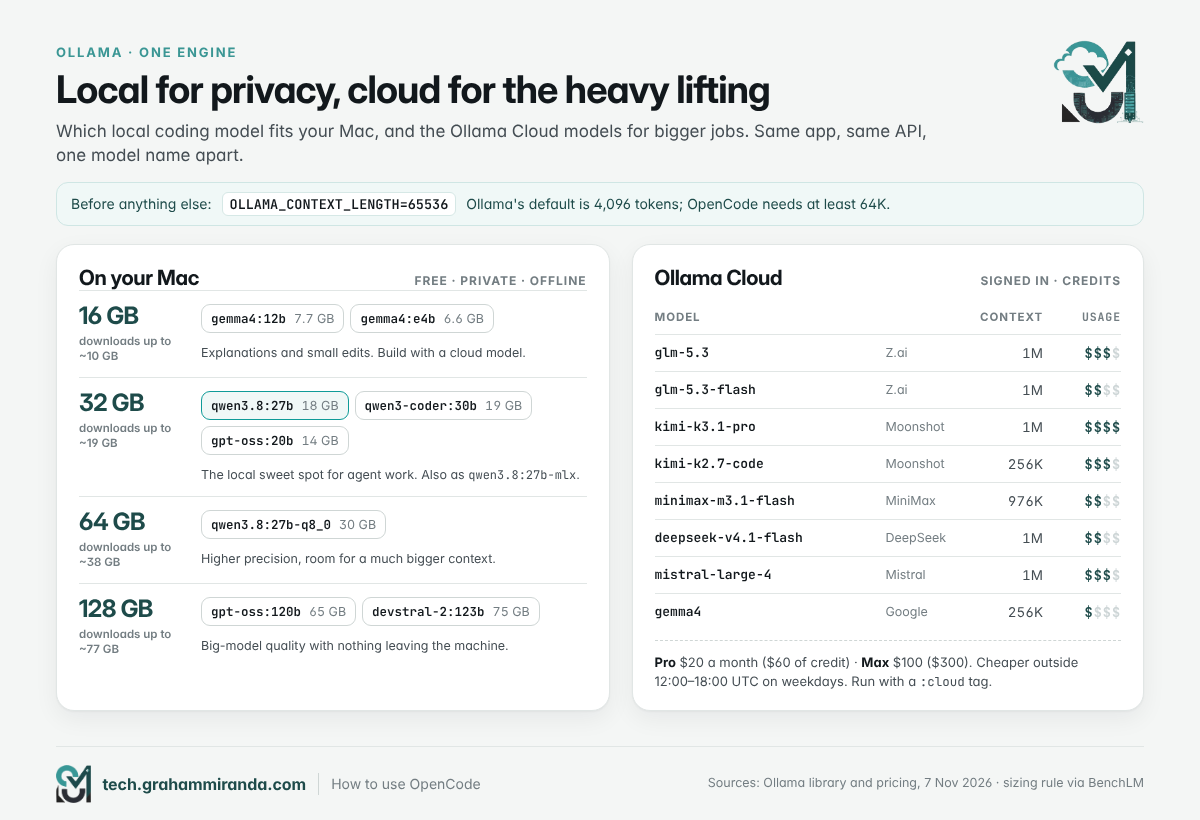
Ollama’s FAQ gives its default context window as 4,096 tokens. Ollama’s own OpenCode guide asks for at least 64K, because an agent’s system prompt, tool definitions and file contents fill a small window before any work happens. Set it on the Ollama server, not in OpenCode:
# If you start the server yourself:
OLLAMA_CONTEXT_LENGTH=65536 ollama serve

# If you use the Mac app: set the variable for launchd, then quit and reopen Ollama
launchctl setenv OLLAMA_CONTEXT_LENGTH 65536
Then check it took effect: ollama ps shows each loaded model’s context size and whether it’s running on the GPU. A bigger window uses more memory, so on a 32 GB Mac, 64K is a sensible ceiling for a 27-billion-parameter model.
Which local model fits your Mac
A useful rule of thumb from BenchLM’s November rankings: a model needs roughly its download size plus 20% for context, and a Mac can give about three quarters of its unified memory to the GPU. In practice, keep the download under about 60% of your Mac’s memory.
| Your Mac’s memory | Model to try first | Download | Context | Good for |
|---|---|---|---|---|
| 16 GB | gemma4:12b or gemma4:e4b |
7.7 GB / 6.6 GB | 256K / 128K | Explanations, small edits, commit messages. Too small for long agent sessions; use cloud models for building |
| 24–32 GB | qwen3.8:27b (also as 27b-mlx for Apple silicon) |
18 GB | 256K | The local sweet spot for coding with an agent |
| 24–32 GB | qwen3-coder:30b |
19 GB | 256K | A mixture-of-experts coder with only about 3 billion active parameters, so it’s quick |
| 24–32 GB | gpt-oss:20b |
14 GB | 128K | OpenAI’s smaller open-weight model; leaves the most headroom |
| 64 GB | The same models at higher precision, such as qwen3.8:27b-q8_0 |
30 GB | 256K | Better answers, room for a large context |
| 96–128 GB | gpt-oss:120b or devstral-2:123b |
65 GB / 75 GB | 128K / 256K | Big-model quality without the cloud |
Sizes and context windows from the Ollama library on 7 November 2026. Speed depends on your chip’s memory bandwidth as much as on its memory size. For the hardware side, see my MacBook for local LLMs guide.
Ollama Cloud: the models your Mac can’t hold
The strongest open-weight coding models today are far too big for a laptop. Ollama Cloud runs them for you. In the app or CLI they carry a :cloud tag and download nothing:
ollama run glm-5.3:cloud
ollama run minimax-m3.1-flash:cloud
The coding-relevant part of the cloud catalogue on 7 November:
| Model | Maker | Context | Ollama’s usage rating | Notes |
|---|---|---|---|---|
glm-5.3 |
Z.ai | 1M | High | Z.ai’s flagship; strong on long agentic tasks |
glm-5.3-flash |
Z.ai | 1M | Medium | Natively multimodal, 18B active parameters; a great default build model |
kimi-k3.1-pro |
Moonshot AI | 1M | Extra high | The newest entry (updated 4 November), multimodal, Moonshot’s most capable model |
kimi-k2.7-code |
Moonshot AI | 256K | High | Coding-tuned and lighter on thinking tokens |
minimax-m3.1-flash |
MiniMax | 976K | Medium | Reads images; $0.15 input and $0.60 output per million tokens |
deepseek-v4.1-flash |
DeepSeek | 1M | Medium | Built for speed and throughput; reads images |
mistral-large-4 |
Mistral | 1M | High | European lab, open weights |
gemma4 |
256K | Low | Cheap enough for helpers and subagents |
The rating is Ollama’s shorthand for how quickly a model spends your credits. If you want to compare the big ones properly, my Kimi K3 vs Fable 5.1 vs GLM-5.3 and GLM-5.3-Flash vs MiniMax M3 comparisons go deeper.
The routing pattern I’d copy
You don’t have to choose one model. Give each kind of work the cheapest model that does it well:
- Planning (the most expensive mistakes happen here): your strongest model.
- Building: a fast, capable model such as GLM-5.3-Flash or MiniMax M3.1 Flash.
- Searching the codebase, reading docs, writing tests and commit messages: a local model. It costs nothing and your code stays put.
Part 4 shows exactly how to set this up in OpenCode’s config.
Local-only mode for sensitive projects
If a project must never touch a cloud model, make that a setting rather than a promise. Ollama can switch its cloud features off entirely (add "disable_ollama_cloud": true to ~/.ollama/server.json, or set OLLAMA_NO_CLOUD=1, then restart it), and OpenCode’s free cloud models can be hidden with OPENCODE_DISABLE_FREE_MODELS=1. Then only connect local providers in that project.
Honest caveats about Ollama
- Local models are slower and weaker on long, multi-step tool use than the big cloud models. They shine on contained jobs.
- Cloud is still someone else’s computer. Ollama’s no-logging policy is good, but your code still leaves your machine, mostly for the United States.
- Credits run out. $60 of Pro credit goes a long way on GLM-5.3-Flash and much less on a model rated “extra high”.
- A slow answer isn’t always the model. Every cloud request makes a round trip over your Wi-Fi, your router and the wider internet first. If responses feel sluggish, check the connection before you blame the model: my own app PingAtlas measures round-trip times from your iPhone, iPad or Mac to cities and to services such as GitHub, and I explained the rest of the path in what happens inside your router.
Part 4 — How to Use OpenCode: Install It and Connect Your Models, Step by Step
This is the setup I’d give a friend. It takes about twenty minutes, most of it downloads.
Step 0 — What you need first
- A Mac with Apple silicon, if you want to build iPhone apps natively. Xcode 27.1 (released 15 October, with Swift 6.4 and the iOS 27.1 SDK) needs macOS Tahoe 26.6 or later. If you build with Expo, its cloud service can build iOS apps from Windows or Linux, but you’ll still want an iPhone to test on.
- Xcode from the Mac App Store, opened once so it can install its components.
- Git. Your real undo button.
- Node.js, only if you’ll use Expo: SDK 58 needs Node 22.13 or later, 24.3 or later, or 26 and later (odd-numbered releases such as 23 and 25 aren’t supported).
- A coding plan from Part 2, or Ollama from Part 3.
Step 1 — Install OpenCode
On macOS or Linux:
curl -fsSL https://opencode.ai/v2/install | bashPrefer an app? Download the desktop version for macOS, Windows or Linux from opencode.ai/download. The terminal and desktop apps share the same background service and sessions. On Windows, use the desktop app or the standalone zip; Windows package managers aren’t supported for v2.
Two traps worth knowing:
- Old guides use the old installer.
opencode.ai/install(without/v2/) still appears in plenty of tutorials, including some official partner docs. Use the/v2/installaddress above. - mise users need mise 2026.10.9 or later, or they’ll get OpenCode 1.
Step 2 — Connect your models
Start OpenCode in a project folder and run /connect:
mkdir -p ~/code/my-first-app && cd ~/code/my-first-app
git init
opencode
Then, depending on what you pay for:
| You have | In /connect, choose |
Then |
|---|---|---|
| OpenCode Go | OpenCode Go | Paste the API key from the OpenCode Console |
| Ollama | Nothing; local models appear by themselves | Or run ollama launch opencode |
| ChatGPT Plus or Pro | OpenAI → Sign in with ChatGPT | Log in in the browser |
| GitHub Copilot | GitHub Copilot | Complete the device login |
| Claude Pro or Max | Claude Agent (not “Anthropic”, which is for API keys) | Run claude auth login in a terminal first; read Part 2’s caveat |
| GLM Coding Plan | The Z.AI Coding Plan provider | Paste your Coding Plan key, not a standard API key |
| An API key | The provider’s name | Paste the key |
Step 3 — Pick your models
Run /models and choose. OpenCode Go models are named opencode-go/<model-id>; local Ollama models appear under the Ollama provider. Copy the exact IDs from /models into your config, because names and tags change.
Step 4 — Add a project config
The defaults work, but an app project deserves a config file that does three jobs: route each agent to the right model, keep the agent away from anything irreversible, and connect your MCP servers. Save this as opencode.jsonc in the project root, and swap in the model IDs /models shows you:
{
  "$schema": "https://opencode.ai/config.json",

  // The model new sessions start with
  "model": "opencode-go/glm-5.3-flash",

  "agents": {
    // Planning: your strongest model, because a bad plan costs the most later
    "plan":    { "model": "opencode-go/glm-5.3" },
    // Building: fast and capable
    "build":   { "model": "opencode-go/glm-5.3-flash" },
    // Read-only exploring: local, free, private
    "explore": { "model": "ollama/qwen3.8:27b" }
  },

  // Rules are checked in order and the LAST match wins
  "permissions": [
    { "action": "shell", "resource": "*",                     "effect": "ask"   },
    { "action": "shell", "resource": "git status *",          "effect": "allow" },
    { "action": "shell", "resource": "git diff *",            "effect": "allow" },
    { "action": "shell", "resource": "git log *",             "effect": "allow" },
    { "action": "shell", "resource": "xcodebuild -list *",    "effect": "allow" },
    { "action": "shell", "resource": "asc * list *",          "effect": "allow" },
    { "action": "shell", "resource": "asc review status *",   "effect": "allow" },
    { "action": "shell", "resource": "git push *",            "effect": "deny"  },
    { "action": "shell", "resource": "asc publish appstore *","effect": "deny"  },
    { "action": "shell", "resource": "* --submit *",          "effect": "deny"  },
    { "action": "shell", "resource": "* --confirm *",         "effect": "deny"  }
  ],

  "mcp": {
    "servers": {
      // Apple's bridge to the Xcode project you have open (Part 6)
      "xcode": { "type": "local", "command": ["xcrun", "mcpbridge"] },
      // Headless builds, simulator control and screenshots (Part 6)
      "XcodeBuildMCP": { "type": "local", "command": ["npx", "-y", "xcodebuildmcp@latest", "mcp"] },
      // Up-to-date library documentation
      "context7": { "type": "remote", "url": "https://mcp.context7.com/mcp" }
    }
  }
}
What you’re pasting, in plain words:
- Every shell command asks first, except a handful of read-only ones. Read-only
ascqueries (anything that lists, plus the review status) are allowed, so the agent can check builds and review progress without bothering you. - A few things are blocked outright: pushing code, publishing or submitting an app for review, and confirming destructive App Store Connect actions. You do those yourself, on purpose. Uploading a build to TestFlight stays allowed (after asking), because it doesn’t send anything to review.
- OpenCode’s defaults already ask before reading
.envfiles. Leave that on. - Permissions are guard rails, not a sandbox. A determined model can find another way to do something. Keep production credentials, signing keys and your App Store Connect Admin key away from the machine where agents run unattended.
Step 5 — Write an AGENTS.md before any code
OpenCode reads AGENTS.md in your project root at the start of every session, plus a personal one at ~/.config/opencode/AGENTS.md if you create it. The /init command can draft one by scanning your repository. It’s the single most effective habit in AI-assisted development, and I wrote about the whole system in my vibe coding guide. For an iPhone app, it should hold the product’s rules as well as the commands:
# Notes for coding agents

## What this app is
One sentence. If a change doesn't serve it, it doesn't belong.

## Non-negotiables
- Works offline. Network features degrade gracefully.
- No analytics, ads or tracking SDKs. Ask before adding ANY dependency.
- No secrets in the app bundle. Keys that cost money live on a server.
- No hidden, dormant or debug-only features in release builds
  (App Review guideline 2.5.19). Debug menus are compiled out of Release.
- Never send personal data to a third-party AI service without
  an explicit in-app consent screen (guideline 5.1.2(i)).
- Accessibility: Dynamic Type, VoiceOver labels, 44 x 44 pt touch targets,
  light and dark mode on every screen.
- Every user-facing string is localised, including widgets,
  notifications and permission prompts.

## Commands
- Build and run: use the XcodeBuildMCP tools (build_run_sim), scheme "MyApp"
- Tests: test_sim
- Never run asc publish or anything with --submit.

## Definition of done
- Builds without warnings, tests pass
- Checked with screenshot + snapshot_ui on the simulator
- Works in airplane mode, dark mode and at the largest text size
Step 6 — Your first real session
- Start in plan mode. Switch to the
planagent (it can’t edit your project files) and ask it to argue with your brief: “Read AGENTS.md and BRIEF.md. List the user flows, the edge cases I haven’t thought of and the screens I’m missing. Then tell me what to cut.” - Save the plan as a roadmap. Ask it to write
ROADMAP.mdas a checklist of small, end-to-end slices. - Build one slice at a time with the
buildagent. One screen, one feature, working end to end. - Review the diff, run it, commit. Every slice ends with a commit. If a step goes wrong,
/undorolls back the agent’s last step from OpenCode’s snapshots; Git is the bigger safety net. - Start a fresh session for the next slice. A clean session that re-reads AGENTS.md and ROADMAP.md is usually smarter than a long one full of stale assumptions.
Part 5 — Agents, Commands, Permissions and Goal Mode: Making OpenCode Yours
Once the basics work, four features turn OpenCode from a chat with a terminal into a workshop that fits your project.
The built-in agents
| Agent | Type | What it does |
|---|---|---|
build |
Primary | The default. Edits files, runs commands, does the work |
plan |
Primary | Explores and plans without editing your project files (it may write its own plan files) |
general |
Subagent | Research and multi-step jobs; can’t start further subagents |
explore |
Subagent | Searches and reads code or web pages; can’t edit anything |
Primary agents are the ones you talk to. Subagents are launched by a primary agent for a focused job, so the main session’s context stays clean.
Write your own subagent: an App Review sceptic
Custom agents are Markdown files in .opencode/agents/ (or ~/.config/opencode/agents/ for every project). The front matter configures the agent and the body becomes its instructions. This one reviews your app the way App Review will, and can’t change anything while it does:
---
description: Reviews the app and its metadata against Apple's App Review Guidelines before a submission
mode: subagent
model: opencode-go/glm-5.3
permissions:
  - action: edit
    resource: "*"
    effect: deny
  - action: shell
    resource: "*"
    effect: deny
---

You are a sceptical App Review specialist. Review the current code and the
files in metadata/ and list problems, most serious first, with file and line:

- Crashes, placeholder text, dead links, missing demo account (2.1)
- Anything that looks like a copy of a saturated app category (4.3(b))
- Hidden, dormant or undocumented features, debug menus, feature flags (2.5.19)
- Data that leaves the device and isn't in the privacy policy or privacy label
- Personal data sent to any AI service without explicit consent (5.1.2(i))
- Account creation without in-app account deletion (5.1.1(v))
- Screenshots or descriptions promising features the build doesn't have

Don't fix anything. Report only.
Save it as .opencode/agents/appstore-reviewer.md, then ask: “Use the appstore-reviewer subagent to review everything since the last release tag.”
Custom commands for the jobs you repeat
Commands are prompt templates you run with a slash. Put them in .opencode/commands/; $ARGUMENTS is replaced with whatever you type after the command, and ` !command ` inserts a shell command’s output before the prompt is sent. This one drafts App Store release notes:
---
description: Draft App Store "What's New" notes from the commits since the last tag
agent: build
---

Here are the commits since the last release:

!`git log $(git describe --tags --abbrev=0)..HEAD --oneline`

Write "What's New" notes for version $ARGUMENTS in plain, friendly English,
under 400 characters, user-facing changes only. Save them to
metadata/en-US/release_notes.txt and show me the text.
Save it as .opencode/commands/whats-new.md and run it with /whats-new 1.2.0. One warning from OpenCode’s docs is worth repeating: those ! blocks run outside the agent’s permission system, so only put commands you trust in them.
A permissions cookbook for app projects
Part 4’s config is a good start. A few more rules worth knowing:
- Per-agent rules go under
agents.<id>.permissionsand are added after the global ones, so you can, for example, let only thebuildagent runxcodebuild. - MCP tools are actions too, named
<server>_<tool>. A rule like{ "action": "XcodeBuildMCP_*", "resource": "*", "effect": "ask" }makes every XcodeBuildMCP call ask first. - Skills can be gated with the
skillaction:allowadvertises and loads a skill freely,askadvertises it but asks before loading,denyhides it completely. - When several resources are checked at once, any
denywins, then anyask.
Goal mode, worktrees and schedules
Three newer features change how long jobs feel:
- Goal mode (2.2.1):
/goal Make every screen pass a VoiceOver audit and fix what failskeeps the session working towards the objective until it’s reviewed, withpause,resumeandclear. Perfect for the big, boring jobs: accessibility passes, localisation, test coverage. - Worktrees: start a session in a separate Git worktree from the new-session screen (or
⌘⌥Oin the desktop app), so an experiment can’t touch your main branch. Scripted runs takeopencode run --worktree=<name>since 2.2.6. Throw the worktree away if the experiment fails. - Scheduled prompts (opt-in, experimental):
/scheduleruns a prompt on a timetable whileopencode serveis running, such as a nightly “run the tests and summarise failures”.
Part 6 — MCP Servers: Giving the Agent Hands
On its own, a coding agent can read files and run shell commands. MCP, the Model Context Protocol, is the standard way to give it more: a running Xcode project, a simulator it can tap and screenshot, your crash reports, current documentation, your build service. Each MCP server exposes a set of tools, and the agent decides when to call them.
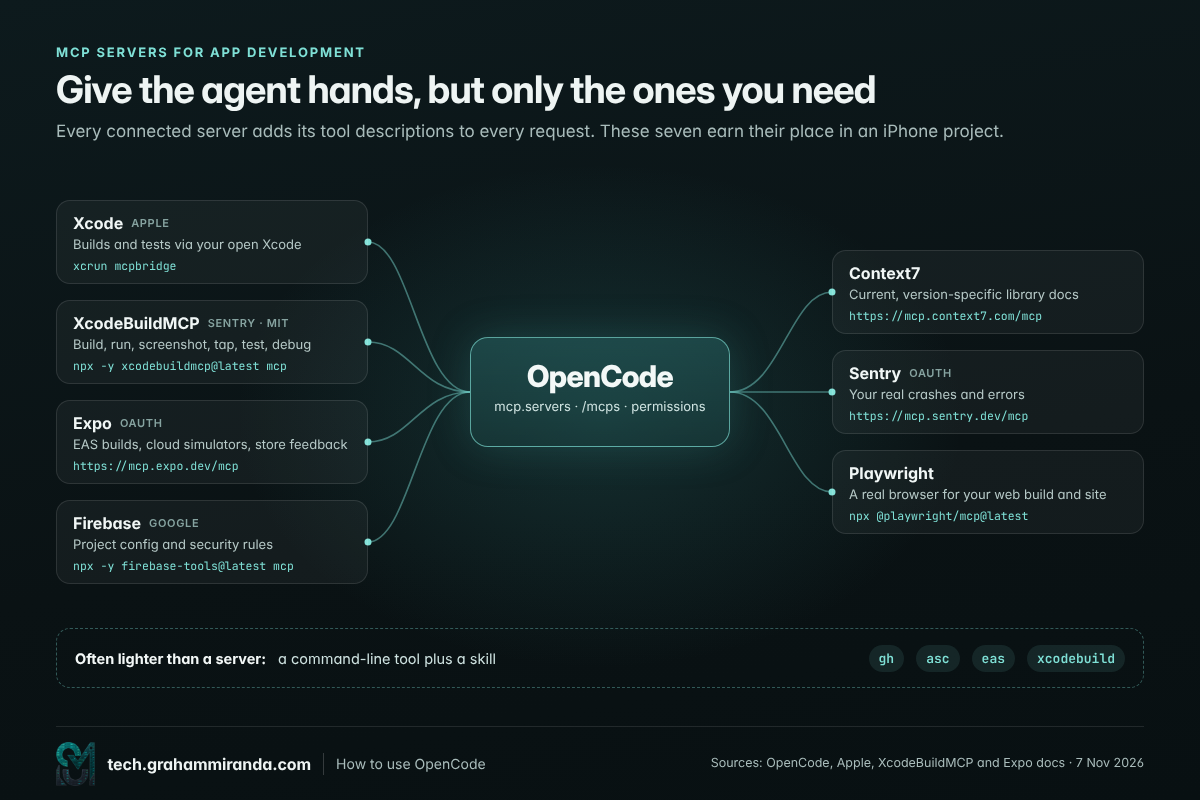
There’s a cost, and OpenCode’s documentation states it plainly: “MCP tools consume model context, so add only the servers you need.” Every connected server adds tool descriptions to every request. Ten servers you rarely use make every answer slower and less focused.
The app developer’s shortlist
| Server | What it gives the agent | Add it to OpenCode | Worth knowing |
|---|---|---|---|
| Xcode (Apple) | Your open Xcode project: building, testing and more, through Xcode itself | opencode mcp add xcode -- xcrun mcpbridge |
In Xcode → Settings → Intelligence, set Allow External Agents to Use Xcode Tools to Always or While Xcode is Open. Open the project in Xcode before you prompt; Xcode shows when an agent connects |
| XcodeBuildMCP | Headless builds, simulator and device runs, screenshots, taps and swipes, accessibility snapshots, tests, LLDB debugging | opencode mcp add XcodeBuildMCP -- npx -y xcodebuildmcp@latest mcp |
Open source (MIT), maintained by Sentry since it acquired the project in February. Needs macOS 14.5+, Xcode 16+ and Node 18+. Only the simulator tools are on by default |
| Expo | EAS builds, workflows and submissions, Expo docs, cloud simulators, crash and feedback data from TestFlight and the stores | opencode mcp add expo --url https://mcp.expo.dev/mcp, then opencode mcp auth expo |
Needs an Expo account and the latest SDK. Some tools need a paid Expo plan. Local simulator tools need npx expo install expo-mcp --dev and SDK 54+ |
| Context7 | Current, version-specific documentation for libraries and frameworks | opencode mcp add context7 --url https://mcp.context7.com/mcp |
Stops the model from inventing APIs that changed last month |
| Sentry | Your real crashes and errors | opencode mcp add sentry --url https://mcp.sentry.dev/mcp, then opencode mcp auth sentry |
Sign-in by OAuth |
| Playwright | A real browser the agent can drive | opencode mcp add playwright -- npx @playwright/mcp@latest |
For the web version of your app and your landing page |
| Firebase | Your Firebase project, security rules and config | opencode mcp add firebase -- npx -y firebase-tools@latest mcp |
Asks before changing anything in your project |
Check what’s connected with opencode mcp list, and switch servers on or off for a session with /mcps.
If you design in Figma, its MCP server can feed frames and variables to the agent too. I covered the OpenCode-specific catch (remote server versus desktop server) in my guide to building an app from scratch with AI.
Xcode’s MCP bridge vs XcodeBuildMCP
They overlap, and they work well together:
- Xcode’s own server (
xcrun mcpbridge) works through the Xcode app you have open. It’s Apple’s, it understands your project the way Xcode does, and it needs Xcode running. - XcodeBuildMCP wraps Apple’s command-line tools (
xcodebuild,simctl,devicectl), so it runs headless. Its real strength is the verify loop:build_run_simto build and launch,screenshotto look,snapshot_uito read the accessibility tree,tapandtype_textto use the app, andtest_simto run the tests. Runxcodebuildmcp initonce in your project to install its two companion skills.
In the config file
The same servers can live in opencode.jsonc (Part 4 has a full example), which is better for a team because the setup travels with the repository:
"mcp": {
  "servers": {
    "expo":   { "type": "remote", "url": "https://mcp.expo.dev/mcp" },
    "sentry": { "type": "remote", "url": "https://mcp.sentry.dev/mcp" },
    "context7": {
      "type": "remote",
      "url": "https://mcp.context7.com/mcp",
      "headers": { "CONTEXT7_API_KEY": "{env:CONTEXT7_API_KEY}" }
    },
    "playwright": { "type": "local", "command": ["npx", "@playwright/mcp@latest"], "disabled": true }
  }
}
Two details from OpenCode’s MCP docs: secrets go in as {env:NAME} (a plain $NAME isn’t expanded), and "disabled": true keeps a server configured without connecting it.
When a command-line tool beats an MCP server
My rule: if a good command-line tool exists, try it with a skill before you add a server. The agent already knows how to run commands, a CLI costs no context until it’s used, and its output can be filtered before it reaches the model. For app work, three CLIs cover a lot of ground:
ghfor GitHub: issues, pull requests, releases.ascfor App Store Connect: builds, TestFlight, metadata, screenshots, review status (Part 9).easfor Expo’s build and submit service.
MCP safety in four rules
- Install servers from their makers or from projects you can read. A server is code running on your machine with your permissions.
- Treat tool output as untrusted. A web page, an issue comment or a crash report can contain instructions aimed at your agent. Keep risky actions on
ask. - Gate tools by name. Every MCP tool is a permission action named
<server>_<tool>, so you can allow the read-only ones and make the rest ask. - Remove what you don’t use. It costs context, and it’s one less thing that can go wrong.
Part 7 — Skills: Write Your Playbook Once
AGENTS.md tells the agent what your project is. Skills teach it how you do specific jobs: releasing a build, writing a migration, preparing screenshots, auditing privacy. A skill is a folder containing a SKILL.md file with a short description at the top and instructions underneath, plus any scripts or reference files it needs. The format is an open standard shared by OpenCode, Claude Code, Codex and others, which is why a skill written for one agent usually works in the others.
How OpenCode uses a skill
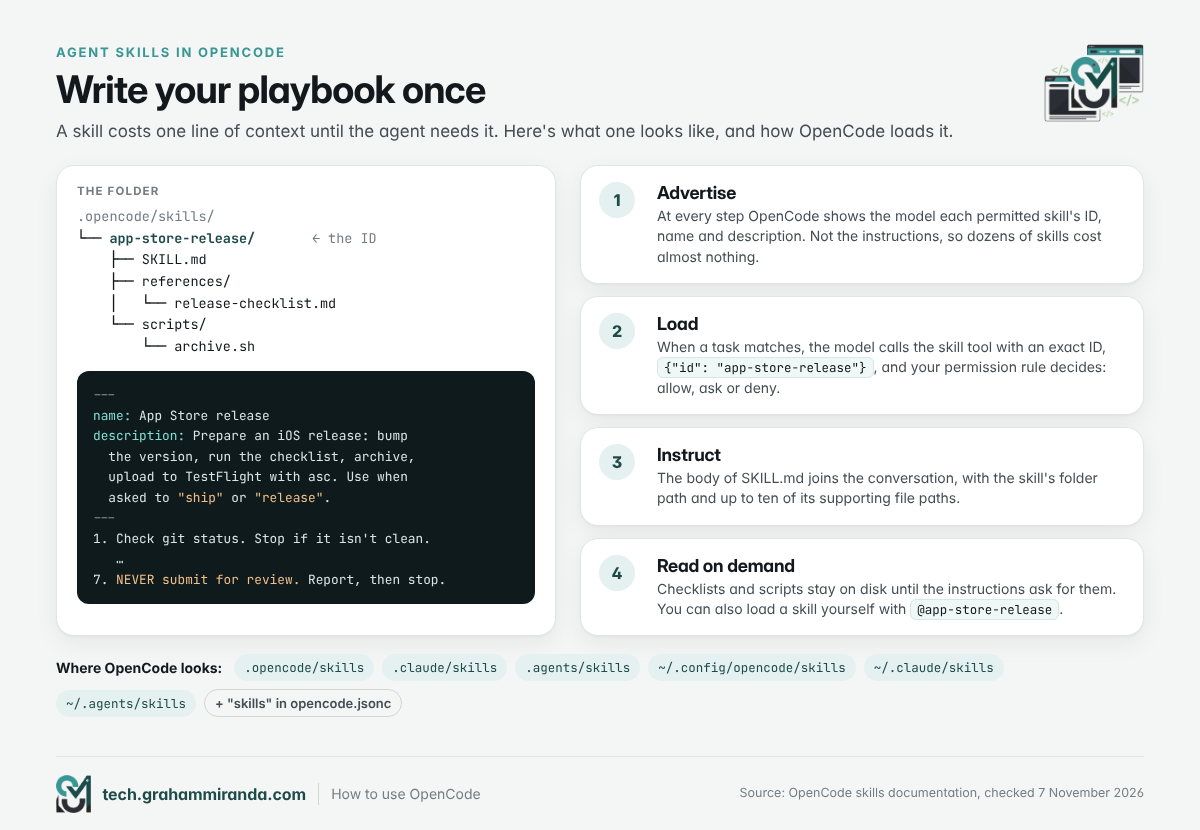
- At every step, OpenCode shows the model a list of the skills it may use: just each skill’s ID, name and description. The instructions themselves aren’t loaded, so a hundred skills cost almost nothing.
- When a task matches, the model calls the
skilltool with the skill’s ID, and OpenCode checks your permissions. - OpenCode adds the instructions to the conversation, with the skill’s folder path and a list of up to ten of its supporting files.
- Supporting files load only when the instructions ask for them. A long checklist or a script sits on disk until it’s needed.
You can also load one yourself by mentioning it in a prompt: @app-store-release.
Where OpenCode looks
| Scope | Folder |
|---|---|
| Your project | .opencode/skills/ |
| Your project (shared with other agents) | .claude/skills/ and .agents/skills/ |
| Every project on your machine | ~/.config/opencode/skills/ |
| Every project (shared) | ~/.claude/skills/ and ~/.agents/skills/ |
| Anywhere else | Paths or HTTP catalogues listed in a skills array in opencode.jsonc |
A skill’s ID comes from its folder name, not the name in its front matter, and it’s case-sensitive: .opencode/skills/app-store-release/SKILL.md has the ID app-store-release. When two sources define the same ID, the later one in this order wins: built-in, .claude/skills, .agents/skills, your global folder, your project’s .opencode/skills, then explicit config entries. A skill without a description isn’t advertised to the model at all.
Write your first skill: an App Store release checklist
Create .opencode/skills/app-store-release/SKILL.md:
---
name: App Store release
description: Prepare an iOS release. Bumps the version and build number, runs the release checklist, archives, uploads to TestFlight with asc and drafts What's New notes. Use when asked to "ship", "release" or "send to TestFlight".
---

# App Store release

1. Check `git status`. If the working tree isn't clean, stop and say so.
2. Bump the marketing version and build number (ask which version if it isn't given).
3. Work through references/release-checklist.md. Every item must pass.
4. Archive and export the IPA with scripts/archive.sh.
5. Upload: `asc builds upload --app "$ASC_APP_ID" --ipa build/MyApp.ipa`
6. Draft What's New notes from the commits since the last tag and save them
   to metadata/en-US/release_notes.txt.
7. NEVER submit for review. Report that the build is uploaded, then stop.
Put the checklist in references/release-checklist.md and the archive script in scripts/archive.sh beside it. The next time you say “ship 1.2.0 to TestFlight”, the agent finds the skill by its description and follows your steps instead of improvising.
Skills worth installing for app work
| Skill set | What’s in it | Install |
|---|---|---|
| Expo skills (official) | 23 skills: 16 for the Expo SDK (Router, native UI, @expo/ui, design systems, upgrades, native modules and more) and 7 for Expo’s services, including eas-app-stores for building and submitting to TestFlight, the App Store and Google Play |
npx skills add expo/skills |
| App Store Connect CLI skills | More than twenty asc skills: release flow, TestFlight orchestration, metadata sync with character-limit checks, listing translation, screenshot pipelines, signing setup, submission health, crash triage, ASO audits |
asc install-skills, or npx skills add rorkai/app-store-connect-cli-skills |
| XcodeBuildMCP skills | Two skills that teach the agent XcodeBuildMCP’s tools and CLI | xcodebuildmcp init |
| skills.sh | Vercel’s open directory of community skills; it lists OpenCode among the supported agents | npx skills add <owner/repo> |
If OpenCode doesn’t show a skill you’ve installed, check where the installer put it against the folders above, or copy the skill’s folder into .opencode/skills/.
Skill safety
A skill is instructions plus, often, scripts that the agent will run. Read a third-party skill before you install it, the same way you’d read a shell script from the internet. Prefer skills from the people who make the tool (Expo for Expo, the asc maintainers for asc), keep unknown skills on ask with a permission rule, and remember that deny hides a skill from the model completely.
Part 8 — Building the App: From Idea to a Build You Trust
The tools are ready. Now the part that decides whether anyone downloads the result.
Pick an idea App Review will let through
AI has made building an app cheap, and Apple has noticed. On 9 June it rewrote guideline 4.3(b), its spam rule: apps that are essentially the same as what’s already plentiful on the store now get rejected, and Apple names dating, flashlight, wallpaper, timer and fortune-telling apps as categories where you need a meaningfully different or better experience. Low-effort novelty apps can be removed, existing apps in those categories can be pulled if they aren’t improved or don’t attract users, and repeated submissions of this kind can cost you your developer membership.
So before the first prompt, one test: can you say in one sentence what your app does that the top results for its main search term don’t? If you can’t, the agent will build it beautifully and App Review will send it back.
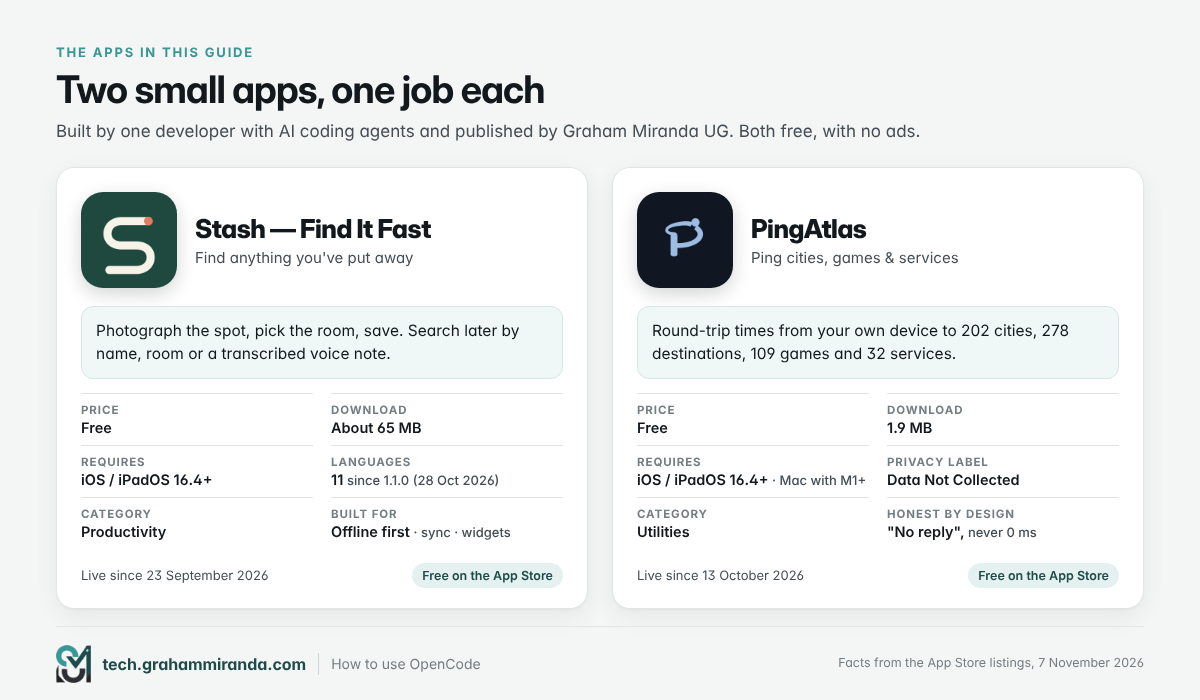
Small and specific beats big and generic. My own two apps are deliberately narrow:
- Stash remembers where you put things: photograph the spot, pick the room, save, then search by name, room or a transcribed voice note.
- PingAtlas measures network round-trip times from your own iPhone, iPad or Mac to 202 cities, 278 public destinations, 109 games and 32 online services, without an account or a remote measuring service.
One job each. That’s what makes them buildable by one person with an agent, and explainable in a sentence on an App Store page.
Choose your stack
| SwiftUI + Xcode 27.1 | Expo SDK 58 (React Native 0.88) | |
|---|---|---|
| Runs on | iPhone, iPad, Mac, Apple Watch, Vision Pro | iPhone, iPad, Android and the web from one codebase |
| Language | Swift 6.4 | TypeScript |
| Need a Mac? | Yes | Not to build or submit (Expo’s cloud does that); yes for local iOS simulator tools |
| Agent tooling | Xcode’s MCP bridge, XcodeBuildMCP, OpenCode inside Xcode through ACP | The Expo MCP server, 23 official skills, an experimental @expo/agent-cli and machine-readable expo command:ps output for agents |
| New this autumn | iOS 27.1 SDK, an iPhone Duo simulator (with some limits on extensions) | Built against the iOS 27 SDK; apps move to UIKit’s scene life cycle, ready for iPhone Duo; App Intents support in alpha; macOS isn’t supported in SDK 58 |
| Best for | Apple-only apps that want the newest platform features | One person shipping to iPhone and Android, with a web version |
If you like to ship a web version first (I do), Expo’s web output lets you put a working demo in front of people before the App Store version exists. Stash’s website does something similar with a browser demo built around a sample home: people can try the idea before they install anything.
The build loop that works
The agent writes fast. What keeps the result trustworthy is the loop around it:
- Brief. A one-page
BRIEF.md: the promise in one sentence, three user stories, the list of screens. - Plan. The
planagent turns it intoROADMAP.md: small vertical slices, each one feature working end to end. - Build one slice. The
buildagent implements it and writes the tests. - Verify like a user. With XcodeBuildMCP the agent can build and launch the app in the simulator, take a screenshot, read the accessibility tree with
snapshot_ui, tap through the flow and run the tests. With Expo, the local MCP tools do the same for the simulator. Ask it to compare what it sees with what you asked for. - Review like App Review. Run the
appstore-reviewersubagent from Part 5. - Read the diff yourself. Every line that’s going to ship.
- Commit, tick the box, start a fresh session.
For the big mechanical passes (adding accessibility labels everywhere, localising every string, raising test coverage) use goal mode: /goal Localise every user-facing string into German, including widgets, notifications and permission prompts.
Three prompt templates worth adapting:
A slice: Implement slice 4 from ROADMAP.md (search). Read AGENTS.md first. Write the unit tests first, then the code. Build and run it in the simulator, take a screenshot of the results screen and check it against the brief. Show me the diff and list every assumption you made.
A bug: On an iPhone at the largest Dynamic Type size, the keyboard covers the Save button on the Add screen. Reproduce it in the simulator, take a screenshot, explain the cause in two sentences, fix it, and check every other form for the same problem.
A pre-commit review: Review everything since the last commit as a sceptical senior iOS reviewer: crashes, data loss, privacy leaks, missing accessibility labels, hard-coded strings and colours, anything that breaks offline use. Numbered list, most serious first. Don’t fix anything yet.
Lessons from two small apps
Stash and localisation. Stash 1.1.0 (28 October) added ten languages to English: Spanish, French, German, Italian, Brazilian Portuguese, Dutch, Polish, Japanese, Korean and Simplified Chinese. The app picks one up from the device and lets you change it under Settings → Language, and the release notes point out that widgets, reminders and the system permission prompts were translated too. That last detail is the lesson: localisation is ideal agent work, but the strings agents forget live outside the main screens, in widgets, notifications, permission purpose strings and date formatting. Name them in AGENTS.md and they get done.
PingAtlas and honest claims. PingAtlas’s App Store description makes specific promises: a missing reply shows as “No reply”, never as 0 ms; there’s no GPS and no location permission; there are no ads, no analytics and no account; results stay on the device unless you export them; and website checks use HEAD requests only. Promises like these belong in AGENTS.md as non-negotiables, because they’re also what your privacy label says. PingAtlas’s label reads “Data Not Collected”, and that’s only true for as long as the code agrees. The reviewer subagent is there to notice the day it doesn’t.
Scope is a feature. PingAtlas is a 1.9 MB download. Stash, with photos, voice notes, sync and widgets, is about 65 MB. More features mean more to test, more to explain in the privacy policy and more for App Review to question. Start with the smallest version that keeps the promise.
Accessibility from day one
Apple’s Accessibility Nutrition Labels let you declare support for nine features on your App Store page: VoiceOver, Voice Control, Larger Text, Dark Interface, Differentiate Without Color Alone, Sufficient Contrast, Reduced Motion, Captions and Audio Descriptions. They’re voluntary today, but Apple says that over time you’ll have to provide them to submit new apps and updates. You may only declare a feature if people can complete all of your app’s common tasks with it, including first launch, sign-in, purchases and settings.
Neither of my own listings declares any yet, which is exactly the kind of gap this guide is meant to catch. The agent can do most of the audit: XcodeBuildMCP’s snapshot_ui reads the accessibility tree, so /goal Make every screen fully usable with VoiceOver and at the largest text size, and list anything you can't fix is a realistic afternoon’s job.
Part 9 — Publishing to the App Store: Let OpenCode Do the Paperwork, Then Press Submit Yourself
Building is the fun part. Publishing is a project of its own, and it’s where first-time developers lose a week. The good news for 2026: almost all of it can now be scripted, which means an agent can do the typing while you make the decisions.
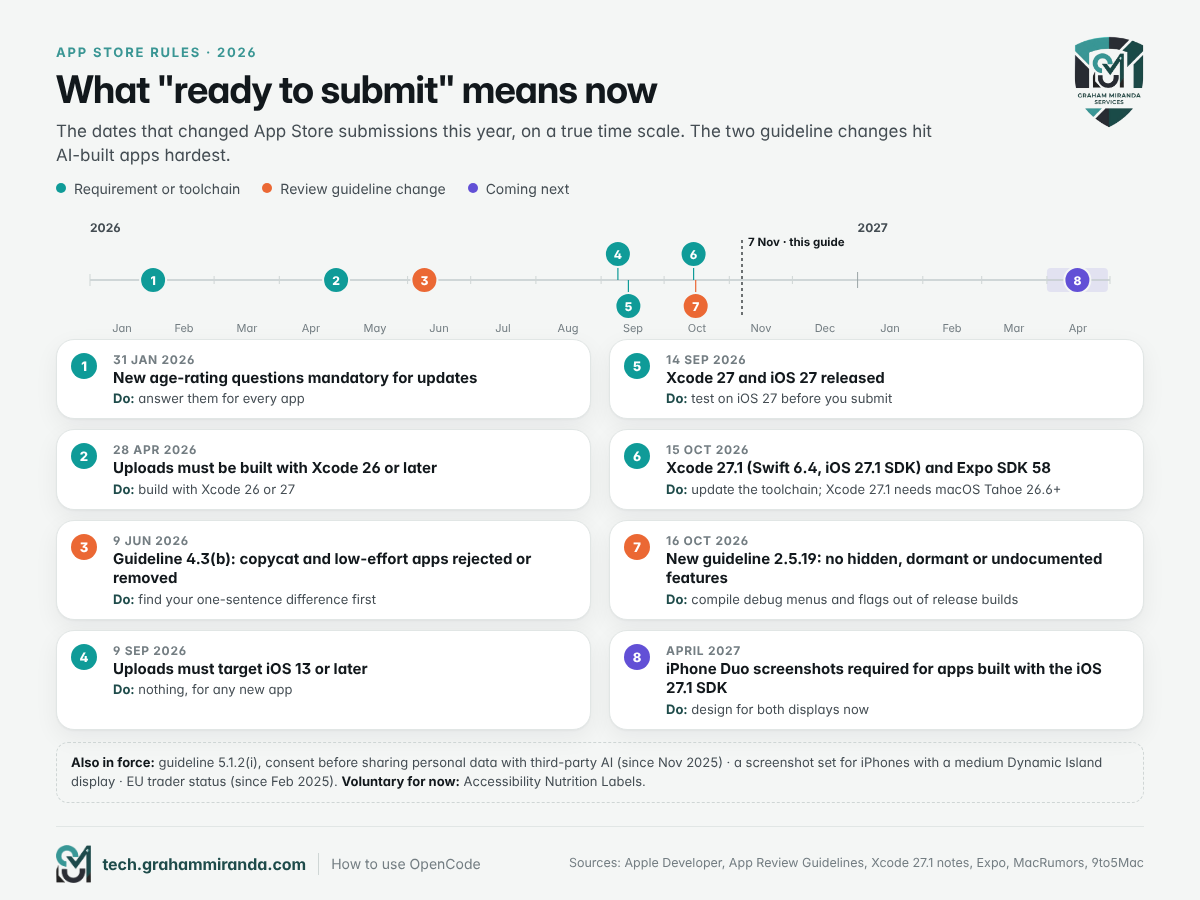
What changed at Apple in 2026
| When | What changed | What to do |
|---|---|---|
| 31 Jan 2026 | New age-rating questions became mandatory for updates | Answer them for every app before you submit |
| 28 Apr 2026 | Uploads must be built with Xcode 26 or later and the 26 SDKs | Use Xcode 26 or 27 |
| 9 Jun 2026 | Guideline 4.3(b) rewritten: copycat and low-effort apps rejected or removed | Differentiate (Part 8) |
| 9 Sep 2026 | Uploads must target iOS 13 or later | Nothing, for any new app |
| 15 Oct 2026 | Xcode 27.1 (Swift 6.4, iOS 27.1 SDK; needs macOS Tahoe 26.6+) and Expo SDK 58 | Update your toolchain |
| 16 Oct 2026 | New guideline 2.5.19 bans hidden, dormant or undocumented features; tougher rules on apps that hide their purpose during review | Compile debug menus and feature flags out of release builds |
| In force | Guideline 5.1.2(i): tell people and get their permission before sharing personal data with third-party AI (added November 2025) | Add a consent screen if your app calls an AI service |
| Now | Screenshots: one set for iPhone with Dynamic Island (medium display) is required, plus 13-inch iPad if your app runs on iPad | Plan your screenshot sizes (Part 10) |
| April 2027 | iPhone Duo screenshots required for apps built with the iOS 27.1 SDK or later | Start designing for the second display now |
| Voluntary, for now | Accessibility Nutrition Labels | Declare what you genuinely support |
The new 2.5.19 is the one that bites AI-built apps. Agents love helpful extras: a hidden debug screen, a feature flag left switched off, a test menu behind a long press. Apple’s new wording is blunt: “Don’t include any hidden, dormant, or undocumented features in your app.” According to 9to5Mac’s report of the change, trying to hide such features, for example through code obfuscation, can lead to removal of the app and termination of your developer account. Put the rule in AGENTS.md and ask the reviewer subagent to search for it before every submission.
The workflow, step by step
- Enrol in the Apple Developer Program. It costs $99 a year (€99 in Germany). Companies enrol as an organisation, which needs a D-U-N-S number. Start early; verification can take days. Enrol here.
- Declare your EU trader status. Under the EU’s Digital Services Act, every developer must say whether they’re a trader. If you publish as a business, your address, phone number and email appear on your product page in every EU country. Apple pulled thousands of apps from EU storefronts in February 2025 for missing this.
- Create an App Store Connect API key. In App Store Connect, go to Users and Access → Integrations → App Store Connect API and generate a team key. Only the Account Holder can request API access in the first place. Give the key the least powerful role that does the job (Apple’s roles overview shows what each can do), download the
.p8file once, and store it somewhere safe and outside your repository. - Install the App Store Connect CLI and sign in.
ascis an open-source (MIT) command-line tool for the App Store Connect API, built for scripts and agents: it prints tables in a terminal and JSON when another program reads its output.
brew install asc        # or: curl -fsSL https://asccli.sh/install | bash

asc auth login --name "MyApp" --key-id "ABC123" --issuer-id "DEF456" \
  --private-key ~/keys/AuthKey_ABC123.p8 --network
asc auth status --validate
Then install its skills (asc install-skills) so OpenCode knows how to use it.
- Create the app record. In App Store Connect, choose Apps → + → New App, and pick your bundle ID carefully, because it never changes (Stash’s is
network.grahammiranda.stash, PingAtlas’snetwork.grahammiranda.pingatlas). Theascskills include one that does this through browser automation, but it’s a two-minute job worth doing by hand once. - Sort out signing. For a native app, Xcode’s automatic signing handles certificates and profiles. For Expo, EAS manages credentials for you. The
asc-signing-setupskill covers bundle IDs, capabilities, certificates and profiles if you prefer to script it. - Build and upload. Native: archive in Xcode (or let the agent do it with the
asc-xcode-buildskill), then upload:
asc builds upload --app "123456789" --ipa build/MyApp.ipaExpo: eas build --platform ios, then eas submit -p ios, which uploads the build to App Store Connect (it doesn’t send it to review). Uploading is safe to delegate; submitting for review isn’t.
- Test with TestFlight first. Internal testers (up to 100 people on your team) get builds without review. External testers (up to 10,000, by email or public link) need a short Beta App Review for the first build. Builds stay testable for 90 days. The agent can manage groups with
asc testflight groups list --app "123456789"and theasc-testflight-orchestrationskill. Give the app to five people with different iPhones for a week; they’ll find the crash you didn’t. - Write the metadata, then let the agent check it. Keep your listing in files in the repository (
metadata/en-US/…) and apply it with a dry run first:
asc metadata apply --app "123456789" --version "1.0.0" --dir ./metadata --dry-runThe asc-metadata-sync skill checks Apple’s character limits before anything is uploaded. Part 10 covers what to write.
- Make the screenshots. At least one, up to ten, per required size, as PNG or JPEG with no transparency. The
asc-shots-pipelineskill can capture them from the simulator, frame them and upload them withasc screenshots upload. Part 10 has the sizes. - Answer the privacy, age-rating and compliance questions honestly. This is the part you must not delegate blindly:
- The privacy label. In Apple’s terms, data counts as collected when it leaves the device and is kept longer than it takes to handle the request. Data processed only on the device doesn’t count. Syncing people’s content to your server does count, even if only they can see it. Ask the agent to audit every network call and SDK, then fill in the label yourself from its table.
- The privacy policy must be linked in App Store Connect and reachable inside the app, and it should describe this app, not just your company.
- Third-party AI (guideline 5.1.2(i)): if personal data goes to an AI service, say so and get permission first.
- Account deletion (guideline 5.1.1(v)): if people can create an account, they must be able to delete it inside the app.
- Age rating, export compliance and the Accessibility Nutrition Labels. If your app only uses the encryption built into iOS, such as HTTPS, set
ITSAppUsesNonExemptEncryptionin your Info.plist after checking Apple’s guidance, so you aren’t asked on every upload.
- Submit, yourself. Add the version for review and submit it on the app’s page in App Store Connect, or run
asc publish appstore … --submit --confirmfrom your own terminal (the permission rules in Part 4 stop the agent from running it). Then let the agent watch:asc review status --app "123456789".
Review: what to expect
Apple says that on average 90% of submissions are reviewed in less than 24 hours, and that more than 40% of unresolved issues come from guideline 2.1, App Completeness: crashes, placeholder content, incomplete information and broken links. If you’re rejected, read the message twice, fix the actual problem, and reply in App Store Connect. The asc-submission-health skill helps diagnose blockers, and the agent is good at drafting a calm, specific reply. Send it yourself.
Part 10 — Launch: The Listing, Screenshots, ASO and Life After Approval
An approved app with a weak listing is a shop with no sign. Here’s the rest of the job.
The listing, field by field
| Field | Limit | What works |
|---|---|---|
| App name | 30 characters | Brand plus benefit. “Stash — Find It Fast” tells a stranger what the app is for |
| Subtitle | 30 characters | The benefit in plain words. PingAtlas uses “Ping cities, games & services” |
| Keywords | 100 characters | Comma-separated, no spaces. Don’t repeat words already in the name or subtitle; they count anyway |
| Promotional text | 170 characters | Changes without a new review, so use it for seasons and news |
| Description | 4,000 characters | What it does, who it’s for, what it doesn’t do with people’s data. Plain and specific |
| What’s New | Per version | Real changes in human words; the /whats-new command from Part 5 drafts it |
| Screenshots | 1 to 10 per size | Tell the story in order; most people never scroll past the first three |
Two rules for letting an agent write any of this: tell it to use only features that exist in the code (and to name the file where each one lives), and keep the result in your repository so every change is reviewed like code. The asc-aso-audit skill can then check keyword gaps offline before anything goes live.
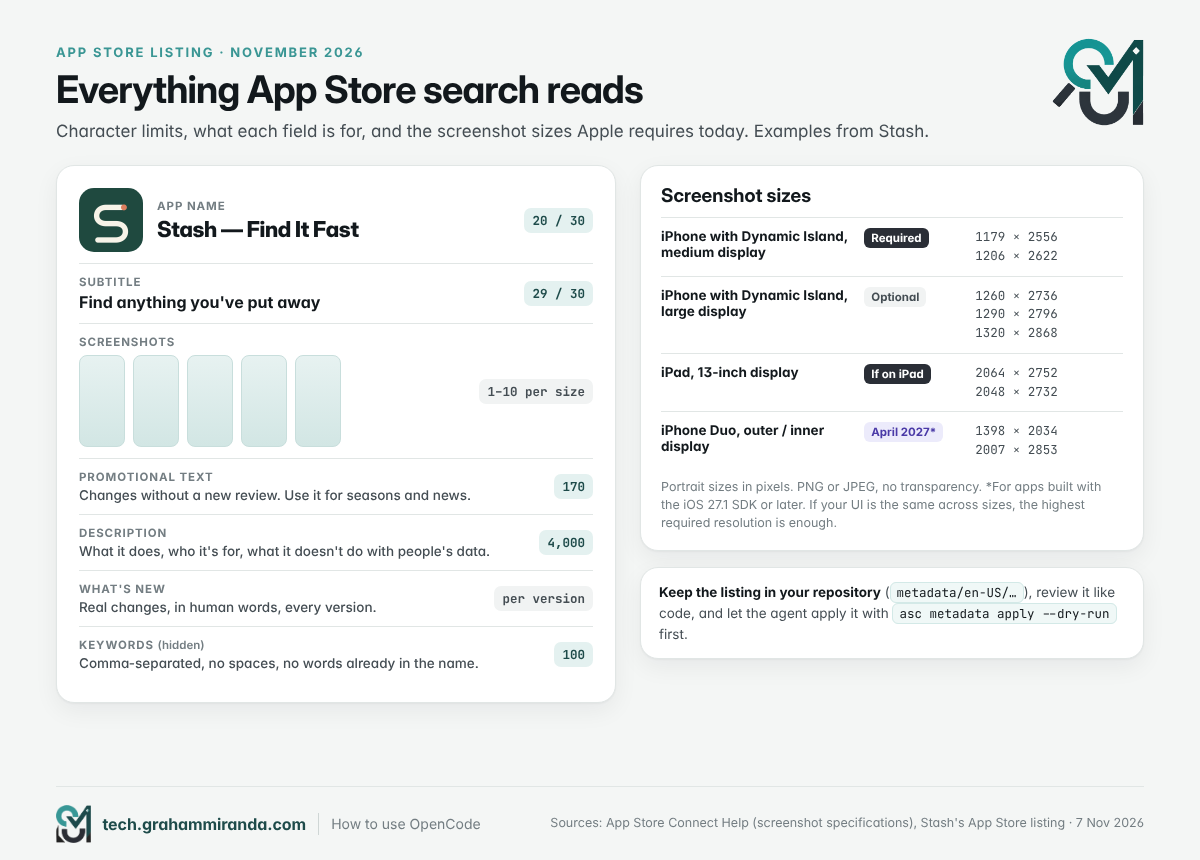
Screenshot sizes in November 2026
| Device | Required? | Portrait sizes (pixels) |
|---|---|---|
| iPhone with Dynamic Island, medium display | Yes | 1179 × 2556 or 1206 × 2622 |
| iPhone with Dynamic Island, large display | Optional | 1260 × 2736, 1290 × 2796 or 1320 × 2868 |
| iPad, 13-inch display | Yes, if your app runs on iPad | 2064 × 2752 or 2048 × 2732 |
| iPhone Duo (outer / inner display) | From April 2027, for apps built with the iOS 27.1 SDK or later | 1398 × 2034 / 2007 × 2853 |
If your interface looks the same across sizes and languages, you only need the highest required resolution; App Store Connect scales it down for smaller devices. Screenshots can’t contain transparency.
Localise the listing, not just the app
If the app speaks several languages, the listing should too. The asc-localize-metadata skill translates the listing text and asc-metadata-sync checks every language against Apple’s character limits, which is where hand-translated German subtitles usually go wrong. Have a native speaker read the result; machine translation is excellent now, but app store copy is marketing, and marketing needs a human ear.
After approval
- Ask for ratings at a happy moment. Apple’s system rating prompt appears at most three times a year per person, so don’t waste it on first launch. Ask right after something has gone well.
- Use promotional text for timing. Moving season, spring cleaning, a gaming weekend. It changes without review.
- Watch crashes from day one. The
asc-crash-triageskill reviews TestFlight crashes and feedback; the Expo MCP server can fetch crashes, feedback and reviews (replies need your confirmation); Sentry’s MCP server brings in production errors. - Ship small updates often. Stash went live on 23 September, had a redesign out on 2 October and added ten languages in version 1.1.0 on 28 October. Ship the version that works, then improve it in public.
- Give the app a home on the web. A simple page with a demo, a privacy policy written for the app, and, if you’re in Germany, an Impressum. My app-from-scratch guide covers the legal pages for German and EU developers.
Part 11 — What It Costs: Four First-Year Budgets
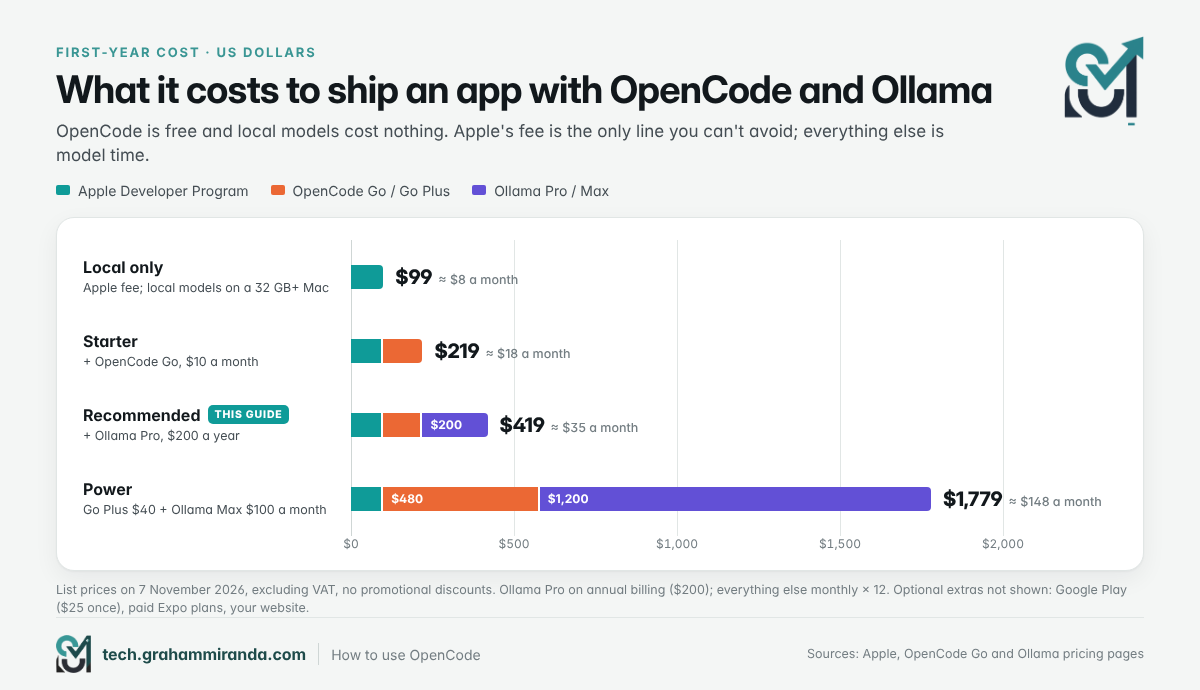
OpenCode is free. Ollama is free on your own hardware. The only cost you can’t avoid for an iPhone app is Apple’s membership; everything else is how much model time you want to buy.
| Budget | What’s in it | First year (USD) |
|---|---|---|
| Local only | Apple Developer Program; OpenCode; Ollama with local models on a Mac you already own (32 GB or more) | $99 |
| Starter | Local only + OpenCode Go ($10 a month) | $219 |
| Recommended | Starter + Ollama Pro on annual billing ($200) | $419 |
| Power | Apple + OpenCode Go Plus ($40 a month) + Ollama Max ($100 a month) | $1,779 |
List prices on 7 November 2026, excluding VAT, without promotional discounts. Swap in your own choices: a GLM Coding Plan Lite instead of Go costs $216 a year on monthly billing (about $151 on yearly billing) rather than $120; ChatGPT Plus is $240 a year. Optional extras: Google Play’s one-time $25 fee if you ship on Android, paid Expo plans if you outgrow the free tier, and whatever your website costs.
The real cost isn’t on the list, though: it’s your evenings. AI shortens the typing, not the thinking, and the thinking is most of the work.
Part 12 — Fifteen Mistakes to Avoid
- Letting the agent submit for review. Deny it in permissions. You press the button.
- Keeping an Admin API key where agents run unattended. Use the least powerful role that works, and keep signing keys and production credentials somewhere else.
- Building a copy of something that already exists. Guideline 4.3(b) now names whole categories. Find your one-sentence difference first.
- Shipping hidden extras. Debug screens, dormant feature flags and test menus break guideline 2.5.19. Compile them out of release builds.
- A privacy label that’s plausible rather than accurate. If data leaves the device and stays on a server, it’s collected, even if only the user can see it.
- Sending personal data to an AI service without asking. Guideline 5.1.2(i) requires disclosure and permission.
- Secrets in the app bundle. Anything inside an app can be extracted. Keys that cost money live on a server.
- Connecting every MCP server you find. Each one costs context on every request. Add what you use.
- Installing skills and servers you haven’t read. They’re instructions and code running with your permissions.
- Believing “done”. Run it on a real iPhone, offline, in dark mode, at the largest text size, with VoiceOver on.
- Using free promotional models for client code. Some may use your data to improve the model. Disable them for client projects.
- Forgetting Ollama’s context length. At the default, an agent runs out of room before it starts. Set 64K on the server.
- Letting dependencies pile up. Every package is code you didn’t read and an update you’ll have to manage. Make the agent ask.
- Long, sprawling sessions. Start fresh for each slice, and use worktrees for experiments.
- Promising your roadmap. Screenshots and descriptions show what this build does. Ideas belong on your website, labelled as ideas.
Part 13 — Which Setup Should You Choose? Six Scenarios
1. “I’ve never written code and I have a Mac.”
OpenCode’s desktop app, OpenCode Go, and Ollama for the small jobs. Expo if you also want Android; SwiftUI if you only care about iPhone. Keep shell commands on ask, commit after every working step, and start with an app that has one job.
2. “My code must never leave my machine.”
OpenCode with local Ollama only. Disable Ollama’s cloud features, set OPENCODE_DISABLE_FREE_MODELS=1, and connect no cloud providers in that project. Expect slower, simpler help, and give the agent smaller tasks. A Mac with 64 GB or more makes this far more comfortable.
3. “I already pay for ChatGPT, Copilot or Claude.”
Connect what you have first. ChatGPT Plus and Pro and GitHub Copilot work through built-in sign-ins at no extra cost. Claude works through the Claude Agent provider; read Part 2 before you depend on it for business work. Add OpenCode Go later if you want open models alongside.
4. “I want iPhone and Android from one codebase.”
Expo SDK 58, the Expo MCP server, Expo’s official skills and EAS for cloud builds and uploads. You can build and upload iOS apps without a Mac, although you’ll still want one (and an iPhone) for testing.
5. “I only care about Apple platforms and want everything native.”
SwiftUI in Xcode 27.1, with OpenCode either inside Xcode through ACP (Xcode → Settings → Intelligence → Add an Agent…, executable opencode, argument acp) or in your terminal with Xcode’s MCP bridge and XcodeBuildMCP. One limitation of the in-Xcode route: there’s no model picker, so set your default model in opencode.jsonc first.
6. “I want to go fast and I’ll pay for it.”
OpenCode Go Plus and Ollama Max, worktrees for parallel experiments, goal mode for the long mechanical jobs, and a frontier model by API key for the genuinely hard problems. Watch your spend weekly. For running several agents side by side, my harness comparison covers the options.
Frequently Asked Questions
Install it with curl -fsSL https://opencode.ai/v2/install | bash (or download the desktop app from opencode.ai/download), open a terminal in your project folder and run opencode. Type /connect to add a model provider, such as OpenCode Go, a ChatGPT sign-in or a local Ollama model, then /models to pick a model. Add an AGENTS.md file describing your project, start in the plan agent, and build one small feature at a time, reviewing every change.
Yes. OpenCode is open source under the MIT licence and costs nothing. It even includes a rotating set of free models you can use without an account. You pay only for model access you choose to add, such as OpenCode Go at $10 a month, an Ollama Cloud plan, an existing ChatGPT or Copilot subscription, or pay-per-token API keys. Local models through Ollama are free.
OpenCode Go is OpenCode’s own coding plan: $10 a month for access to 32 open models, including GLM-5.3, Kimi K3, MiniMax M3.1 Flash and DeepSeek V4.1 Flash. Each model has a monthly dollar allowance, of which you can use 20% per five hours and 50% per week. Go Plus costs $40 a month with higher limits, and Go Teams $20 per member. Most models are served with zero data retention.
Yes. OpenCode detects a local Ollama server automatically and lists its models in /models. You can also run ollama launch opencode, which works with OpenCode v2 since Ollama 0.40.12. Set Ollama’s context length to at least 64K tokens, because the default of 4,096 is far too small for a coding agent. Ollama’s cloud models work the same way once you’re signed in.
Keep the model’s download under about 60% of your Mac’s memory. On 32 GB, start with qwen3.8:27b (18 GB), qwen3-coder:30b (19 GB) or gpt-oss:20b (14 GB). On 64 GB, use the same models at higher precision with a larger context. On 96 to 128 GB, gpt-oss:120b (65 GB) and devstral-2:123b (75 GB) fit. On 16 GB, local models suit small jobs; use cloud models for building.
Since OpenCode 2.2.3 (30 October 2026), yes, through the Claude Agent provider: install Claude Code 2.1.248 or later, run claude auth login, then choose Claude Agent in /connect. It runs the official Claude Code program through Anthropic’s Agent SDK. Anthropic hasn’t publicly approved this use, and its Agent SDK terms restrict third parties offering claude.ai login, so use an Anthropic API key for business work.
Yes, both through built-in providers. For ChatGPT Plus or Pro, run /connect, choose OpenAI and then “Sign in with ChatGPT”; usage counts against your plan. For GitHub Copilot, choose GitHub Copilot and complete the device login; your account needs Copilot Chat access, which the free Copilot plan includes.
MCP (Model Context Protocol) servers give a coding agent extra tools, such as controlling Xcode or a simulator. For iOS work, the most useful are Xcode’s own bridge (xcrun mcpbridge), XcodeBuildMCP for builds, simulator control and screenshots, the Expo MCP server for Expo projects, Context7 for current documentation and Sentry for crash data. Each server adds context to every request, so connect only what you use.
Skills are folders containing a SKILL.md file: a short description plus step-by-step instructions, sometimes with scripts. OpenCode shows the model only the descriptions and loads a skill’s instructions when a task needs them. It reads skills from .opencode/skills, .claude/skills and .agents/skills in your project, and from global folders. Expo and the App Store Connect CLI publish official skill sets.
It can do almost all of the work: archiving, uploading builds, managing TestFlight, syncing metadata and screenshots, and checking review status, using tools like the asc CLI or Expo’s EAS. It shouldn’t press “Submit for Review”. Block the submit commands in OpenCode’s permissions, answer the privacy and compliance questions yourself, and submit the version yourself in App Store Connect.
Not strictly. With Expo, EAS builds your iOS app in the cloud and uploads it to App Store Connect from Windows or Linux. For native development with Xcode you need a Mac, and Xcode 27.1 requires macOS Tahoe 26.6 or later. Either way you’ll want a real iPhone for testing, and you need an Apple Developer Program membership ($99 a year) to publish.
From $99 in the first year if you use local models and only pay Apple’s membership fee. The setup recommended in this guide (OpenCode Go plus Ollama Pro on annual billing) comes to about $419 for the first year including Apple’s fee, and a power setup with OpenCode Go Plus and Ollama Max to about $1,779. Prices are November 2026 list prices excluding VAT.
Builds must be made with Xcode 26 or later (since April), copycat and low-effort apps in saturated categories are rejected under a rewritten guideline 4.3(b) (June), hidden, dormant or undocumented features are banned under the new guideline 2.5.19 (October), and apps must target iOS 13 or later (September). iPhone Duo screenshots become required in April 2027 for apps built with the iOS 27.1 SDK, and the required iPhone screenshot set is now the one for medium-size Dynamic Island displays (1179 × 2556 or 1206 × 2622 pixels).
They’re two free iPhone and iPad apps from Graham Miranda UG, the author’s company. Stash — Find It Fast remembers where you put things: you photograph the spot, pick a room and search for it later, even by transcribed voice notes, in 11 languages. PingAtlas measures network round-trip times from your own device to cities, games and online services, with no account, no ads and no analytics.
The Bottom Line
Learning how to use OpenCode well isn’t about memorising commands. It’s about building a small system around the agent: a coding plan that fits your budget, Ollama for the work that should stay on your machine, a handful of MCP servers that let the agent see what it builds, skills that hold your playbook, and permissions that keep the irreversible decisions with you.
My recommendation stands: OpenCode with OpenCode Go and Ollama is the cheapest, most flexible and least lock-in-prone way to build an app with AI in late 2026. Add a subscription you already pay for, or a frontier model by API key, when a task deserves it. Then use the agent for the paperwork too, and keep the “Submit” button for yourself.
If you’d like to see what this kind of process produces at small scale, both of my apps are free: Stash — Find It Fast for the things you put away, and PingAtlas for checking how close the internet really is from where you’re sitting. Then go and build yours.
Building with OpenCode? I’d like to hear which coding plan you settled on, which local model earned a place on your Mac, and which MCP server or skill you couldn’t do without. Corrections and counter-evidence are welcome; this article gets updated when the picture changes.
Disclosure: Stash and PingAtlas are my own apps, published by my company, Graham Miranda UG (haftungsbeschränkt). Both are free with no ads. This article contains one affiliate link, to Z.ai’s GLM Coding Plan in Part 2; if you subscribe through it you get 10% off and I receive a commission. No company mentioned here sponsored, reviewed or approved this article.
Last updated: 7 November 2026.