 English
  Deutsch
  Español
  Italiano
  Français
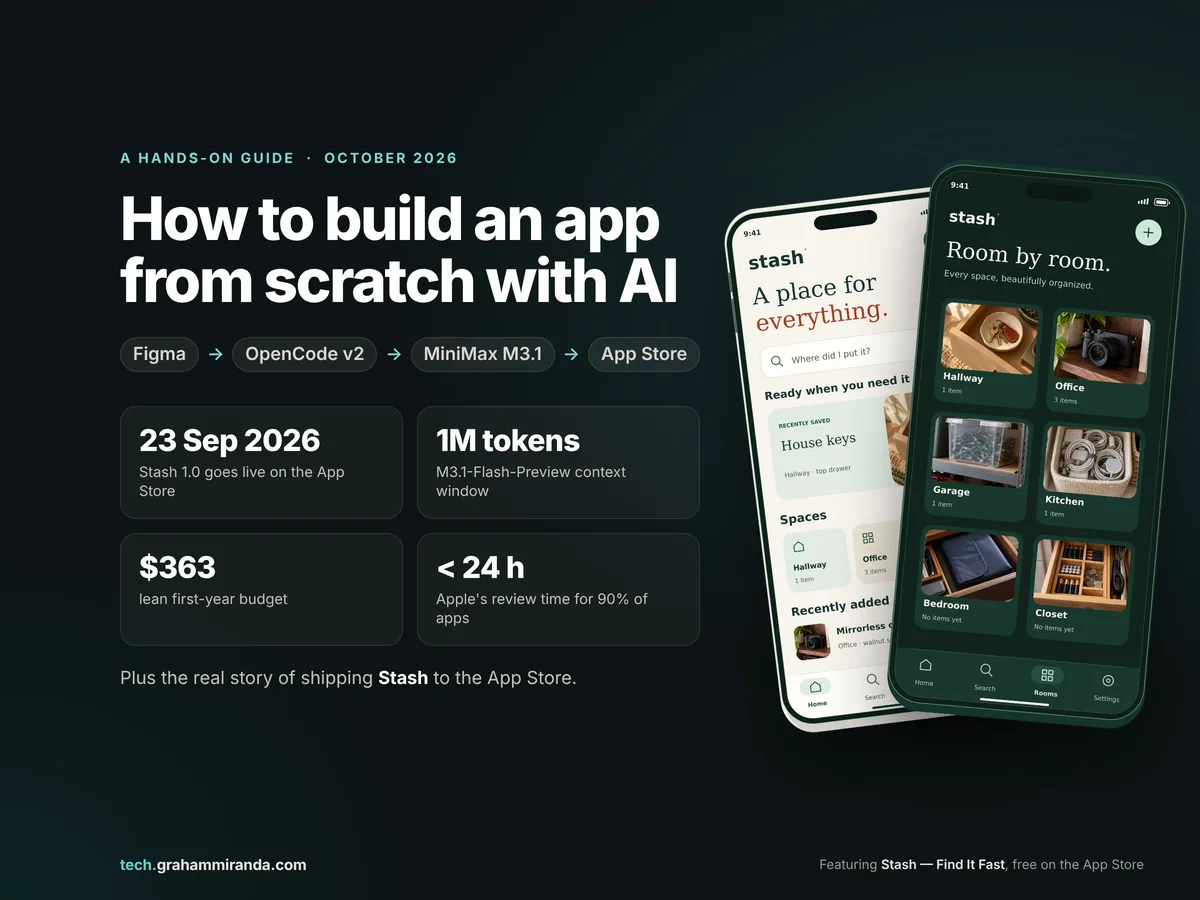
Every home has a drawer that eats things. Keys, the spare charger, the passport you need twice a year. You put something there “for safekeeping”, and three months later you’re on your knees emptying an entire cupboard onto the floor. This is a complete guide to how to build an app from scratch with AI in 2026, told through the app I made to fix that drawer.
Stash is my answer to that drawer. It’s a small, calm iPhone and iPad app: you take a photo of the spot where you put something, give it a name and a room, and when you need it again, you search. That’s the whole idea. It went live on the App Store on 23 September 2026. It’s free, and it has no ads.
I don’t come from a coding background. Everything I build, I build with AI agents, and over the past year the tools for doing that have gone from “nice demo” to “you can actually ship this”. So this guide is practical first: every step from an empty folder to a live App Store listing, with Stash as the worked example throughout.
The stack is the one I’d hand to anyone starting today. Figma for the design. OpenCode v2 as the coding agent. MiniMax M3.1 as the model doing the thinking (strictly speaking M3.1-Flash-Preview, which launched on 27 September, and I’ll explain why that distinction matters). Then all the “stuff” that never makes it into the YouTube tutorials: the backend, the privacy policy, App Store Connect, screenshots, review, the landing page, the legal pages, and what all of it costs.
Everything here was checked against official documentation, release notes and the App Store itself on 5 October 2026. Some of it will be out of date within weeks. MiniMax’s new model is a preview, OpenCode ships almost daily, and Figma is still deciding which coding agents may connect to its MCP server. I’ve flagged the volatile parts as I go.
Disclosure: Stash is my app, published by my company, Graham Miranda UG. It’s free, with no ads and no in-app purchases. This article contains no affiliate links. MiniMax, OpenCode’s team at Anomaly, Figma, Apple, Google and Expo have not sponsored, reviewed or approved it.
TL;DR — The 60-Second Version
- You can build a real app from scratch with AI in 2026, but “from scratch” now means decisions, not typing. The agent writes the code. You own the brief, the design, the data model, the privacy story, the testing and the App Store paperwork.
- The stack: Figma (screens and design variables) → OpenCode v2 (open-source agent, MIT licence) → MiniMax M3.1-Flash-Preview (1M-token context, reads text, images and video, five effort levels) → an Expo or Xcode build → TestFlight → the App Store. Firebase if you need accounts and sync.
- “MiniMax M3.1” today means M3.1-Flash-Preview. It launched on 27 September 2026 and is available only through MiniMax’s M Plan subscription ($22, $55 or $132 a month, with 50% off the first month on monthly billing until 14 October) and the MiniMax Code app. There’s no per-token price, no open weights and no published benchmark yet. Thinking can’t be switched off, and effort defaults to max.
- It works in OpenCode v2 without a config file:
/connect→ “MiniMax Token Plan (minimax.io)” → paste your subscription key →/models→MiniMax-M3.1-Flash-Preview. - The Figma catch nobody mentions: Figma’s remote MCP server doesn’t accept OpenCode yet. It’s allowlist-only during the beta. Use Figma’s desktop MCP server at
127.0.0.1:3845instead (it needs the Figma desktop app and a paid Dev or Full seat, from $12 a month), or hand the agent exported frames, which M3.1 can read. - Shipping is a project of its own: $99 a year for the Apple Developer Program (€99 in Germany), builds made with Xcode 26 or later, a privacy policy, privacy labels that match reality, in-app account deletion if you offer accounts, and EU trader details. Apple says 90% of submissions are reviewed within 24 hours.
- Stash in numbers: live since 23 September 2026, version 1.0.1 with a new design on 2 October, free, iOS and iPadOS 16.4 or later, about 64 MB, no tracking, and a guest mode that keeps everything on the device.
- What it costs: about $363 for the first year on the lean setup (Apple membership plus M Plan Go), about $500 with a Figma Dev seat. Backend costs start at zero on Firebase’s free quotas.
- The rule that matters most: “done” is a claim, not a fact. Run the app on a real phone, in airplane mode, in dark mode, with VoiceOver on. Then believe it.
The Stack at a Glance
| Layer | Tool | Its job in this workflow | Cost (October 2026) |
|---|---|---|---|
| Design | Figma | Screens, components, colour and type variables, clickable prototype | Free Starter plan; a Dev seat from $12/month unlocks the desktop MCP server |
| Design-to-code bridge | Figma MCP server (desktop) | Hands frames, variables and screenshots to the agent | Included with the seat |
| Coding agent | OpenCode v2 | Plans, edits files, runs commands and tests; terminal, desktop app, or inside Xcode 27 | Free, MIT licence |
| Model | MiniMax M3.1-Flash-Preview | The planning and coding brain; reads screenshots and screen recordings | M Plan from $22/month |
| App framework | Expo SDK 56 (iPhone + Android) or SwiftUI with Xcode 27 (Apple only) | The app itself | Free; Expo’s free tier includes 15 iOS and 15 Android cloud builds a month |
| Backend | Firebase (Auth, Firestore, Storage, Functions, Messaging) | Accounts, sync, photo storage, notifications | Free quotas; Storage and Functions need the pay-as-you-go Blaze plan |
| Distribution | App Store Connect + TestFlight | Beta testing, review, release | $99/year Apple Developer Program |
| Launch | A static landing page and legal pages | Explain, demo, comply | Whatever your hosting costs |
Prices are list prices on 5 October 2026, excluding VAT. Subscription terms change often, so check before you buy.
Table of Contents
- Part 1 — Meet Stash: The App This Guide Is Built Around
- Part 2 — The 2026 Stack for Building an App From Scratch With AI
- Part 3 — MiniMax M3.1, Explained Honestly
- Part 4 — Setting Up OpenCode v2 With MiniMax M3.1, Step by Step
- Part 5 — Designing Your App in Figma When You’re Not a Designer
- Part 6 — Connecting Figma to OpenCode: The MCP Catch
- Part 7 — How to Build an App From Scratch, Phase by Phase
- Part 8 — How to Publish an App on the App Store in 2026
- Part 9 — “And Stuff”: The Launch Kit Around the App
- Part 10 — What It Costs to Build an App With AI in 2026
- Part 11 — Ten Mistakes to Avoid When You Build Your First App With AI
- Part 12 — Should You Use This Exact Stack? Six Scenarios
- Part 13 — What to Watch Over the Next Few Months
- Frequently Asked Questions
- The Bottom Line
- Sources
Part 1 — Meet Stash: The App This Guide Is Built Around
Before the tools, the example. A guide to building apps is only as good as the app it builds, so here is exactly what Stash is, using its own App Store listing and privacy policy rather than my enthusiasm.
The listing opens with one line that sums up the job: “Never tear the house apart looking for something again.” Then it explains the entire product in three sentences: “Stash is the fastest way to remember where you put things. Snap a photo, pick the room, save. That’s the whole app.”
That last sentence is the design brief. Everything in the app either makes saving faster or makes finding faster. Anything that does neither doesn’t belong.
What Stash does
| Feature | What it does | Why it matters |
|---|---|---|
| Photo of the spot | You photograph the drawer, shelf or box, not the item | You remember places visually; a photo of the place is the memory |
| Name, room, exact spot, note | “House keys · Hallway · top drawer · in the ceramic dish on the left” | Four short fields beat a free-text essay you’ll never search well |
| Voice notes, transcribed | Record a quick note; Stash turns it into searchable text | Faster than typing when your hands are full |
| Search | By item name, room, note or the words you recorded, with a filter for items that have photos | The whole point of the app is the moment you need something |
| Rooms | Browse your home one room at a time | For when you don’t remember the name, only roughly where |
| “Found it” | One tap when you’ve got it back | Closes the loop |
| Reminders | Seasonal items resurface when you need them | Winter tyres, the Christmas lights, the camping gear |
| Widgets | Home Screen and Lock Screen widgets | Two taps from “I should remember this” to saved |
| Offline, then sync | Works with no signal; syncs across iPhone and iPad when you have an account | Cellars and garages have terrible reception |
| Appearance | Light, dark or follow the system | It looks calm at 11pm too |
| Export and delete | Export your stashes; delete your account from Settings | Your data stays yours, and Apple requires the second one |
How it looks
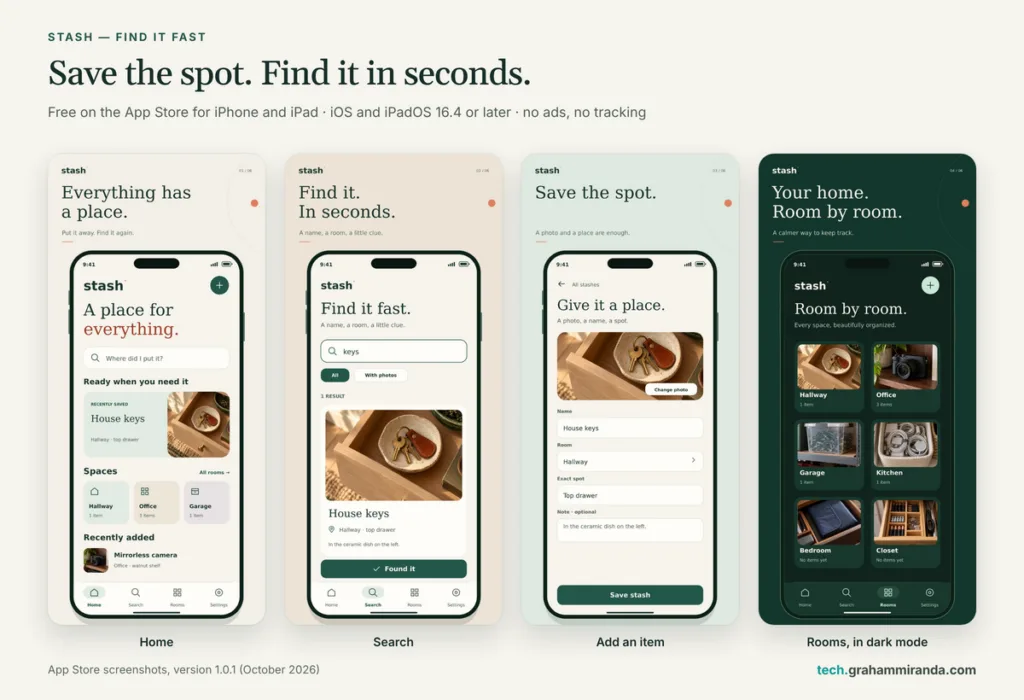
The visual direction is deliberately quiet: a warm off-white background, a deep forest green, a single coral accent, serif headlines and a plain sans-serif for everything else. The App Store screenshots tell the story in six headlines: Everything has a place. Find it. In seconds. Save the spot. Your home. Room by room. Remember the little details. Clear. In every light.
Show Image Stash on iPhone: save the spot, find it in seconds, browse room by room. Light and dark, same calm.
How it handles your data
This matters more than any feature, so I’ll quote the privacy policy rather than paraphrase it:
- Guest mode: “If you do not create an account, your rooms, items, photos and voice notes stay on your device and are not uploaded.”
- With an account: sync and backup run on Google Firebase (Authentication, Cloud Firestore, Cloud Storage, Cloud Functions and Cloud Messaging), with security rules that keep each user’s data isolated.
- No business model built on you: “We do not show ads, run advertising or analytics tracking, build user profiles, or sell your data.”
- Voice notes: turning a recording into searchable text may use the speech service built into the phone (Apple’s, on iOS).
- Deletion: delete your account in Settings, or through a web form; copies are removed from backups within 30 days.
If you’ve read my piece on why local-first software is making a comeback, you’ll recognise the philosophy. The app should work perfectly without the cloud. The cloud is a convenience you opt into.
The facts box
| App Store name | Stash — Find It Fast |
| Subtitle | Find anything you’ve put away |
| First release | 23 September 2026 (version 1.0) |
| Current version | 1.0.1, released 2 October 2026: “New Design and bug fixes.” |
| Price | Free, no in-app purchases |
| Requires | iOS or iPadOS 16.4 or later; also runs on Apple silicon Macs and Apple Vision Pro as an iPad app |
| Size | About 64 MB |
| Category | Productivity (also listed under Utilities) |
| Age rating | 4+ |
| Developer | Graham Miranda UG (haftungsbeschränkt), Blankenburg (Harz), Germany |
| Website | stash.grahammiranda.network, in ten languages, with a browser demo |
| Download | Stash on the App Store |
What isn’t in the app (yet)
The website has a section called Design explorations with three ideas: pin the exact spot on a photo, Quick Move for when an item’s home changes, and boxes and labels so you can see what’s inside a box without opening it. The site is explicit that “these ideas are in the interactive concept, not features in the App Store release.”
I like that separation, and I’d recommend it to anyone building their first app. Explore freely in a prototype. Ship only what works. Your App Store page should never promise what the binary can’t do. Apple’s reviewers check, and so do your one-star reviewers.
Why this is a good shape for a first app
If you’re reading this because you want to build your own app, steal the shape of Stash even if you don’t care about lost keys:
- One core loop. Save, then find. Everything else supports that loop.
- Data that starts on the device. No server needed on day one, so you can ship before you’ve built a backend.
- A handful of real platform features. Camera, microphone, notifications and widgets are the right amount of “native” to learn without drowning.
- An optional cloud. Accounts and sync can arrive in version two without rewriting version one.
- No feed, no chat, no payments. Each of those is its own project with its own failure modes.
An AI agent can build almost anything you can describe. The hard part is describing something small enough to finish.
Part 2 — The 2026 Stack for Building an App From Scratch With AI
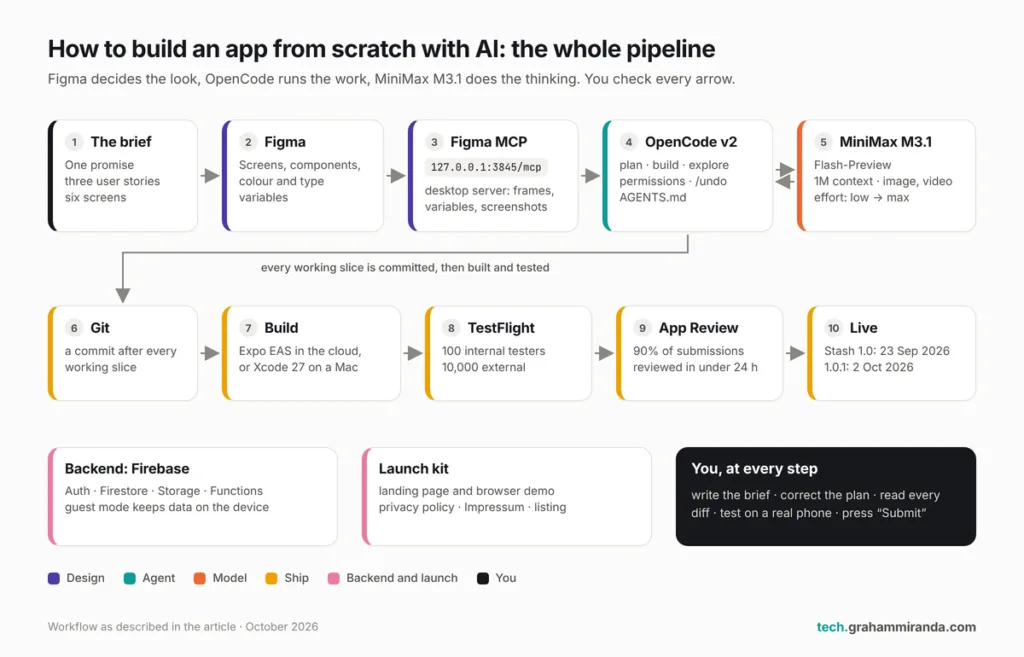
Three tools, three separate jobs:
- Figma decides what the app looks like.
- OpenCode decides how the work gets done: which files to read, which commands to run, what to ask you before doing anything risky.
- MiniMax M3.1 does the thinking inside OpenCode: planning, writing code, reading screenshots, fixing what broke.
Keeping those jobs separate is the most important architectural decision in this whole guide, and it has nothing to do with code. When a better model comes out next month (and one will), you change one line in a config file. When a better design tool comes out, your agent doesn’t care. Nothing is welded together.
Why OpenCode v2 is the agent
OpenCode is an open-source AI coding agent under the MIT licence. You point it at a project folder, describe what you want, and it works the way a developer does: reads the code, makes a plan, edits files, runs commands, reads the errors, fixes them and keeps going.
Version 2.0.0, a ground-up rebuild, was tagged on 11 September 2026, and the team had shipped 2.0.22 by 2 October. I covered the rebuild in depth in my OpenCode v2 deep dive, so here is only what matters for building an app:
- It’s model-agnostic. More than 75 providers through Models.dev, plus local models. MiniMax is built in.
- One shared background server. The terminal interface, the desktop app, the browser UI and the IDE extensions all see the same sessions.
- Permissions that work like a firewall. An ordered list of allow, ask and deny rules where the last match wins, so “never run
git push” and “never submit to the App Store” are one line each. - Undo for every step. Snapshots before and after each model step, with
/undoand/redo. - Subagents you can see and stop, and skills that load from
.opencode,.claudeand.agentsfolders. - It runs inside Xcode 27. Apple’s new Xcode accepts any agent that speaks the Agent Client Protocol, and
opencode acpdoes exactly that (setup in Part 4).
The homepage now counts 208,000 GitHub stars, 950 contributors and 16 million monthly developers. Two honest caveats from the v2 docs: session sharing hasn’t come back in v2 yet, and v1 plugins don’t load.
Why MiniMax M3.1 is the model
Part 3 goes deep, but the short version is three properties that happen to suit app building unusually well:
- A 1,000,000-token context window. A small app, its design notes, its AGENTS.md and the relevant documentation fit into one working session with room to spare.
- It reads images and video, not only text. You can give it a Figma frame, a simulator screenshot or a screen recording of a bug.
- Five effort levels, from
lowtomax, so the planning work gets deep thinking and the mechanical work gets speed.
The trade-off is that it’s a preview with no published benchmarks or per-token pricing, available only through MiniMax’s own subscription. I’ll come back to that, because it’s not a small caveat.
Why Figma is the design tool
Figma is still where app design happens. The free Starter plan is enough to design a first app. Its variables become your design tokens, the colours, spacing and type sizes that keep every screen consistent. And its MCP server lets a coding agent read a selected frame directly, which is the closest thing yet to “make it look like this” actually working.
At Config 2026 (23 to 25 June in San Francisco), Figma also opened its Figma Agent to all paid plans as an open beta, added a motion timeline, and previewed “code layers” that treat code as a first-class object on the canvas. You don’t need any of that to build your first app. It’s useful to know where things are heading.
And the “stuff”
The parts nobody puts in the thumbnail:
| What | Options | Covered in |
|---|---|---|
| App framework | Expo (React Native) for iPhone plus Android; SwiftUI with Xcode 27 for Apple only; Flutter | Part 7 |
| Backend | Firebase is the easy default for accounts, sync and file storage | Part 7 |
| Version control | Git, always. GitHub or similar for a backup | Parts 4 and 7 |
| Builds and signing | Xcode on a Mac, or Expo’s EAS cloud builds without one | Parts 7 and 8 |
| Testing and release | TestFlight and App Store Connect | Part 8 |
| Launch | A landing page, a demo, legal pages, App Store optimisation | Part 9 |
Show Image The whole pipeline on one page. You stand at the left (the brief), in the middle (reviewing every diff) and at the right (pressing “Submit for Review”).
What “from scratch” means now
Here is the uncomfortable truth about building an app with AI in 2026: the agent does the part that used to be hard, and leaves you the part that was always hard.
| You own | The agent owns |
|---|---|
| What the app is for, and what it refuses to do | Turning that into files, components and functions |
| The screens and the design system | Implementing them, screen by screen |
| The data model: what gets stored, where, for how long | Writing the storage, sync and migration code |
| The privacy story, the legal pages and the App Store answers | Auditing the code so your answers are accurate |
| Testing on real devices, with real people | Writing and running automated tests |
| Pressing “Submit” | Never pressing “Submit” |
If that table makes you slightly nervous, good. That nervousness is what separates an app that ships from a folder full of half-working code.
Part 3 — MiniMax M3.1, Explained Honestly
If you search for “MiniMax M3.1” right now, you’ll find confident articles about a model that, strictly speaking, hasn’t been released. Here’s what actually exists, what you can use today, and what nobody knows yet.
What exists, in order
- 1 June 2026: MiniMax M3. An open-weight, natively multimodal model with a 1M-token context window, a mixture-of-experts design of roughly 428 billion total parameters with about 23 billion active per token, and MiniMax’s own sparse attention. I compared it with GLM-5.3-Flash for OpenCode in August, in GLM-5.3-Flash vs MiniMax M3.
- July: “M3.1” becomes a name. Reports from the World Artificial Intelligence Conference in Shanghai described an M3.1 with a million-token context and stronger multimodal abilities. No model, model ID or price followed.
- 23 September: a mystery model. An anonymous model called “Space Bunny Alpha” appeared on OpenRouter and in OpenCode as a free preview, with a 1M context and adjustable reasoning. Independent tokenizer fingerprinting pointed towards MiniMax. MiniMax hasn’t confirmed anything, and a tokenizer match is evidence about a model family, not proof.
- 27 September: MiniMax M3.1-Flash-Preview. The first M3.1-branded model anyone can use, launched in MiniMax’s own coding app, MiniMax Code, and through its coding subscription. MiniMax describes it as a model for “everyday development, fast, reliable, and ready for real work, from quick bug fixes to full features.”
- 30 September: the M Plan. MiniMax Code 3.1.0 arrived with a new subscription called M Plan, which replaces the Token Plan for new customers at the same prices.
The full M3.1 from the summer still hasn’t shipped. When people say “M3.1” in October 2026, they mean M3.1-Flash-Preview, and so do I for the rest of this article.
Show Image Everything in this article happened in four and a half months, and seven of these nine dates fall in the last five weeks.
MiniMax M3 vs M3.1-Flash-Preview
| MiniMax M3 | MiniMax M3.1-Flash-Preview | |
|---|---|---|
| Released | 1 June 2026 | 27 September 2026 |
| Status | Generally available | Preview |
| Model ID | MiniMax-M3 | MiniMax-M3.1-Flash-Preview |
| Context window | 1M tokens | 1,000,000 tokens |
| Input | Text, image, video | Text, image, video |
| Thinking | Can be switched on or off | Always on. Five effort levels: low, medium, high, xhigh, max (default max) |
| Open weights | Yes, under the MiniMax Community License | No weights, no model card |
| Pay-as-you-go price | $0.30 per million input tokens, $1.20 output, $0.06 cached; double above 512K input | Not published. Subscription only |
| Where you can use it | MiniMax API, OpenRouter, OpenCode Go, Ollama Cloud and many other hosts | M Plan subscription and MiniMax Code only |
| Published benchmarks | Yes, from MiniMax and independent boards | None |
| Architecture | ~428B total, ~23B active, sparse MoE | Not disclosed |
| In OpenCode v2 | Built in, through several providers | Built in, through “MiniMax Token Plan (minimax.io)” |
Snapshot from MiniMax’s documentation and Models.dev on 5 October 2026. Previews change without notice; check before you rely on any row.
One thing worth decoding: the docs say thinking can’t be disabled. Send thinking.type: "disabled" or an effort of none, and the API returns a 400 error that says, in so many words, that the model “requires adaptive thinking.” What you can control is how hard it thinks.
How to get it: the M Plan
MiniMax’s documentation is blunt about access: “MiniMax-M3.1-Flash-Preview is available only through M Plan and MiniMax Code for now.”
| M Plan tier | Price | What’s included |
|---|---|---|
| Go | $22/month | M3.1-Flash-Preview, plus MiniMax’s image and audio models |
| Explore | $55/month | Everything in Go, plus the H3 video model |
| Build | $132/month | Everything in Explore, with the largest usage allowance |
A few details that matter more than the headline prices:
- Launch offer: 50% off your first month on monthly billing, until 14 October 2026. Annual billing is excluded. After the first month it renews at the full price unless you turn auto-renewal off.
- Free week: all subscribers got unlimited M3.1-Flash-Preview from 1 to 7 October (China time). If you’re reading this after the 7th, that one’s gone.
- It’s a subscription key, not an API key. MiniMax’s docs are clear that subscription keys and pay-as-you-go API keys are not interchangeable. You’ll paste the subscription key into OpenCode.
- Quotas, not metering. Usage is limited in rolling five-hour and weekly windows, and unused quota doesn’t roll over. For the equivalent Token Plan tiers, MiniMax’s own guidance was roughly three to four, four to five, and six to seven agents running at once.
- Existing Token Plan subscribers keep their plan. New customers buy the M Plan.
- Supported tools on MiniMax’s M Plan page include Claude Code, Codex, Cursor, OpenCode, Hermes Agent and OpenClaw.
MiniMax Code itself is a desktop agent for macOS and Windows, with a coding mode and a “work” mode for research and documents, plus a command-line version. It’s a perfectly good way to try the model. I use OpenCode because it doesn’t tie me to any one model maker, which is the whole point of Part 2.
Why it suits app building
- The context window changes how you work. A small mobile app runs to a few thousand lines of code, perhaps a few tens of thousands. With a million tokens, the agent can hold the whole codebase, your AGENTS.md, the data model and a chunk of platform documentation at once. Fewer “I forgot what we decided” moments. (MiniMax’s own OpenCode guide caps the window at 512K in its example config, which I’d copy. Shorter contexts mean faster answers.)
- Show it, don’t describe it. Because it takes images and video, you can drop in an exported Figma frame, a screenshot from the iOS Simulator, or a screen recording of the bug where the keyboard covers the Save button. That last one alone saves an extraordinary amount of typing.
- Effort is a dial, not a switch.
maxfor planning a feature or untangling a sync bug.lowormediumfor renaming things, writing tests and translating strings. Part 4 shows how to set that per agent. - The cost is flat. For a solo builder, a predictable monthly bill beats watching a per-token meter during a long debugging session.
One early independent test measured roughly 90 to 110 tokens per second on day one. That’s a single measurement, not a benchmark, but it matches the “Flash” name.
What nobody knows yet
This is the part most M3.1 coverage leaves out:
- There are no benchmarks. Not from MiniMax, not from the independent boards, because a model that’s only reachable through one company’s subscription is hard to test independently. You are the benchmark. Give it one real task from your own project, give the same task to a model you already trust, and compare the diffs.
- There’s no per-token price. That’s fine inside a subscription. It’s a problem if you want to run the model in CI or a product, where you need to know what a million tokens costs.
- It’s a preview. It can change behaviour, get renamed or be replaced by the full M3.1 without notice. Keep the model ID in one config file so swapping it is a one-line change.
- Thinking is always on. Even trivial requests carry some reasoning overhead. Lower the effort for small jobs.
- It’s only available from MiniMax. It isn’t on OpenRouter, Ollama Cloud or OpenCode Go at the time of writing. Your prompts and code go to MiniMax’s servers, so for client work under strict data rules, read MiniMax’s terms first or keep that project on local models.
Don’t download “MiniMax M3.1”
Within a day of the launch, GitHub repositories that have nothing to do with MiniMax appeared, promising an “official free download” of M3.1-Flash as a Windows zip to “extract and run”. There are no M3.1 weights to download, and MiniMax Code comes from MiniMax’s own website. Treat any “M3.1 download” as malware until proven otherwise.
When to use MiniMax M3 instead
Use M3 if you need any of the things the preview doesn’t offer: pay-as-you-go pricing, open weights you could self-host, or access through OpenCode Go, Ollama Cloud or OpenRouter. It’s also the safer choice for anything automated, because its price and behaviour are documented. If you want a broader view of the alternatives, my MiniMax M3 vs Kimi K2.7 Code vs Nemotron 3 Ultra comparison covers the field.
Part 4 — Setting Up OpenCode v2 With MiniMax M3.1, Step by Step
This is the setup I’d give a friend. It takes about fifteen minutes, most of it waiting for downloads.
Step 0 — What you need first
- A Mac with Apple silicon, if you want to build and run iPhone apps locally. Xcode 27 (released on 14 September 2026) no longer supports Intel Macs and needs macOS Tahoe 26.4 or later. If you go the Expo route in Part 7, you can build iOS apps in the cloud from Windows or Linux, but you’ll still want a real iPhone to test on.
- Git. Snapshots, branches and your own sanity all depend on it.
- Node.js (LTS) if you’ll use Expo.
- A MiniMax M Plan subscription (Part 3).
- A modern terminal. macOS Terminal is fine; Ghostty, WezTerm and Kitty are nicer.
Step 1 — Install OpenCode v2
bash
curl -fsSL https://opencode.ai/v2/install | bash

opencode --version          # should print 2.0.x
opencode service status     # the shared background server should be running
Want the desktop app as well? Download it from opencode.ai/download, or on a Mac run brew install --cask opencode-desktop. The terminal and the desktop app share one server, so a session you start in one shows up in the other.
One thing to watch: MiniMax’s own OpenCode guide still shows the v1 installer URL (opencode.ai/install). Use the /v2/install one above.
Step 2 — Get your M Plan subscription key
Subscribe on MiniMax’s platform and create a subscription key in the console. Not a pay-as-you-go API key: they’re different products, and only the subscription key gives you M3.1-Flash-Preview.
Treat the key like a password. Never paste it into a chat, a screenshot or a Git repository.
Step 3 — Connect MiniMax inside OpenCode
bash
cd ~/code/my-app
opencode
Then, inside OpenCode:
- Type
/connectand search for MiniMax Token Plan (minimax.io). The provider kept its old name; it takes M Plan keys. - Paste your subscription key.
- Type
/modelsand pick MiniMax-M3.1-Flash-Preview.
That’s it. OpenCode’s model catalogue (Models.dev) already lists the model with its 1,000,000-token context, image and video input, and the five effort levels, so you don’t need a config file to start. If it doesn’t show up in /models, update OpenCode first; the config in Step 4 also adds it by hand.
Two alternatives: opencode auth login does the same from the terminal, and MiniMax’s setup wizard (npx -y mmx-cli@latest agent setup) installs and configures OpenCode for you, with M3 as the default. Switch to M3.1 afterwards with /models. Accounts on MiniMax’s China platform use the “(minimax.cn)” version of the provider.
Step 4 — Add a project config
The defaults work, but an app project deserves a config file that does three things: routes each agent to the right effort level, sets permissions that keep the agent away from anything irreversible, and connects your MCP servers. Save this as opencode.jsonc in your project root:
jsonc
{
  "$schema": "https://opencode.ai/config.json",

  // Default model for new sessions
  "model": "minimax-coding-plan/MiniMax-M3.1-Flash-Preview",

  "providers": {
    "minimax-coding-plan": {
      "models": {
        "MiniMax-M3.1-Flash-Preview": {
          // MiniMax's own OpenCode example caps the window at 512K
          "limit": { "context": 524288 },

          // Thinking is always on and defaults to "max".
          // These variants send MiniMax's documented output_config.effort field.
          "variants": [
            { "id": "quick", "body": { "output_config": { "effort": "low" } } },
            { "id": "steady", "body": { "output_config": { "effort": "medium" } } },
            { "id": "careful", "body": { "output_config": { "effort": "high" } } }
          ]
        }
      }
    }
  },

  "agents": {
    // Planning gets the full default effort: a bad plan costs the most later
    "plan":    { "model": "minimax-coding-plan/MiniMax-M3.1-Flash-Preview" },
    // Building: thorough, but faster than max
    "build":   { "model": "minimax-coding-plan/MiniMax-M3.1-Flash-Preview#careful" },
    // Read-only searching through the codebase: speed matters more than depth
    "explore": { "model": "minimax-coding-plan/MiniMax-M3.1-Flash-Preview#quick" }
  },

  "permissions": [
    { "action": "shell", "resource": "*",                  "effect": "ask"   },
    { "action": "shell", "resource": "git status *",       "effect": "allow" },
    { "action": "shell", "resource": "git diff *",         "effect": "allow" },
    { "action": "shell", "resource": "git log *",          "effect": "allow" },
    { "action": "shell", "resource": "npm test *",         "effect": "allow" },
    { "action": "shell", "resource": "npx tsc *",          "effect": "allow" },
    { "action": "shell", "resource": "npx expo lint *",    "effect": "allow" },
    { "action": "shell", "resource": "git push *",         "effect": "deny"  },
    { "action": "shell", "resource": "eas submit *",       "effect": "deny"  },
    { "action": "shell", "resource": "firebase deploy *",  "effect": "deny"  }
  ],

  "mcp": {
    "servers": {
      // Figma's desktop MCP server (Part 6). Local, so no OAuth.
      "figma-desktop": {
        "type": "remote",
        "url": "http://127.0.0.1:3845/mcp",
        "oauth": false
      },
      // Firebase's official MCP server. It asks before changing your project.
      "firebase": {
        "type": "local",
        "command": ["npx", "-y", "firebase-tools@latest", "mcp"]
      }
    }
  }
}
A few notes so you know what you’re pasting:
- The permission rules read top to bottom, and the last match wins. Every shell command asks first, the harmless Git and test commands run freely, and three things are denied outright: pushing code, submitting to the App Store, and deploying your backend. You do those yourself, on purpose.
- Swap the allowed commands for your toolchain. If you’re building natively with Xcode instead of Expo, replace the
npxlines with your test and lint commands. - If a variant doesn’t seem to do anything, run
/modelsto confirm the variant names, and check the request in OpenCode’s logs. MiniMax usesmaxwhen no effort is sent, so the worst case is a slower answer, not a broken one. - Older v1-style examples still work. MiniMax’s guide uses the v1
providerkey; OpenCode v2 reads supported v1 settings without rewriting your file.
Step 5 — Write an AGENTS.md before you write a line of code
OpenCode reads AGENTS.md at the start of every session. It’s the single most effective habit in AI-assisted development, and my vibe coding guide goes into the whole system. For an app, it should hold the product’s rules as well as the build commands. Here’s the shape of one for an app like Stash:
markdown
# Notes for coding agents (example for a Stash-style app)

## What this app is
Stash remembers where things are. Photo of the spot + name + room = found in seconds.
If a change doesn't make saving or finding faster, it doesn't belong.

## Non-negotiables
- Offline first. Every feature works with no network. Sync is a bonus.
- Guest mode never uploads anything.
- No analytics, ads or tracking SDKs. Ask before adding ANY dependency.
- No secrets in the app bundle. Privileged work happens in Cloud Functions.
- Accessibility: Dynamic Type, VoiceOver labels, 44 x 44 pt touch targets.
- Light and dark mode for every screen.

## Design
- Tokens live in src/theme/tokens.ts. Never hard-code a colour or a font size.
- When implementing a Figma frame: get_design_context, then get_variable_defs,
  then get_screenshot to compare your result.

## Commands
- Install: npm install
- Run: npx expo start
- Test: npm test
- Types: npx tsc --noEmit
- Lint: npx expo lint

## Definition of done
- Tests, types and lint pass
- Works in airplane mode
- Works in light and dark mode, at the largest text size
- No new warnings in the console
Step 6 (optional) — Run OpenCode inside Xcode, and give it Xcode’s tools
Xcode now has agentic coding built in, and it accepts outside agents in two different ways. Both are worth knowing if you build natively.
OpenCode as an agent inside Xcode (ACP). Xcode can host any agent that speaks the Agent Client Protocol, and OpenCode does, through opencode acp.
- Sign in from the terminal first:
opencode auth login. - Run
which opencodeand copy the absolute path. Xcode doesn’t expand~or read your shell’s PATH. - In Xcode, choose Xcode → Settings → Intelligence, then under Agents click Add an Agent.
- Paste the path as the command and add
acpas the argument. - Start a new conversation in Xcode’s Intelligence sidebar and pick OpenCode.
You can’t switch models from Xcode’s interface, so set your default model in opencode.jsonc first.
Xcode’s tools inside OpenCode (MCP). The other direction is often more useful: OpenCode stays in your terminal, but it can build your project, run tests and render SwiftUI previews through Xcode.
- In Xcode → Settings → Intelligence, under Model Context Protocol, turn on Allow external agents to use Xcode tools.
- Add Xcode’s bridge to OpenCode:
opencode mcp add xcode -- xcrun mcpbridge - Open your project in Xcode before you prompt. The bridge talks to the running Xcode, and Xcode tells you when an external agent connects.
Which effort level for which job
| Task | Agent | Effort |
|---|---|---|
| Planning a feature, the data model or the sync logic | plan | max (the default) |
| Implementing a screen from a Figma frame | build | high |
| Fixing a bug with a clear way to reproduce it | build | high; max if it’s a sync or race-condition bug |
| Writing tests, renaming, small refactors | build | medium |
| Searching the codebase, reading docs | explore | low |
| Copy changes and string translations | build | low or medium |
Higher effort means more thinking tokens and more waiting, in MiniMax’s own words. Most of the time in an agent loop is spent waiting, so match the effort to the risk.
Part 5 — Designing Your App in Figma When You’re Not a Designer
You don’t need to be a designer to design a good first app. You need a small number of decisions, made once, written down where the agent can read them.
Start with words, not rectangles
Before you open Figma, write three things in a plain text file:
- The promise, in one sentence. For Stash: the fastest way to remember where you put things.
- Three user stories. “I put my passport in the desk drawer and want to find it in March.” “I’m in the garage, I have no signal, and I want to log where the drill went.” “I want the Christmas lights to remind me they exist in November.”
- The screen list. Stash ships with four tabs (Home, Search, Rooms and Settings) plus an Add screen and an item detail view. Six screens. That’s a whole app.
Then give that file to the plan agent and ask it to argue with you: “Read this brief. List the user flows, the edge cases I haven’t thought about, and the screens I’m missing. Then tell me what I should cut.” This is exactly the kind of boring, thorough work that max effort is for: the “what happens when the user denies camera access?” kind of question. Ten minutes of it can save you a redesign.
Set up variables before you draw anything
Figma variables are named values: colours, spacing, corner radii, sizes. Set them up first, with a light and a dark mode for the colours, and your app will be consistent by default.
They matter twice as much with an AI agent. When the agent implements a screen, Figma’s MCP server can hand it the exact variables used in that frame (the get_variable_defs tool), so it writes colors.green instead of guessing at a hex code from a screenshot.
Here’s the palette from Stash’s public design concept:
| Token | Value | Used for | Contrast on Paper |
|---|---|---|---|
| Paper | #F6F4EE | App background | — |
| Surface | #FFFCF7 | Cards and fields | — |
| Ink | #172E2A | Primary text | 13.1 : 1 |
| Green | #23594C | Buttons, selected states, brand | 7.3 : 1 |
| Green soft | #E1EBE4 | Quiet highlights | — |
| Coral | #D46F4F | Accent dot, one word in a headline | 3.1 : 1 |
| Coral soft | #F8E8DE | Warm highlights | — |
| Muted | #6E7D76 | Secondary text | 3.9 : 1 |
| Line | #DEDFD7 | Dividers and borders | — |
Headlines use a serif; everything else uses the system’s sans-serif. That’s the whole type system.
The contrast column is the part to copy. Ink and green clear the 4.5 : 1 that WCAG asks for normal text with a lot to spare. Coral, at about 3 : 1, only passes for large text, so it belongs on big headline words and small accent dots, which is exactly where Stash uses it. The muted grey sits at 3.9 : 1, so it belongs on larger captions rather than small print. Check this in Figma before the agent copies a token into fifty places.
Show Image Nine colours, two typefaces, a handful of components. A design system doesn’t have to be big to be useful; it has to be written down.
Build five components, not fifty
For a first app you need roughly five reusable components: a button (primary and quiet), a text field, a card, a list row or tile (Stash’s room tile) and the tab bar. Build them as Figma components with variants for their states: default, pressed, disabled, error.
Apple publishes official iOS design resources for Figma. Use them as reference for system pieces such as sheets, alerts and the keyboard rather than redrawing them. Your agent will use the real system components anyway.
Design the screens the agent will forget
AI agents are very good at the happy path and quietly terrible at everything around it. Design these on purpose:
- Empty states. The first launch, a room with nothing in it (Stash’s rooms grid shows “No items yet”), a search with no results.
- Huge text. Set your phone to the largest Dynamic Type size and look at your layouts. Long item names wrap. Buttons grow.
- Dark mode, for every screen, not just the pretty ones.
- No photo. What does an item card look like without one?
- Permission denied. The user said no to the camera. Now what?
- Offline. What does “saved, will sync later” look like?
Let AI help inside Figma, but keep the source of truth yours
Figma’s own AI has grown up fast this year. The Figma Agent went into open beta for all paid plans at Config 2026, and it’s free during the beta for Full seats. It can generate and remix designs inside your file. Figma Make turns prompts into clickable prototypes. Weave tools now run image jobs such as background swaps without leaving the design file.
They’re excellent for exploring. Generate ten variations of a home screen, steal the one good idea, then rebuild it with your own components and variables. If generated layers become your source of truth, your design system drifts, and the coding agent inherits the drift.
Stash does something I’d recommend to anyone: its experimental ideas live in a separate, clearly labelled interactive concept on the website, not in the app. You get to explore in public without promising features that don’t exist.
Prototype, then watch three people use it
Wire the screens into a clickable prototype, hand your phone to three people, and ask each of them to save something and find it again. Don’t explain anything. Watch where they hesitate. Three people will find most of the problems that matter, and fixing a frame in Figma takes minutes, while fixing it after the agent has built it takes a session.
Part 6 — Connecting Figma to OpenCode: The MCP Catch
This is the part of the workflow that feels like the future when it works: select a frame in Figma, tell the agent to build it, and it reads the real layout, the real variables and the real components instead of squinting at a screenshot.
It’s also the part where most guides skip a detail that will cost you an evening.
What the Figma MCP server gives an agent
MCP, the Model Context Protocol, is the standard way for an AI agent to use outside tools. Figma’s MCP server exposes a set of tools; these are the ones that matter for building an app:
| Tool | What it returns |
|---|---|
get_design_context | The design context for the selected layer or frame. Figma calls it the default starting point |
get_variable_defs | The variables and styles used in the selection: your colours, spacing, type |
get_screenshot | An image of the selection, so the agent can compare its result |
get_metadata | A sparse XML outline of the layer structure |
get_code_connect_map | Mappings between Figma components and your real code components |
create_design_system_rules | A prompt that writes a rules file describing your design system for the agent |
There are also write tools (use_figma to create and edit native Figma content, generate_figma_design to turn a running web UI into Figma layers, and more), but nearly all of them are available only on the remote server. Hold that thought.
Remote server vs desktop server
Figma runs two versions of the server:
- The remote server at
https://mcp.figma.com/mcp. Figma recommends it, it doesn’t need the desktop app, it works on every seat and plan, and it has the full tool set including writing to the canvas. - The desktop server at
http://127.0.0.1:3845/mcp, which runs inside the Figma desktop app. It requires a Dev or Full seat on a paid plan, and it’s mostly read-only.
The catch: OpenCode isn’t allowed on the remote server yet
The remote server only accepts approved clients during its beta. Figma’s list includes Claude Code, Codex, Cursor, VS Code, Gemini CLI, Kiro, Warp and Xcode, among others. OpenCode isn’t on it. Try to connect, and the registration step fails with an HTTP 403.
This isn’t a bug on OpenCode’s side. In May, a Figma staff member explained on Figma’s forum that the connection scope is “intentionally gated to supported clients while we’re in beta”, and pointed people to the desktop server, which “bypasses the OAuth issue and the allowlist entirely.” OpenCode’s team has an open pull request to add a registered Figma client, still waiting on Figma’s approval at the time of writing.
You’ll find posts suggesting you borrow another app’s OAuth client ID to sneak past the allowlist. Don’t. Use the desktop server and wait for official support.
Show Image Three routes from Figma to OpenCode. Only one of them is a dead end, and it’s the one Figma recommends for everyone else.
Setting up the desktop server with OpenCode
- Install the Figma desktop app and sign in with an account that has a Dev or Full seat on a paid plan. On the Professional plan a Dev seat costs $12 a month and a Full seat $16.
- Open your design file and switch to Dev Mode with
Shift + D. - In the inspect panel, find the MCP server section and click Enable desktop MCP server.
- Add it to OpenCode. Either use the
figma-desktopblock from the config in Part 4, or run:
bash
opencode mcp add figma-desktop --url http://127.0.0.1:3845/mcp
If OpenCode tries to start an OAuth sign-in for it, set "oauth": false on the server in opencode.jsonc. The desktop server is local and doesn’t need one. 5. Check it’s connected with opencode mcp list.
Keep the Figma desktop app open while you work. If Figma is closed, the agent’s Figma tools simply disappear.
Mind the rate limits
On the Professional plan, Dev and Full seats get up to 200 MCP tool calls a day and 10 a minute. Organization seats get 15 a minute; Enterprise gets 600 a day and 20 a minute. View and Collab seats are capped at a handful of calls a month. Two hundred sounds like a lot until an eager agent calls get_screenshot after every small edit, so tell it, in AGENTS.md, to compare against the screenshot once per screen rather than once per change.
The prompt pattern that works
Select a frame in Figma, then in OpenCode:
Implement the selected Figma frame as the Add Item screen. First call get_design_context and get_variable_defs. Use only tokens from src/theme/tokens.ts; if a value is missing, add a token rather than hard-coding it. Reuse our existing Button, TextField and Card components. When you’re done, call get_screenshot and list every visible difference between the frame and what you built. Then fix them.
Two habits make this far more reliable:
- Run
create_design_system_rulesonce at the start of the project and save the result as a section of your AGENTS.md or as a skill in.opencode/skills/. From then on, every session knows your design rules without being told. - One frame per request. “Build the whole app from this file” produces a whole app that’s a bit wrong everywhere. One screen at a time produces screens that are right.
No paid seat? The free route
You can do all of this without MCP. M3.1 reads images, so export each frame as a PNG at 2x, attach it to your prompt, and paste your colour and spacing values into a tokens file in the repository. You lose the exact layer data and the variable lookups, so expect more back and forth on spacing. For a first app with six screens, it’s entirely workable, and it costs nothing.
Part 7 — How to Build an App From Scratch, Phase by Phase
This is the “from scratch” part. Seven phases, in the order I’d do them, with the prompts and the traps.
Phase 0 — Pick your framework
You have three sensible choices in 2026, and the right one depends on where your app needs to run.
| SwiftUI + Xcode 27 | Expo SDK 56 (React Native) | Flutter | |
|---|---|---|---|
| Runs on | iPhone, iPad, Mac, Apple Watch, Vision Pro | iPhone, iPad, Android, web | iPhone, iPad, Android, web, desktop |
| Language | Swift 6.4 | TypeScript | Dart |
| Need a Mac? | Yes | Not to build or submit: Expo’s EAS service builds iOS apps in the cloud | Yes, for iOS builds, unless you use cloud CI |
| Widgets | Native WidgetKit | Stable for iOS since SDK 56 | Through plugins plus native WidgetKit code |
| Agent-friendliness | Very good, especially with Xcode’s own MCP tools; the Swift compiler catches a lot | Very good: TypeScript types, fast reloads and a huge amount of public example code | Good |
| Best for | Apple-only apps that want every native feature | One codebase for iPhone and Android, built by one person | Identical-looking UI on every platform |
My rule of thumb:
- Apple only, and you want the platform’s newest toys (Apple’s on-device AI frameworks, Live Activities, deep system integration): SwiftUI, with OpenCode running inside Xcode or using Xcode’s tools (Part 4).
- iPhone and Android from one codebase, and you’re one person: Expo. SDK 56 shipped on 21 May 2026 with React Native 0.85, moved its minimum to iOS 16.4, made its SwiftUI and Jetpack Compose UI layer production-ready, and promoted iOS widgets to stable. Its EAS service builds and submits iOS apps from Windows or Linux, and the free tier includes 15 iOS and 15 Android builds a month.
- Flutter if you or your team already know it.
Stash’s App Store listing requires iOS 16.4, and its privacy policy already covers an Android build, so it’s clearly meant to travel beyond the iPhone.
Phase 1 — Scaffold, commit, brief
Create the empty project and make sure it runs before the agent touches it.
Expo:
bash
npx create-expo-app@latest my-app
cd my-app
npx expo start        # open it on your phone with Expo Go, or in the iOS Simulator
SwiftUI: in Xcode, choose File → New → Project → iOS → App, select SwiftUI, and run it once in the Simulator.
Then add the files from Part 4 (AGENTS.md and opencode.jsonc), plus two more:
ROADMAP.md: the list of vertical slices below, with checkboxes. The agent reads it, ticks things off, and you always know where you are.src/theme/tokens.ts(or a Swift equivalent): your Figma variables as code. Copy them in by hand, or let the agent pull them withget_variable_defs.
Commit. If Git isn’t already set up, git init first. From now on, every working step ends with a commit.
Phase 2 — Plan the data model before any screens
The data model is the decision that’s most expensive to change later, because once real users have real data, every change needs a migration. Use the plan agent at full effort:
You’re planning a “where did I put it?” app. Read AGENTS.md, ROADMAP.md and the brief. Propose the data model, the local storage approach and the folder structure. The app must work fully offline with no account; accounts and sync come later and must not require rewriting the local layer. List the trade-offs, the migrations we’d need if we add sync later, and anything in the brief that’s ambiguous. Don’t write code yet.
For an app shaped like Stash, you’ll end up with something like this (an illustration, not Stash’s actual schema):
ts
type Room = {
  id: string;
  name: string;            // "Hallway"
  createdAt: number;
  updatedAt: number;
};

type Item = {
  id: string;
  name: string;            // "House keys"
  roomId: string;
  spot?: string;           // "Top drawer"
  note?: string;           // "In the ceramic dish on the left"
  photoPath?: string;      // local file first; cloud copy only with an account
  voiceNotePath?: string;
  transcript?: string;     // what makes voice notes searchable
  remindAt?: number;       // seasonal reminder
  createdAt: number;
  updatedAt: number;       // used to resolve sync conflicts
  deletedAt?: number;      // soft delete, so deletions can sync too
};
Read the plan properly. Argue with it. This is the cheapest moment in the whole project to change your mind.
Phase 3 — Build in vertical slices
A vertical slice is one feature that works end to end, from the screen to storage and back, before you start the next. Here’s the order I’d build a Stash-like app in:
- Add an item: name, room, spot and note, saved locally.
- Photos: camera and photo library, stored as local files.
- Home: recently saved items and the rooms row.
- Search: by name, room and note, plus a “with photos” filter.
- Item detail and “Found it”.
- Rooms: the grid, plus adding, renaming and deleting rooms.
- Voice notes: record, transcribe, make the transcript searchable.
- Reminders: local notifications for seasonal items.
- Widgets for the Home Screen and Lock Screen.
- Settings: appearance, export and, once accounts exist, account deletion.
- Accounts and sync: version two material, if you’re sensible.
Each slice follows the same loop:
- Plan: the
planagent writes a short plan for the slice. You correct it. - Design: select the Figma frame, then use the prompt pattern from Part 6.
- Build: the
buildagent implements, runs the tests and fixes what fails. - Run it yourself, on a device, and try to break it.
- Read the diff. Every line that’s going to ship.
- Commit, tick the box in ROADMAP.md, start a fresh session for the next slice.
That fresh session matters more than it looks. Even with a million tokens of context, a long session accumulates stale assumptions. A clean start that re-reads AGENTS.md and ROADMAP.md is often smarter than a long one.
Phase 4 — Offline first, then sync
Stash’s privacy policy describes a pattern I’d copy for almost any personal app: without an account, everything stays on the device; with an account, data syncs through a backend. It makes the first version simpler, App Review easier and your users’ trust stronger.
The order of operations:
- Make the local layer complete first. SQLite through Expo’s library, or SwiftData in a native app. Photos and recordings live as files on the device.
- Add accounts with Firebase Authentication. Email sign-in is enough to start. If you add Google or another third-party login as the main way to sign in, Apple’s guideline 4.8 requires an equivalent privacy-focused option such as Sign in with Apple.
- Sync item records to Cloud Firestore, and photos and voice notes to Cloud Storage, each under the user’s own path.
- Do privileged work on the server. Anything that needs admin rights, such as wiping every file when an account is deleted, belongs in Cloud Functions, never in the app bundle.
- Lock it down with security rules so that each user can only ever read and write their own data:
rules_version = '2';
service cloud.firestore {
  match /databases/{database}/documents {
    match /users/{uid}/{document=**} {
      allow read, write: if request.auth != null && request.auth.uid == uid;
    }
  }
}
Write the equivalent rule for Cloud Storage, and have the agent write tests that try to read another user’s data and fail. Firebase’s official MCP server (it’s in the Part 4 config) lets the agent understand and validate your rules, and asks for your approval before it changes anything in the project. Deploying stays your job, which is why firebase deploy is denied in the permissions.
Two money notes. Firebase’s free Spark plan covers Authentication (50,000 monthly users) and Firestore’s free quotas (1 GiB stored, 50,000 reads and 20,000 writes a day), but Cloud Storage and Cloud Functions need the pay-as-you-go Blaze plan. Blaze keeps generous no-cost quotas, including 5 GB of storage and 2 million function invocations a month, so a small app can still cost nothing. Set a budget alert on day one anyway.
If you want the deeper “why” behind local-first design, I wrote about it in why local-first software is making a comeback.
Phase 5 — The iPhone-specific bits
These are the details that separate “it works on my phone” from “it passes review”:
- Permission prompts need honest reasons. Camera, photo library, microphone and, if you use Apple’s speech framework, speech recognition each need a purpose string that says exactly why. “To photograph where you put something” is good. “This app needs access” is a classic rejection reason.
- Ask at the right moment. Ask for notifications when someone sets their first reminder, not on first launch. People say yes when the reason is obvious.
- Prefer on-device speech recognition where the phone supports it, and say in your privacy policy that the platform’s speech service may process audio. Stash’s policy does exactly that.
- Widgets are their own small app. They have their own lifecycle, their own memory limits and their own way of reading your data. Budget a full slice for them.
- Privacy manifests. Since May 2024, apps (including the SDKs inside them) must declare approved reasons for certain system APIs. Firebase’s SDKs ship their own manifests; make sure yours exists too.
- Dark mode, Dynamic Type, VoiceOver. Check all three on every screen. Agents are far more reliable about accessibility labels when AGENTS.md demands them, so make it demand them.
Phase 6 — Test like a sceptic
The agent will tell you it’s done. It will often be wrong in small ways, and sometimes in large ones. Xcode 27’s agents can now run tests and check SwiftUI previews themselves, which helps, but nothing replaces a person with a phone.
Automated: unit tests for search, the data model, and especially the sync merge logic. Those are the bugs that lose people’s data.
By hand, before every release:
- A real device, not just the Simulator
- Airplane mode: save, search, edit, then reconnect and check that it syncs
- Dark mode and the largest text size on every screen
- VoiceOver: can you save and find an item with your eyes closed?
- Every permission denied, one at a time
- A fresh install, and an upgrade over the previous version (data must survive)
- Delete account: is everything actually gone?
When something breaks, record it. Use the iPhone’s screen recording, attach the video, and ask M3.1 what’s wrong. It accepts video input, and “watch this” beats three paragraphs of description.
Prompt templates for this kind of app
Adapt these rather than copying them blindly.
A slice:
Implement slice 4 from ROADMAP.md (search). Read AGENTS.md first. Search must match item names, room names, notes and voice-note transcripts, case-insensitively, as the user types. Add a “With photos” filter. Write unit tests first, then the implementation. Run the tests and the type checker. Show me the diff and a list of any assumptions you made.
A bug:
Attached is a screen recording. On an iPhone with the largest text size, the keyboard covers the Save button on the Add screen. Find the cause, explain it in two sentences, fix it, and check the other forms in the app for the same problem.
A review:
Review every change since the last commit as a sceptical senior iOS reviewer. Look for crashes, data loss, privacy leaks, missing accessibility labels, hard-coded colours and anything that breaks offline use. Don’t fix anything yet; give me a numbered list, most serious first.
That last prompt is worth running before every single commit. It costs a minute and catches the problems that cost a weekend.
Part 8 — How to Publish an App on the App Store in 2026
Building the app is the fun part. Publishing it is paperwork, and the paperwork is where first-time developers lose a week. Here’s all of it in one place.
What Apple requires as of October 2026
| Requirement | Details | In force since |
|---|---|---|
| Apple Developer Program | $99 a year (€99 in Germany). Companies enrol as an organisation, which needs a D-U-N-S number | — |
| Build tools | Uploads must be built with Xcode 26 or later using the iOS 26 SDK | 28 April 2026 |
| Minimum target | Apps must target iOS 13 or later | 9 September 2026 |
| Age rating | Answer Apple’s updated age-rating questions | 31 January 2026 |
| Privacy manifest | Approved reasons for “required reason” APIs, including in third-party SDKs | 1 May 2024 |
| Privacy policy | Linked in App Store Connect and reachable inside the app (guideline 5.1.1(i)) | — |
| Account deletion | “If your app supports account creation, you must also offer account deletion within the app” (5.1.1(v)) | — |
| EU trader status | Every developer declares it. Traders’ address, phone and email are shown on the product page in all 27 EU countries | — |
Apple’s current versions are Xcode 27 and iOS 27, both released on 14 September 2026. You don’t have to build with Xcode 27 yet, but you can no longer upload anything built with Xcode 16 or older (Apple jumped straight from Xcode 16 to 26 when it switched to year-based version numbers).
A note for German and EU developers: if you publish as a business, you’re a trader under the EU’s Digital Services Act, and Apple verifies your contact details before showing them on your product page. In February 2025, Apple pulled thousands of apps from EU storefronts for missing this information. Don’t be one of them.
App Store Connect, field by field
Create the app record in App Store Connect, then fill in:
- Bundle ID. A reverse-domain identifier that never changes, such as Stash’s
network.grahammiranda.stash. Pick it carefully. - Name (30 characters) and subtitle (30). Stash uses Stash — Find It Fast and Find anything you’ve put away: the brand plus the benefit, then the benefit in plain words.
- Keywords (100 characters), separated by commas without spaces. Don’t repeat words already in your name or subtitle; they count anyway.
- Promotional text (170 characters), which you can change without a new review, and the description (4,000).
- Screenshots. One to ten per device size, PNG or JPEG, no transparency. For iPhone, the 6.9-inch size (1320 × 2868) or the 6.5-inch size (1284 × 2778); for iPad, the 13-inch size (2064 × 2752). Stash’s set uses the 6.5-inch and 13-inch sizes.
- Category. A primary and an optional secondary. Stash is Productivity, with Utilities second.
- URLs. Support, marketing and privacy policy. Every one must work.
- App Privacy, the “nutrition label”. More on this below, because it’s where honest people still get it wrong.
- Age rating questionnaire.
- App Review information: contact details, notes for the reviewer and, if your app requires sign-in, a demo account. A guest mode like Stash’s makes the reviewer’s life easier.
- Export compliance. If your app only uses the encryption built into the operating system, such as HTTPS, it usually qualifies for an exemption. Check Apple’s guidance, then set
ITSAppUsesNonExemptEncryptionin your Info.plist so you’re not asked on every upload.
The text fields are good work for the agent too: “Draft the App Store subtitle, keywords, promotional text and description. Use only features that exist in the code; list the file where each feature lives.” That last instruction keeps it from inventing features.
TestFlight before anything else
Upload a build (from Xcode’s Organizer, or with eas build --platform ios --auto-submit on Expo) and test it through TestFlight first:
- Internal testers: up to 100 people on your team, no review needed.
- External testers: up to 10,000, invited by email or with a public link. The first external build goes through a short Beta App Review.
- Builds stay testable for 90 days.
Give it to five friends with different phones for a week. They’ll find the crash you didn’t.
What actually gets apps rejected
Apple says that “on average, 90% of submissions are reviewed in less than 24 hours”, and that “over 40% of unresolved issues are related to guideline 2.1: App Completeness”: crashes, placeholder content, incomplete information and broken links. The usual suspects for a first app:
| Guideline | What it means in practice |
|---|---|
| 2.1 App Completeness | No crashes, no “Lorem ipsum”, no dead links, demo account details if sign-in is required |
| 4.2 Minimum Functionality | “Your app should include features, content, and UI that elevate it beyond a repackaged website” |
| 4.8 Login Services | Third-party login as the main sign-in means you must also offer a privacy-focused option such as Sign in with Apple |
| 5.1.1(i) Privacy policy | Linked in App Store Connect and inside the app; says what you collect, who processes it, and how deletion works |
| 5.1.1(v) Account deletion | If people can create an account, they can delete it in the app |
| Accurate metadata | Screenshots and descriptions show what the binary actually does, not the roadmap |
Stash keeps its design explorations on the website, clearly labelled, and off the App Store page, which is the right side of that last line.
Privacy labels: get them right, not just plausible
Apple’s definition is precise: “‘Collect’ refers to transmitting data off the device in a way that allows you and/or your third-party partners to access it for a period longer than what is necessary to service the transmitted request in real time.” Data processed only on the device isn’t collected.
In practice, for a Stash-shaped app:
- Guest mode only (nothing leaves the phone): the data isn’t collected.
- Accounts with sync: the email address, the photos, the voice recordings and the notes stored on your backend are collected, because they leave the device and stay on a server, even though only the user can see them. They go in the label as data linked to the user, used for app functionality, and not used for tracking.
The agent is an excellent auditor here, because it can read every network call in the codebase:
Audit this codebase for every piece of data that leaves the device: what it is, where it goes (which SDK or endpoint), whether it’s stored, for how long, and whether it’s linked to the user. Include data sent by third-party SDKs. Output a table I can use to fill in Apple’s App Privacy questions and the Google Play Data safety form.
Then make sure three documents tell the same story: your privacy policy, your App Store privacy label and, if you ship on Android, your Google Play Data safety form. Stash’s privacy policy says its data table is written to match both store declarations, which is the right standard to hold yourself to.
Show Image Print it, stick it next to the screen, tick it before every first submission.
How Stash shipped
Stash 1.0 went live on 23 September 2026. Version 1.0.1, with “New Design and bug fixes”, followed on 2 October, nine days later. Ship the version that works, then improve it in public: that’s the healthiest rhythm I know for a first app.
Part 9 — “And Stuff”: The Launch Kit Around the App
An app on the App Store with nothing around it is a shop with no sign. Here’s the rest of the kit, again using Stash as the example.
A landing page with a demo people can touch
Stash’s website does a few things I’d copy for any first app:
- One promise above the fold. “Put it away. Know where.” Then one sentence and two buttons: get the app, or try it in the browser.
- A live preview in the hero. The phone on the right isn’t a picture. You can tap around in it.
- A real browser demo. A sample home where you can search for the keys, browse rooms and add a test item. The demo “runs in your browser tab”, doesn’t touch the app’s data, and forgets everything when you reload. It lets people try the idea before they commit to an install.
- Three steps, four features, no jargon. Photograph the spot. Give it a name and a room. Find it when you need it.
- The design explorations, clearly labelled as concepts rather than features.
- Ten languages (English, German, French, Spanish, Italian, Dutch, Brazilian Portuguese, Polish, Swedish and Danish), each with proper
hreflangtags so search engines show the right one, plus a light and dark appearance switch. - Structured data describing the app as a
MobileApplication, with its price, platforms and App Store link, so search engines understand the page is about an app. - Nothing creepy. The site’s code has no analytics, no advertising pixels, no social embeds, no external fonts, no sign-in and no contact form. It stores only your chosen language and appearance in your browser.
Show Image The Stash landing page. The phone on the right is a working demo, not a screenshot.
A static page like this is also a perfect first project for the same OpenCode and M3.1 setup: plain HTML, CSS and a little JavaScript, no framework required, and you can see every change in a browser instantly.
Legal pages, if you’re in Germany or the EU
This is general information from someone who has been through it, not legal advice. When in doubt, ask a lawyer.
Shipping from Germany means a few more pages than a US tutorial will tell you about:
- An Impressum (imprint) under § 5 of the Digitale-Dienste-Gesetz (DDG), the German law that replaced the old Telemediengesetz in 2024: company name, address, managing director, register entry, contact details and, where you have one, the VAT ID.
- Two separate privacy texts. One for the website and one for the app, because they process different data. Stash has both, and each says clearly which one you’re reading.
- An app privacy policy with real substance. Stash’s covers the controller, a table of exactly what’s collected and why, the legal basis for each purpose under Article 6 GDPR, the processors involved (Firebase, from Google), how international transfers are covered (the EU-U.S. Data Privacy Framework and standard contractual clauses), retention and deletion, users’ rights, the responsible supervisory authority, children, security and how changes are announced.
- A way to delete an account outside the app. Stash offers a web form as well as the in-app option. Google Play requires a web link for account deletion if your app lets people create accounts, so you’ll need one anyway the day you ship on Android.
- The data processing terms with your backend provider, accepted in its console before real user data arrives.
Cookies are the other classic headache. Stash’s website sidesteps most of it by having nothing to ask consent for: no analytics, no ad pixels, no tracking, just a remembered language and theme. The cheapest consent banner is the one you never need.
App Store optimisation without the snake oil
App Store search works on your name, subtitle and keywords, and people decide in seconds from your icon and first screenshots. A few rules that hold up:
- Name: brand plus benefit. “Stash — Find It Fast” tells a stranger what the app is for.
- Screenshots tell a story, in order. Stash’s six read like a short ad: Everything has a place. Find it. In seconds. Save the spot. Your home. Room by room. Remember the little details. Clear. In every light. Plenty of people never scroll past the first two or three, so put the core loop there.
- Localise the listing in every language your app actually supports.
- Ask for ratings at a happy moment. Apple’s review prompt can appear at most three times a year per user, so don’t waste it on first launch. In an app like Stash, the obvious moment is just after someone taps “Found it”.
- Use promotional text for seasons. Spring cleaning, moving house, putting the winter things away. It changes without a new review.
Android, when you’re ready
If you built with Expo or Flutter, Android is mostly a build away. The paperwork is lighter but different:
- Google Play charges $25 once to open a developer account.
- New personal accounts (created after 13 November 2023) must run a closed test with at least 12 testers, opted in for 14 days in a row, before they can publish. Organisation accounts are exempt, which is one more reason to publish through a company if you have one.
- The Data safety form is Google’s version of the privacy label. Keep it consistent with your privacy policy and your App Store answers.
Part 10 — What It Costs to Build an App With AI in 2026
The software in this stack is mostly free. What you pay for is the model, the Apple membership and, optionally, a better Figma seat.
| Item | List price | When you need it |
|---|---|---|
| Apple Developer Program | $99 a year (€99 in Germany) | To publish on the App Store at all |
| OpenCode v2 | Free, MIT licence | Always |
| MiniMax M Plan | Go $22, Explore $55, Build $132 a month (50% off the first month on monthly billing until 14 October) | To use M3.1-Flash-Preview |
| Figma | Starter free; Professional Dev seat $12 a month, Full seat $16 | A paid seat only for the desktop MCP server |
| Xcode | Free | Native builds, on an Apple silicon Mac |
| Expo EAS | Free tier with 15 iOS and 15 Android builds a month; Starter $19 a month | If you build with Expo |
| Firebase | Free Spark plan; Blaze is pay-as-you-go with no-cost quotas | Accounts and sync; Storage and Functions need Blaze |
| Google Play | $25, once | Only if you ship on Android |
| Landing page | Whatever your hosting and domain cost | Strongly recommended |
Three realistic first-year budgets
| Budget | What’s in it | First year |
|---|---|---|
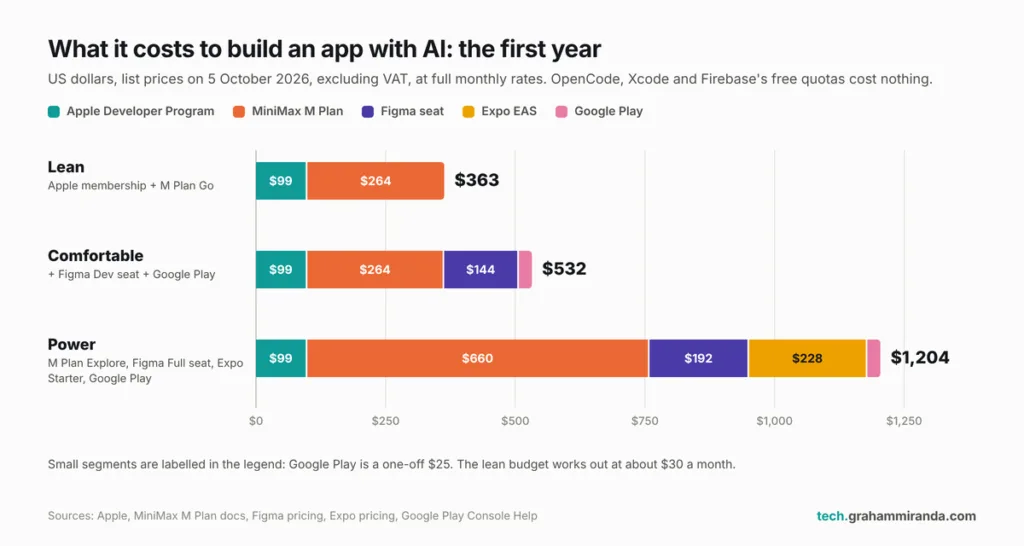
| Lean | Apple membership + M Plan Go; Figma Starter with exported frames; Expo, Firebase and OpenCode on free tiers | $363 |
| Comfortable | Lean + a Figma Dev seat for the desktop MCP server + Google Play | $532 |
| Power | Apple + M Plan Explore + a Figma Full seat + Expo Starter + Google Play | $1,204 |
Show Image The model subscription is the biggest line in every budget. The Apple fee is the only one you can’t avoid.
List prices in US dollars on 5 October 2026, excluding VAT, at full monthly rates (no launch discounts). Your backend bill depends on your users; at small scale, Firebase’s no-cost quotas usually cover it. Set a budget alert anyway.
The lean budget works out at about $30 a month. The real cost of the project isn’t on the list, though: it’s your evenings. AI shortens the typing, not the thinking, and the thinking is most of it.
Part 11 — Ten Mistakes to Avoid When You Build Your First App With AI
- Starting with code instead of a brief. The agent will happily build the wrong app very quickly.
- Building everything at once. “Make the whole app” gives you a whole app that’s slightly broken everywhere. Build vertical slices.
- Skipping AGENTS.md. Without it, every session starts from zero, and the agent re-decides things you already decided.
- Letting the agent add dependencies freely. Every package is code you didn’t read, extra app size and a future update to manage. Make it ask.
- Hard-coding colours and sizes. Then changing the design means editing 140 files. Tokens, always.
- Believing “done”. Agents report success optimistically. Run it on a real phone, in airplane mode, in dark mode, at the largest text size.
- Putting secrets in the app. Anything inside an app bundle can be extracted. API keys that cost money, or give admin access, live on a server.
- A privacy label that’s plausible rather than accurate. If data leaves the device and stays on a server, it’s collected, even when only the user can see it.
- Forgetting account deletion. Apple requires it in the app if you allow sign-up; Google Play requires a web link as well.
- Promising your roadmap. Screenshots and descriptions show what the app does today. Concepts belong on your website, labelled as concepts.
And one more for luck: not reading the diff. Vibe coding means not writing every line. It doesn’t mean not reading the lines that ship. The security numbers in my State of AI 2026 round-up are the reason.
Part 12 — Should You Use This Exact Stack? Six Scenarios
1. “I’ve never written a line of code.”
Expo, the OpenCode desktop app, M3.1 on the M Plan’s Go tier, and Figma’s free plan with exported frames. Keep your first app to one core loop, like Stash’s save-and-find. Leave shell commands on ask, commit after every working step, and use /undo without guilt.
2. “I only care about the iPhone, and I want it fully native.”
SwiftUI in Xcode 27, with OpenCode either inside Xcode through ACP or in your terminal with Xcode’s MCP tools. M3.1 for planning and building. You’ll get first access to Apple’s newest frameworks and the tightest integration with the system.
3. “I already pay for Claude or ChatGPT.”
Use what you have, and be fair about where it wins. Claude Code, Codex and Cursor are on Figma’s approved list for the remote MCP server today, including the write-to-canvas tools that OpenCode can’t reach yet. OpenCode can sign in with ChatGPT Plus or Pro directly. Add M3.1 through OpenCode for the jobs where its million-token context and video input shine.
4. “I want the cheapest possible start.”
MiniMax M3 instead of M3.1 (through OpenCode Go at $10 a month, or pay-as-you-go), Figma Starter, Expo’s free builds and Firebase’s free plan. The $99 Apple membership is the only cost you can’t avoid for an iPhone app. If you’re not ready for that, build the web version first.
5. “My app handles sensitive data.”
Design for guest mode first, keep third-party SDKs to a minimum, and think about where your code goes, too. Your prompts and source code go to the model provider. For very sensitive projects, local models through Ollama keep everything on your own machine (my OpenCode v2 article covers that setup), and get a privacy professional to review the app before launch.
6. “I build apps for clients.”
A Figma Organization plan with Code Connect, OpenCode’s policies to control which providers each client project may use, an M Plan tier with room for several parallel agents, and paid EAS builds. Put each client’s design rules in a committed skill or AGENTS.md so every session and every teammate starts from the same rules.
Part 13 — What to Watch Over the Next Few Months
- MiniMax’s full M3.1. Whether it ships, whether it gets a per-token price, published benchmarks and open weights like M3, and whether the Flash preview reaches OpenRouter, OpenCode Go or Ollama Cloud.
- OpenCode on Figma’s allowlist. OpenCode’s pull request for a registered Figma client is waiting on Figma. When it lands, the remote server’s write tools open up to OpenCode users.
- Figma’s write-to-canvas pricing. Figma says those features are free during the beta and will become usage-based later.
- Figma Code Layers, previewed at Config, which promises design and code on the same canvas.
- OpenCode v2 maturing: session sharing coming back, plugins catching up, and the 2.0.x releases settling down.
- Apple’s next SDK deadline. If Apple follows its usual pattern, builds made with Xcode 27 will become mandatory for uploads around next spring.
- Stash itself. The three design explorations on its website (pinning the exact spot, Quick Move, boxes and labels) show where the ideas are heading.
Frequently Asked Questions
Can I build an app from scratch with no coding experience?
Yes. In 2026, an AI coding agent such as OpenCode, paired with a strong model such as MiniMax M3.1, writes the code while you make the decisions: what the app does, how it looks, what data it stores and how you test it. You still need to learn how to read a plan, review a diff, test on a real device and handle App Store Connect. Start with an app that has one core loop and no payments.
How long does it take to build an app with AI?
It depends far more on scope than on tools. A small app with one core loop, like a save-and-find app, is a matter of weeks of evenings rather than months, if you build in vertical slices and test as you go. Publishing adds a few days for TestFlight and App Store paperwork; Apple says 90% of submissions are reviewed in under 24 hours.
What is MiniMax M3.1?
MiniMax M3.1 is the next generation of MiniMax’s M3 model family. As of October 2026, the only version you can use is MiniMax-M3.1-Flash-Preview, launched on 27 September 2026: a multimodal coding model with a 1,000,000-token context window, text, image and video input, always-on thinking and five effort levels from low to max. It’s available only through MiniMax’s M Plan subscription and the MiniMax Code app.
Is MiniMax M3.1 available through the API?
Only with a subscription key. M3.1-Flash-Preview works on MiniMax’s OpenAI-compatible and Anthropic-compatible endpoints, but only with an M Plan subscription key. There’s no pay-as-you-go price, no open weights and no listing on OpenRouter, Ollama Cloud or OpenCode Go yet. MiniMax M3 remains available pay-as-you-go at $0.30 per million input tokens and $1.20 per million output tokens.
How do I use MiniMax M3.1 in OpenCode?
Install OpenCode v2, start it in your project folder, run /connect, choose “MiniMax Token Plan (minimax.io)” and paste your M Plan subscription key. Then run /models and select MiniMax-M3.1-Flash-Preview. No config file is needed, though a project opencode.jsonc lets you set effort levels per agent and add permissions.
Does the Figma MCP server work with OpenCode?
Partly. Figma’s remote MCP server only accepts approved clients during its beta, and OpenCode isn’t on the list yet, so connecting fails with an HTTP 403. Figma’s desktop MCP server does work: enable it in Dev Mode in the Figma desktop app and point OpenCode at http://127.0.0.1:3845/mcp. It requires a Dev or Full seat on a paid plan and offers mostly read-only tools.
Do I need a Mac to build an iPhone app?
Not necessarily. Native development with Xcode needs a Mac, and Xcode 27 requires Apple silicon. With Expo, EAS builds your iOS app in the cloud and EAS Submit uploads it to App Store Connect from macOS, Windows or Linux. You’ll still want an iPhone for testing, and you need an Apple Developer Program membership to publish.
How much does it cost to publish an app on the App Store?
The Apple Developer Program costs $99 a year, or the local equivalent (€99 in Germany). Apple doesn’t charge per app or per submission. Building costs depend on your tools; the lean setup in this guide comes to about $363 for the first year including a MiniMax M Plan subscription, with free tiers for OpenCode, Figma, Expo and Firebase.
How long does App Store review take?
Apple says that on average 90% of submissions are reviewed in less than 24 hours. The most common reason apps get stuck is guideline 2.1, App Completeness: crashes, placeholder content, incomplete review information and broken links, including the support and privacy policy URLs.
Should I use SwiftUI, React Native (Expo) or Flutter?
Use SwiftUI with Xcode 27 if your app is Apple-only and you want the newest platform features. Use Expo (React Native) if you want one codebase for iPhone and Android and you’re working alone: SDK 56 supports iOS 16.4 and later, has stable iOS widgets and can build in the cloud. Use Flutter if you or your team already know Dart.
What’s the difference between MiniMax M3 and M3.1?
MiniMax M3, released on 1 June 2026, is generally available with open weights, published benchmarks and per-token pricing, and runs on many providers. M3.1-Flash-Preview, released on 27 September 2026, is a subscription-only preview with no weights, price or benchmarks yet, always-on thinking and five effort levels. Both have a 1M-token context and accept text, images and video.
What is Stash?
Stash — Find It Fast is a free iPhone and iPad app from Graham Miranda UG that remembers where you put things. You photograph the spot, give the item a name and a room, and search for it later by name, room, note or transcribed voice note. It also offers reminders for seasonal items, widgets, offline use and sync between iPhone and iPad. It launched on the App Store on 23 September 2026.
Does Stash collect my data?
Stash has no ads, no analytics tracking and doesn’t sell data. In guest mode, without an account, your rooms, items, photos and voice notes stay on your device. If you create an account, they sync through Google Firebase so they’re available on your iPhone and iPad, isolated from other users, and you can delete your account and data from Settings or through a web form.
The Bottom Line
Building an app from scratch in 2026 is no longer a question of whether you can write the code. An agent like OpenCode v2, running a model like MiniMax M3.1, will write more code in an afternoon than you’d read in a week. The real work has moved to the edges: deciding what the app is, designing it carefully enough that an agent can’t misread it, testing it like a sceptic, and doing the unglamorous paperwork that turns a project folder into something a stranger can download.
The stack in this guide is the one I’d recommend today. Figma for decisions you can see. OpenCode v2 because it’s open, scriptable, careful with permissions and loyal to no single model. MiniMax M3.1 because a million tokens of context and video input suit app building unusually well, as long as you treat a preview like a preview. And the “stuff” (Firebase, TestFlight, privacy labels, a landing page, legal pages) because that’s what users actually meet.
Stash is what that looks like when it ships: one small promise, kept well. Download Stash on the App Store, or try the browser demo first. Then go and build yours.
Building your first app with AI? I’d like to hear which framework you picked, whether you got Figma’s MCP server talking to your agent, and how MiniMax M3.1 is treating you. Corrections and counter-evidence are welcome; this article gets updated when the picture changes.
Disclosure: Stash is my own app, published by my company, Graham Miranda UG. It’s free, with no ads and no in-app purchases. There are no affiliate links in this article, and none of the companies mentioned sponsored or reviewed it before publication.
Last updated: 5 October 2026.