 Italiano
  English
  Deutsch
  Español
  Français
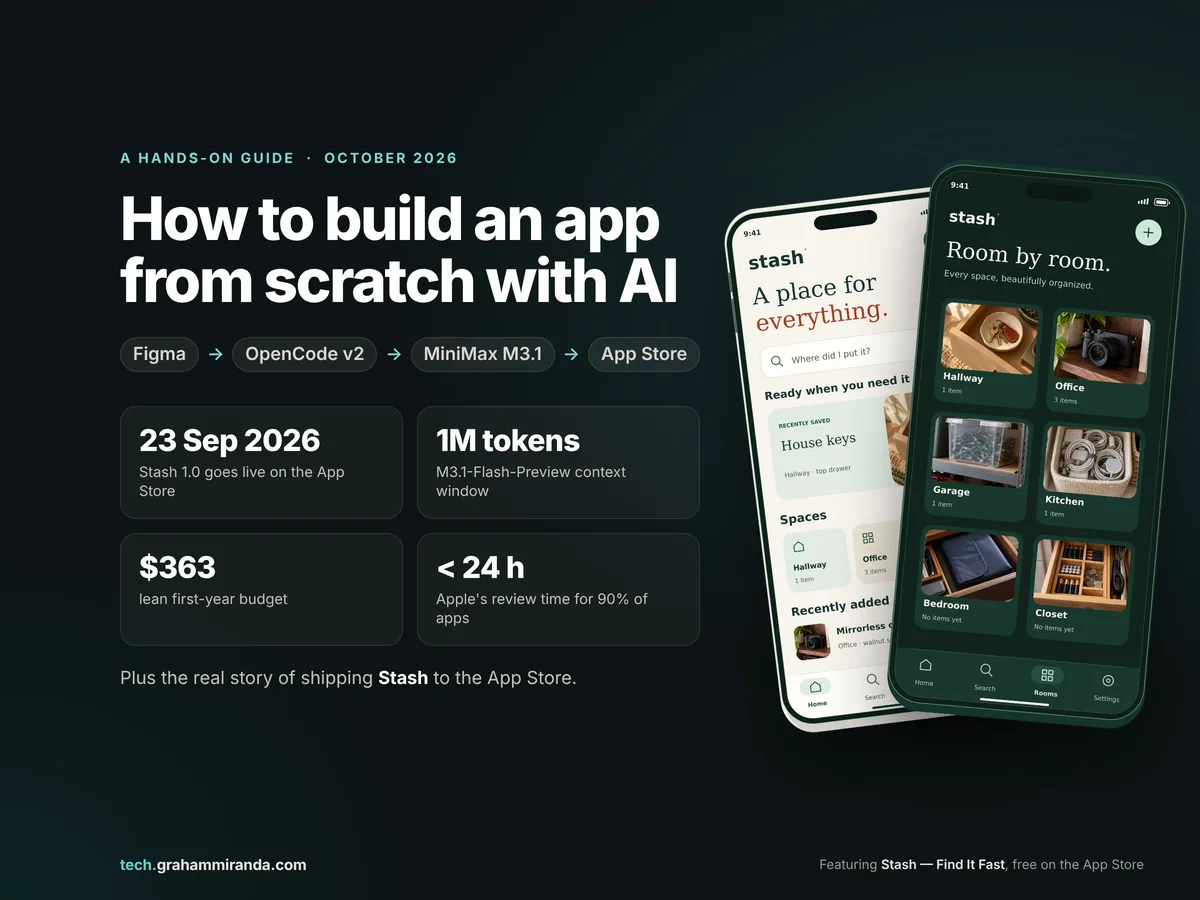
In ogni casa c'è un cassetto che “divora” le cose. Chiavi, il caricabatterie di riserva, il passaporto che ti serve due volte all'anno. Ci metti qualcosa "per sicurezza" e, tre mesi dopo, ti ritrovi in ginocchio a svuotare un intero armadio sul pavimento. Questa è una guida completa a Come creare un'app da zero con l'IA nel 2026, raccontato attraverso l'app che ho creato per riparare quel cassetto.
Stash è la mia risposta a quel cassetto. È una piccola e intuitiva app per iPhone e iPad: scatti una foto del punto in cui hai riposto qualcosa, le dai un nome e indichi in quale stanza si trova, e quando ne hai di nuovo bisogno, la cerchi. L’idea è proprio questa. È stata pubblicata sull’App Store il 23 settembre 2026. È gratuita e non contiene pubblicità.
Non ho una formazione nel campo della programmazione. Tutto ciò che realizzo, lo realizzo con agenti di intelligenza artificiale e, nell’ultimo anno, gli strumenti per farlo sono passati dall’essere una “bella demo” a diventare “qualcosa che si può davvero lanciare sul mercato”. Questa guida è quindi innanzitutto pratica: illustra ogni passaggio, da una cartella vuota a una scheda live sull’App Store, utilizzando Stash come esempio pratico per tutto il percorso.
Questa è la pila di libri che consiglierei a chiunque iniziasse oggi. Figma per il progetto. OpenCode v2 come agente codificante. MiniMax M3.1 come il modello che svolge il lavoro di elaborazione (a rigor di termini, M3.1-Flash-Preview, lanciato il 27 settembre, e spiegherò perché questa distinzione è importante). Poi tutte quelle “cose” che non compaiono mai nei tutorial su YouTube: il backend, l’informativa sulla privacy, App Store Connect, gli screenshot, la revisione, la landing page, le pagine legali e quanto costa tutto questo.
Tutto ciò che è riportato qui è stato verificato confrontandolo con la documentazione ufficiale, le note di rilascio e lo stesso App Store su 5 ottobre 2026. Alcune informazioni risulteranno obsolete nel giro di poche settimane. Il nuovo modello di MiniMax è solo un’anteprima, OpenCode rilascia aggiornamenti quasi ogni giorno e Figma sta ancora decidendo quali agenti di programmazione potranno connettersi al proprio server MCP. Ho segnalato le parti soggette a modifiche man mano che procedevo.
Informativa: Stash è la mia app, pubblicata dalla mia azienda, Graham Miranda UG. È gratuita, senza pubblicità né acquisti in-app. Questo articolo non contiene link di affiliazione. MiniMax, il team di OpenCode presso Anomaly, Figma, Apple, Google ed Expo non l’hanno sponsorizzato, revisionato né approvato.
TL;DR — La versione in 60 secondi
- Nel 2026 sarà possibile creare un’app vera e propria partendo da zero grazie all’intelligenza artificiale, ma oggi “partendo da zero” significa prendere decisioni, non digitare. L'agente si occupa della scrittura del codice. A te spettano il brief, la progettazione, il modello di dati, la politica sulla privacy, i test e le pratiche burocratiche relative all'App Store.
- Lo stack: Figma (schermate e variabili di progettazione) → OpenCode v2 (agente open source, licenza MIT) → MiniMax M3.1-Flash-Preview (contesto da 1 milione di token, legge testo, immagini e video, cinque livelli di difficoltà) → una build Expo o Xcode → TestFlight → l’App Store. Firebase se servono account e sincronizzazione.
- “Oggi ”MiniMax M3.1” indica M3.1-Flash-Preview. È stato lanciato il 27 settembre 2026 ed è disponibile esclusivamente tramite l’abbonamento M Plan di MiniMax ($22, $55 o $132 al mese, con 50% in omaggio sul primo mese con fatturazione mensile fino al 14 ottobre) e tramite l’app MiniMax Code. Non è previsto un prezzo per token, né pesi aperti, né un benchmark pubblicato al momento. Il pensiero non può essere disattivato e lo sforzo è impostato di default al massimo.
- Funziona in OpenCode v2 senza un file di configurazione:
/connect→ “Piano MiniMax Token (minimax.io)” → incolla la tua chiave di abbonamento →/models→MiniMax-M3.1-Anteprima Flash. - L'aspetto di Figma di cui nessuno parla: Il server MCP remoto di Figma non supporta ancora OpenCode. Durante la fase beta è consentito l'accesso solo agli utenti presenti nella lista bianca. Utilizza Figma’s desktop Server MCP all'indirizzo
127.0.0.1:3845oppure (è necessaria l'app desktop di Figma e un abbonamento a pagamento di tipo Dev o Full, a partire da $12 al mese), oppure fornire all'agente i fotogrammi esportati, che M3.1 è in grado di leggere. - La spedizione è un progetto a sé stante: $99 all’anno per l’Apple Developer Program (99 € in Germania), build realizzate con Xcode 26 o versioni successive, un’informativa sulla privacy, etichette sulla privacy che rispecchino la realtà, la possibilità di cancellare l’account dall’app se si offrono account e i dati identificativi del commerciante nell’UE. Apple afferma che il 90% delle richieste viene esaminato entro 24 ore.
- Stash in cifre: disponibile dal 23 settembre 2026, versione 1.0.1 con un nuovo design dal 2 ottobre, gratuita, compatibile con iOS e iPadOS 16.4 o versioni successive, circa 64 MB, senza tracciamento e con una modalità ospite che mantiene tutti i dati sul dispositivo.
- Quanto costa: a proposito di $363 per il primo anno con la configurazione essenziale (abbonamento Apple più M Plan Go), circa $500 con una licenza Figma Dev. I costi per il backend partono da zero grazie alle quote gratuite di Firebase.
- La regola più importante: “Fatto” è un’affermazione, non un dato di fatto. Prova l’app su un telefono vero, in modalità aereo, in modalità scura e con VoiceOver attivato. Solo allora potrai crederci.
Panoramica su The Stack
| Strato | Strumento | Il suo ruolo in questo flusso di lavoro | Costo (ottobre 2026) |
|---|---|---|---|
| Progettazione | Figma | Schermate, componenti, variabili di colore e tipo, prototipo cliccabile | Piano Starter gratuito; una licenza Dev a partire da $12 al mese sblocca il server MCP desktop |
| Ponte tra progettazione e codice | Server Figma MCP (desktop) | Invia all'agente i frame, le variabili e gli screenshot | In dotazione con il sedile |
| Agente di codifica | OpenCode v2 | Crea progetti, modifica file, esegue comandi e test; tramite terminale, app desktop o all’interno di Xcode 27 | Gratuito, licenza MIT |
| Modello | MiniMax M3.1 - Anteprima Flash | Il cervello responsabile della progettazione e della programmazione; analizza screenshot e registrazioni dello schermo | Piano M a partire da $22 al mese |
| Framework dell'app | Expo SDK 56 (iPhone + Android) oppure SwiftUI con Xcode 27 (solo Apple) | L'app stessa | Gratuito; il piano gratuito di Expo include 15 build cloud per iOS e 15 per Android al mese |
| Backend | Firebase (Auth, Firestore, Storage, Functions, Messaging) | Account, sincronizzazione, archiviazione delle foto, notifiche | Quote gratuite; per lo storage e le funzioni è necessario il piano Blaze con pagamento a consumo |
| Distribuzione | App Store Connect + TestFlight | Test beta, revisione, rilascio | $99/anno Programma per sviluppatori Apple |
| Lancio | Una pagina di destinazione statica e le pagine legali | Spiegare, mostrare, rispettare | A prescindere dai costi di hosting |
I prezzi indicati sono quelli di listino al 5 ottobre 2026, IVA esclusa. Le condizioni di abbonamento cambiano spesso, quindi ti consigliamo di verificarle prima dell'acquisto.
Indice
- Parte 1 — Scopri Stash: l’app su cui si basa questa guida
- Parte 2 — Lo stack del 2026 per sviluppare un'app da zero con l'IA
- Parte 3 — MiniMax M3.1: una spiegazione sincera
- Parte 4 — Configurazione di OpenCode v2 con MiniMax M3.1, passo dopo passo
- Parte 5 — Progettare la propria app in Figma anche se non si è designer
- Parte 6 — Collegamento di Figma a OpenCode: il problema dell’MCP
- Parte 7 — Come creare un'app da zero, fase per fase
- Parte 8 — Come pubblicare un'app sull'App Store nel 2026
- Parte 9 — “E altro”: Il kit di lancio relativo all’app
- Parte 10 — Quanto costa sviluppare un'app con l'IA nel 2026
- Parte 11 — Dieci errori da evitare quando si sviluppa la propria prima app con l'IA
- Parte 12 — È consigliabile utilizzare proprio questa combinazione? Sei scenari
- Parte 13 — Cosa tenere d’occhio nei prossimi mesi
- Domande frequenti
- In sintesi
- Fonti
Parte 1 — Scopri Stash: l’app su cui si basa questa guida
Prima degli strumenti, l’esempio. Una guida alla creazione di app vale solo quanto l’app che permette di realizzare, quindi ecco esattamente cos’è Stash, basandomi sulla sua scheda nell’App Store e sulla sua informativa sulla privacy piuttosto che sul mio entusiasmo.
L'annuncio si apre con una frase che riassume il lavoro: “Non dovrai mai più mettere la casa sottosopra per cercare qualcosa.” Poi descrive l'intero prodotto in tre frasi: “Stash è il modo più veloce per ricordarsi dove si mettono le cose. Scatta una foto, scegli la stanza, salva. L’app è tutta qui.”
Quell'ultima frase rappresenta le linee guida di progettazione. Ogni elemento dell'app serve a velocizzare il salvataggio o la ricerca. Tutto ciò che non soddisfa questi due requisiti non deve essere incluso.
Cosa fa Stash
| Caratteristica | Cosa fa | Perché è importante |
|---|---|---|
| Foto del luogo | Si fotografa il cassetto, il ripiano o la scatola, non l'oggetto | I luoghi si ricordano visivamente; una foto del luogo è il ricordo stesso |
| Nome, stanza, punto esatto, nota | “Chiavi di casa · Corridoio · primo cassetto · nel piattino di ceramica a sinistra” | Quattro campi brevi sono meglio di un saggio in formato testo libero che non riuscirai mai a cercare bene |
| Note vocali, trascritte | Scrivi una breve nota; Stash la trasforma in testo ricercabile | Più veloce che digitare quando hai le mani occupate |
| Ricerca | Per nome dell'oggetto, stanza, nota o parole che hai registrato, con un filtro per gli oggetti che hanno delle foto | Il punto forte dell'app è proprio quel momento in cui hai bisogno di qualcosa |
| Camere | Esplora la tua casa una stanza alla volta | Perché quando non ti ricordi il nome, ma solo più o meno dove si trova |
| “Trovato!” | Basta un tocco quando lo hai recuperato | Chiude il ciclo |
| Promemoria | Gli articoli stagionali tornano a farsi vedere proprio quando ne hai bisogno | Pneumatici invernali, luci natalizie, attrezzatura da campeggio |
| Widget | Widget della schermata iniziale e della schermata di blocco | Due tocchi da “Dovrei ricordarmelo” a “Salvato” |
| Prima offline, poi sincronizza | Funziona anche senza segnale; si sincronizza tra iPhone e iPad se si dispone di un account | Nelle cantine e nei garage la ricezione è pessima |
| Aspetto | Chiaro, scuro o seguire il sistema | Sembra tranquillo anche alle 23:00 |
| Esporta ed elimina | Esporta i tuoi stash; elimina il tuo account dalle Impostazioni | I tuoi dati rimangono di tua proprietà, e Apple richiede il secondo |
Come appare
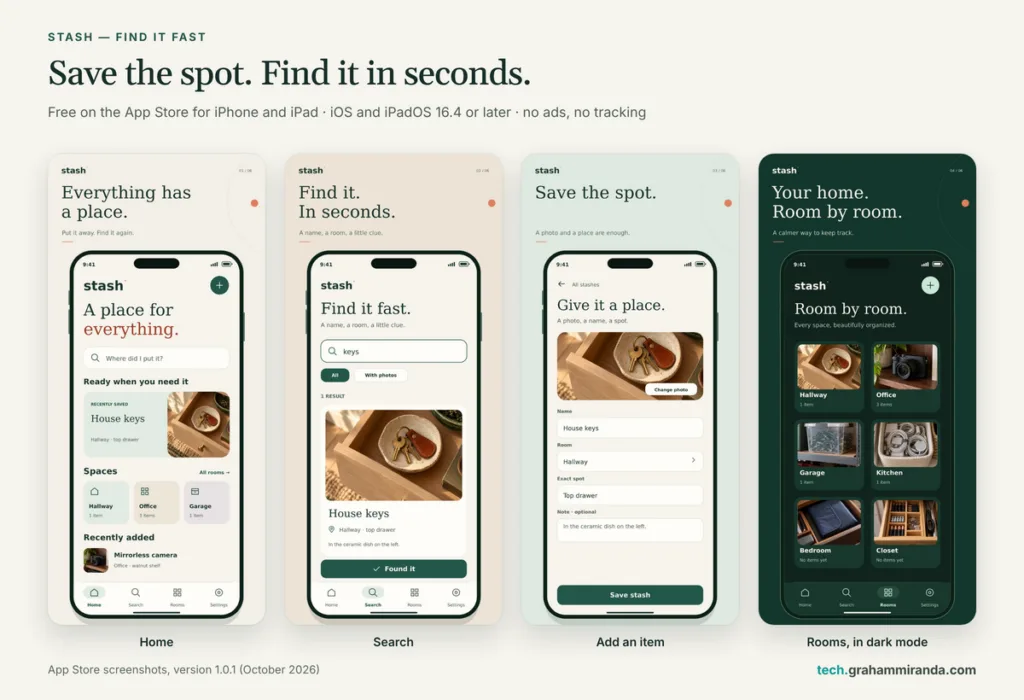
La direzione visiva è volutamente sobria: uno sfondo bianco sporco dai toni caldi, un verde bosco intenso, un unico accento color corallo, titoli in carattere serif e un semplice carattere sans-serif per tutto il resto. Le schermate dell’App Store raccontano la storia in sei titoli: Ogni cosa ha il suo posto. Trovalo. In pochi secondi. Conserva quel posto. La tua casa. Stanza per stanza. Ricorda i piccoli dettagli. Chiaro. Con qualsiasi luce.
Mostra immagine Stash su iPhone: salva il posto, ritrovalo in pochi secondi, sfoglia stanza per stanza. Chiaro o scuro, la stessa tranquillità.
Come vengono trattati i tuoi dati
Questo aspetto è più importante di qualsiasi altra funzionalità, quindi citerò testualmente l'informativa sulla privacy anziché parafrasarla:
- Modalità ospite: “Se non crei un account, le tue stanze, i tuoi oggetti, le tue foto e le tue note vocali rimangono sul tuo dispositivo e non vengono caricate.”
- Con un account: La sincronizzazione e il backup vengono eseguiti su Google Firebase (Autenticazione, Cloud Firestore, Cloud Storage, Cloud Functions e Cloud Messaging), con regole di sicurezza che garantiscono l'isolamento dei dati di ciascun utente.
- Nessun modello di business basato su di te: “Non mostriamo annunci pubblicitari, non effettuiamo attività pubblicitarie né di monitoraggio analitico, non creiamo profili utente e non vendiamo i tuoi dati.”
- Note vocali: Per trasformare una registrazione in testo ricercabile è possibile utilizzare il servizio di riconoscimento vocale integrato nel telefono (quello di Apple, su iOS).
- Cancellazione: Elimina il tuo account dalle Impostazioni o tramite un modulo web; le copie vengono rimosse dai backup entro 30 giorni.
Se avete letto il mio articolo su Perché il software "local-first" sta tornando in auge, ne riconoscerete la filosofia. L'app dovrebbe funzionare perfettamente anche senza il cloud. Il cloud è una comodità a cui si può scegliere di ricorrere.
Riquadro informativo
| Nome sull’App Store | Stash — Trovalo subito |
| Sottotitolo | Trova tutto quello che hai messo via |
| Prima versione | 23 settembre 2026 (versione 1.0) |
| Versione attuale | 1.0.1, rilasciata il 2 ottobre 2026: “Nuovo design e correzioni di bug.” |
| Prezzo | Gratuito, senza acquisti in-app |
| Requisiti | iOS o iPadOS 16.4 o versioni successive; funziona anche sui Mac con Apple Silicon e su Apple Vision Pro come app per iPad |
| Dimensioni | Circa 64 MB |
| Categoria | Produttività (elencata anche nella sezione "Utilità") |
| Classificazione per età | 4+ |
| Sviluppatore | Graham Miranda UG (a responsabilità limitata), Blankenburg (Harz), Germania |
| Sito web | stash.grahammiranda.network, in dieci lingue, con un demo del browser |
| Scarica | Scarica Stash dall'App Store |
Cosa non è (ancora) presente nell'app
Il sito web presenta una sezione intitolata Esplorazioni progettuali con tre idee: indicare il punto esatto su una foto, Trasloco veloce quando la posizione di un oggetto cambia, e scatole ed etichette così puoi vedere cosa c'è dentro una scatola senza aprirla. Il sito specifica chiaramente che “Queste idee fanno parte del concept interattivo, non sono funzionalità presenti nella versione disponibile sull’App Store.”
Mi piace questa distinzione e la consiglierei a chiunque stia sviluppando la propria prima app. Sperimentate liberamente con un prototipo. Pubblicate solo ciò che funziona. La pagina dell’App Store non dovrebbe mai promettere ciò che l’app non è in grado di fare. I revisori di Apple lo verificano, e lo stesso fanno gli utenti che vi assegnano una stella.
Perché questa è una buona struttura per una prima app
Se stai leggendo questo articolo perché vuoi creare la tua app, prendi spunto da Stash anche se non ti interessa la questione delle chiavi smarrite:
- Un ciclo principale. Prima salva, poi cerca. Tutto il resto è al servizio di questo ciclo.
- Dati generati dal dispositivo. Non serve alcun server fin dal primo giorno, quindi puoi lanciare il prodotto prima ancora di aver sviluppato il backend.
- Una manciata di vere funzionalità della piattaforma. La fotocamera, il microfono, le notifiche e i widget rappresentano la giusta dose di funzionalità “native” da imparare senza sentirsi sopraffatti.
- Un cloud opzionale. Le funzionalità relative agli account e alla sincronizzazione possono essere introdotte nella versione due senza dover riscrivere la versione uno.
- Niente feed, niente chat, niente pagamenti. Ognuno di essi costituisce un progetto a sé stante, con le proprie modalità di fallimento.
Un agente di intelligenza artificiale è in grado di costruire praticamente qualsiasi cosa tu riesca a descrivere. La difficoltà sta nel descrivere qualcosa di abbastanza piccolo da poter essere portato a termine.
Parte 2 — Lo stack del 2026 per sviluppare un'app da zero con l'IA
Tre strumenti, tre lavori distinti:
- È Figma a determinare l'aspetto dell'app.
- OpenCode stabilisce come viene svolto il lavoro: quali file leggere, quali comandi eseguire, cosa chiederti prima di compiere qualsiasi azione rischiosa.
- È MiniMax M3.1 a pensare Dietro le quinte di OpenCode: pianificazione, scrittura del codice, analisi degli screenshot, risoluzione dei problemi.
Mantenere separati questi compiti è la decisione architettonica più importante di tutta questa guida, e non ha nulla a che vedere con il codice. Quando il mese prossimo uscirà un modello migliore (e ne uscirà sicuramente uno), basterà modificare una riga in un file di configurazione. Quando uscirà uno strumento di progettazione migliore, al tuo agente non importerà nulla. Nulla è incastrato in modo rigido.
Perché OpenCode v2 è l'agente
OpenCode è un agente di programmazione basato sull'intelligenza artificiale open source, distribuito sotto licenza MIT. Basta indicargli la cartella di un progetto, descrivere ciò che si desidera e lui lavora proprio come farebbe uno sviluppatore: legge il codice, elabora un piano, modifica i file, esegue i comandi, analizza gli errori, li corregge e prosegue il lavoro.
La versione 2.0.0, frutto di una ricostruzione completa, è stata rilasciata l'11 settembre 2026, e il team aveva già pubblicato la versione 2.0.22 entro il 2 ottobre. Ho trattato in modo approfondito la ricostruzione nel mio Analisi approfondita di OpenCode v2, quindi ecco solo ciò che conta per sviluppare un'app:
- È indipendente dal modello. Oltre 75 fornitori tramite Models.dev, oltre a modelli locali. MiniMax è integrato.
- Un unico server di background condiviso. L'interfaccia del terminale, l'applicazione desktop, l'interfaccia utente del browser e le estensioni dell'IDE visualizzano tutte le stesse sessioni.
- Autorizzazioni che funzionano come un firewall. Un elenco ordinato di regole di autorizzazione, richiesta e rifiuto in cui prevale l'ultima corrispondenza, quindi “non eseguire mai
git push” e “non inviare mai all'App Store” sono una riga ciascuno. - Annulla ogni operazione. Istantanee prima e dopo ogni fase della modellazione, con
/undoe/redo. - Sottoagenti che puoi individuare e fermare, e le competenze che vengono caricate da
.opencode,.claudee.agenticartelle. - Funziona all’interno di Xcode 27. Il nuovo Xcode di Apple accetta qualsiasi agente che utilizzi il protocollo Agent Client Protocol, e
opencode acpfa proprio questo (come illustrato nella Parte 4).
La homepage conta ora 208.000 stelle su GitHub, 950 collaboratori e 16 milioni di sviluppatori al mese. Due avvertenze da tenere presenti, tratte dalla documentazione della v2: la condivisione delle sessioni non è ancora stata reintrodotta nella v2 e i plugin della v1 non vengono caricati.
Perché il MiniMax M3.1 è il modello ideale
La Parte 3 approfondisce l'argomento, ma in sintesi si tratta di tre proprietà che si rivelano particolarmente adatte alla creazione di app:
- Una finestra di contesto di 1.000.000 di token. Una piccola app, le relative note di progettazione, il file AGENTS.md e la documentazione pertinente rientrano tranquillamente in una sola sessione di lavoro, con ancora un po’ di margine.
- Legge immagini e video, non solo testo. Puoi allegare un frame di Figma, uno screenshot del simulatore o una registrazione dello schermo che mostra il bug.
- Cinque livelli di intensità, da
bassoamax, così il lavoro di pianificazione richiede una riflessione approfondita e quello tecnico viene svolto con rapidità.
Il rovescio della medaglia è che si tratta di un'anteprima senza benchmark pubblicati né prezzi per token, disponibile solo tramite l'abbonamento offerto da MiniMax. Tornerò su questo punto, perché non è un aspetto da sottovalutare.
Perché Figma è lo strumento di progettazione ideale
Figma rimane il punto di riferimento per la progettazione di app. Il piano Starter gratuito è sufficiente per progettare una prima app. Il suo variabili diventeranno i tuoi "design token", ovvero i colori, le spaziature e le dimensioni dei caratteri che garantiscono la coerenza su ogni schermata. E il suo Server MCP consente a un agente di codifica di leggere direttamente un fotogramma selezionato, il che è quanto di più vicino ci sia finora a una soluzione che permetta davvero di “farlo apparire così”.
In occasione di Config 2026 (dal 23 al 25 giugno a San Francisco), Figma ha inoltre reso disponibile Figma Agent per tutti i piani a pagamento in versione beta aperta, ha aggiunto una timeline per l’animazione e ha presentato in anteprima i “code layers”, che trattano il codice come un oggetto di primo livello sull’area di lavoro. Non serve nulla di tutto ciò per creare la tua prima app. È utile sapere in che direzione si sta andando.
E le “cose”
Le parti che nessuno inserisce nella miniatura:
| Cosa | Opzioni | Trattato in |
|---|---|---|
| Framework dell'app | Expo (React Native) per iPhone e Android; SwiftUI con Xcode 27 solo per Apple; Flutter | Parte 7 |
| Backend | Firebase è la soluzione predefinita più semplice per la gestione degli account, la sincronizzazione e l'archiviazione dei file | Parte 7 |
| Controllo delle versioni | Git, sempre. GitHub o piattaforme simili come backup | Parti 4 e 7 |
| Compilazioni e firma | Xcode su un Mac, oppure le build cloud EAS di Expo senza Mac | Parti 7 e 8 |
| Test e rilascio | TestFlight e App Store Connect | Parte 8 |
| Lancio | Una landing page, una demo, le pagine legali, l'ottimizzazione per l'App Store | Parte 9 |
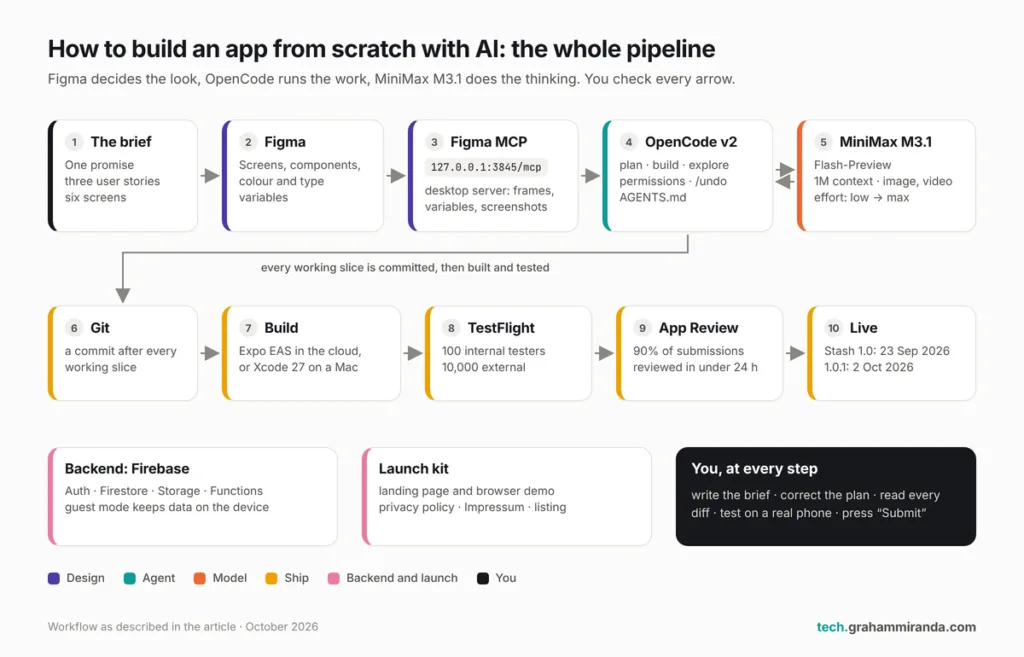
Mostra immagine L'intero flusso di lavoro in un'unica pagina. Ti trovi a sinistra (il brief), al centro (dove esamini ogni modifica) e a destra (dove clicchi su “Invia per la revisione”).
Cosa significa oggi “da zero”
Ecco la scomoda verità sullo sviluppo di un’app con l’intelligenza artificiale nel 2026: l’agente si occupa della parte che prima era difficile, lasciandoti quella che è sempre stata difficile.
| Possiedi | L'agente possiede |
|---|---|
| A cosa serve l'app e cosa non fa | Trasformare il tutto in file, componenti e funzioni |
| Le schermate e il sistema di progettazione | Attuarle, schermata per schermata |
| Il modello di dati: cosa viene archiviato, dove e per quanto tempo | Scrittura del codice relativo all'archiviazione, alla sincronizzazione e alla migrazione |
| L'informativa sulla privacy, le pagine legali e le risposte relative all'App Store | Verifica del codice per garantire l'accuratezza delle tue risposte |
| Test su dispositivi reali, con persone reali | Scrittura ed esecuzione di test automatizzati |
| Cliccando su “Invia” | Non premere mai “Invia” |
Se quella tabella ti rende un po’ nervoso, bene. È proprio quel nervosismo a distinguere un’app pronta per il lancio da una cartella piena di codice che funziona solo a metà.
Parte 3 — MiniMax M3.1: una spiegazione sincera
Se cercate “MiniMax M3.1” in questo momento, troverete articoli che ne parlano con sicurezza, pur trattandosi di un modello che, a rigor di termini, non è ancora stato lanciato sul mercato. Ecco cosa esiste davvero, cosa potete usare oggi e cosa nessuno sa ancora.
Ciò che esiste, in ordine
- 1° giugno 2026: MiniMax M3. Un modello a peso aperto, nativamente multimodale, con una finestra di contesto di 1 milione di token, una struttura di tipo “mixture-of-experts” con circa 428 miliardi di parametri totali e circa 23 miliardi attivi per token, e il sistema di attenzione sparsa proprietario di MiniMax. L’ho confrontato con GLM-5.3-Flash per OpenCode ad agosto, in GLM-5.3-Flash vs MiniMax M3.
- Luglio: “M3.1” diventa un nome. I resoconti provenienti dalla Conferenza mondiale sull’intelligenza artificiale di Shanghai hanno descritto un modello M3.1 con un contesto di un milione di token e capacità multimodali più avanzate. Non sono stati forniti né il nome del modello, né l’ID del modello, né il prezzo.
- 23 settembre: una modella misteriosa. Un modello anonimo denominato “Space Bunny Alpha” è apparso su OpenRouter e su OpenCode come anteprima gratuita, con un contesto di 1 milione e un ragionamento regolabile. L’analisi indipendente delle impronte digitali del tokenizzatore ha indicato MiniMax. MiniMax non ha confermato nulla, e la corrispondenza del tokenizzatore costituisce un indizio riguardo a una famiglia di modelli, non una prova.
- 27 settembre: Anteprima di MiniMax M3.1-Flash. Il primo modello con il marchio M3.1 accessibile a tutti, lanciato nell’app di programmazione di MiniMax, MiniMax Code, e tramite il suo abbonamento alla programmazione. MiniMax lo descrive come un modello per “Sviluppo quotidiano, veloce, affidabile e pronto per l’uso pratico, dalle rapide correzioni di bug alle funzionalità complete.”
- 30 settembre: il Piano M. MiniMax Code 3.1.0 è stato lanciato con un nuovo abbonamento denominato "M Plan", che sostituisce il "Token Plan" per i nuovi clienti a parità di prezzi.
La versione completa dell'M3.1 prevista per l'estate non è ancora stata rilasciata. Quando a ottobre 2026 si parlerà di “M3.1”, ci si riferirà all'M3.1-Flash-Preview, e lo stesso farò anch'io nel resto di questo articolo.
Mostra immagine Tutto ciò che è descritto in questo articolo è accaduto nell'arco di quattro mesi e mezzo, e sette di queste nove date ricadono nelle ultime cinque settimane.
MiniMax M3 vs M3.1 - Anteprima Flash
| MiniMax M3 | MiniMax M3.1 - Anteprima Flash | |
|---|---|---|
| Pubblicato | 1° giugno 2026 | 27 settembre 2026 |
| Stato | Disponibile al pubblico | Anteprima |
| ID modello | MiniMax-M3 | MiniMax-M3.1-Anteprima Flash |
| Finestra di contesto | 1 milione di token | 1.000.000 di token |
| Input | Testo, immagine, video | Testo, immagine, video |
| Riflessioni | Può essere attivato o disattivato | Sempre attivo. Cinque livelli di intensità: basso, medio, alto, xalto, max (impostazione predefinita max) |
| Pesi liberi | Sì, ai sensi della licenza MiniMax Community | Senza pesi, senza scheda del modello |
| Prezzo a consumo | $0,30 per milione di token in ingresso, $1,20 in uscita, $0,06 in cache; il doppio se l'ingresso supera i 512K | Non pubblicato. Solo per abbonati |
| Dove è possibile utilizzarlo | API MiniMax, OpenRouter, OpenCode Go, Ollama Cloud e molti altri host | Solo abbonamento al Piano M e codice MiniMax |
| Benchmark pubblicati | Sì, da MiniMax e da schede indipendenti | Nessuno |
| Architettura | ~428 miliardi in totale, ~23 miliardi attivi, MoE sparsa | Non divulgato |
| In OpenCode v2 | Integrato, tramite diversi fornitori | Integrato tramite “MiniMax Token Plan (minimax.io)” |
Istantanea tratta dalla documentazione di MiniMax e da Models.dev del 5 ottobre 2026. Le anteprime sono soggette a modifiche senza preavviso; si raccomanda di verificare prima di fare affidamento su qualsiasi riga.
Una cosa che vale la pena approfondire: i documenti dicono che il pensiero non può essere disattivato. Invia thinking.type: "disabled" o uno sforzo di nessuno, e l'API restituisce un errore 400 che, in sostanza, indica che il modello “richiede un pensiero flessibile.” Quello che puoi controllare è quanto intensamente ragiona.
Come ottenerlo: il Piano M
La documentazione di MiniMax è molto chiara riguardo all'accesso: “MiniMax-M3.1-Flash-Preview è disponibile, per il momento, solo tramite M Plan e MiniMax Code.”
| Livello M del piano | Prezzo | Cosa è incluso |
|---|---|---|
| Go | $22/mese | M3.1-Flash-Preview, oltre ai modelli audio e video di MiniMax |
| Esplora | $55/mese | Tutto ciò che riguarda Go, oltre al modello video H3 |
| Costruire | $132 al mese | Tutto ciò che offre Explore, con il pacchetto dati più ampio |
Alcuni dettagli che contano più dei prezzi indicati:
- Offerta di lancio: 50% di sconto sul primo mese con fatturazione mensile, fino al 14 ottobre 2026. È esclusa la fatturazione annuale. Dopo il primo mese, l’abbonamento si rinnova a prezzo pieno, a meno che non si disattivi il rinnovo automatico.
- Settimana gratuita: Tutti gli abbonati hanno avuto accesso illimitato a M3.1-Flash-Preview dal 1° al 7 ottobre (ora cinese). Se stai leggendo questo messaggio dopo il 7, l'offerta è ormai scaduta.
- È una chiave di abbonamento, non una chiave API. La documentazione di MiniMax indica chiaramente che le chiavi di abbonamento e le chiavi API pay-as-you-go non sono intercambiabili. Dovrai incollare la chiave di abbonamento in OpenCode.
- Quote, non misurazione. L'utilizzo è limitato a finestre mobili di cinque ore e settimanali, e la quota non utilizzata non viene riportata al periodo successivo. Per i livelli equivalenti del Token Plan, le indicazioni fornite da MiniMax erano di circa tre-quattro, quattro-cinque e sei-sette agenti attivi contemporaneamente.
- Abbonati al Piano Token esistente mantengono il loro piano. I nuovi clienti acquistano il Piano M.
- Strumenti supportati Nella pagina dedicata al piano M di MiniMax figurano Claude Code, Codex, Cursor, OpenCode, Hermes Agent e OpenClaw.
Codice MiniMax È un agente desktop per macOS e Windows, dotato di una modalità di programmazione e di una modalità “lavoro” dedicata alla ricerca e alla gestione dei documenti, oltre a una versione da riga di comando. È un ottimo modo per provare il modello. Utilizzo OpenCode perché non mi vincola a nessun produttore di modelli in particolare, il che è proprio il punto centrale della Parte 2.
Perché è adatto allo sviluppo di app
- La finestra di contesto cambia il tuo modo di lavorare. Una piccola app mobile richiede poche migliaia di righe di codice, forse qualche decina di migliaia. Con un milione di token, l’agente può contenere contemporaneamente l’intero codice sorgente, il file AGENTS.md, il modello di dati e una parte della documentazione della piattaforma. Meno momenti del tipo “Non ricordo più cosa avevamo deciso”. (La guida OpenCode di MiniMax limita la finestra a 512K nella sua configurazione di esempio, che io consiglierei di copiare. Contesti più brevi significano risposte più veloci.)
- Mostralo, non descriverlo. Dato che supporta immagini e video, puoi inserire un frame esportato da Figma, uno screenshot dal simulatore iOS o una registrazione dello schermo che mostra il bug in cui la tastiera copre il pulsante “Salva”. Già solo quest’ultima opzione ti fa risparmiare un’enorme quantità di digitazione.
- L'impegno è come una manopola, non come un interruttore.
maxper pianificare una funzionalità o risolvere un bug di sincronizzazione.bassofidomedioper rinominare elementi, scrivere test e tradurre stringhe. La Parte 4 illustra come configurare tali impostazioni per ciascun agente. - Il costo è fisso. Per chi sviluppa da solo, una fattura mensile prevedibile è preferibile al dover tenere d’occhio un contatore a token durante una lunga sessione di debug.
Uno dei primi test indipendenti ha rilevato una velocità compresa tra circa 90 e 110 token al secondo il primo giorno. Si tratta di una singola misurazione, non di un benchmark, ma è in linea con il nome “Flash”.
Quello che nessuno sa ancora
Questa è la parte che la maggior parte degli articoli sull’M3.1 tralascia:
- Non ci sono parametri di riferimento. Non da MiniMax, né dai forum indipendenti, perché un modello accessibile solo tramite l’abbonamento di una singola azienda è difficile da testare in modo indipendente. Il punto di riferimento sei tu. Assegna al modello un compito reale tratto dal tuo progetto, affida lo stesso compito a un modello di cui ti fidi già e confronta i risultati.
- Non esiste un prezzo per singolo token. Va bene nell'ambito di un abbonamento. Il problema sorge se si vuole eseguire il modello in CI o in un prodotto, dove è necessario sapere quanto costa un milione di token.
- È un'anteprima. Può cambiare comportamento, essere rinominato o sostituito dalla versione completa M3.1 senza preavviso. Conserva l'ID del modello in un unico file di configurazione, in modo che sostituirlo richieda solo una riga di modifica.
- Il pensiero non si ferma mai. Anche le richieste più banali comportano un certo sforzo di elaborazione. Riducete lo sforzo richiesto per i compiti di minore entità.
- È disponibile esclusivamente presso MiniMax. Al momento della stesura di questo articolo, il servizio non è disponibile su OpenRouter, Ollama Cloud né OpenCode Go. I prompt e il codice vengono inviati ai server di MiniMax, quindi, se si lavora per conto di clienti soggetti a rigide norme sulla protezione dei dati, si consiglia di leggere prima i termini di servizio di MiniMax oppure di mantenere il progetto su modelli locali.
Non scaricare “MiniMax M3.1”
A meno di un giorno dal lancio, sono comparsi su GitHub dei repository che non hanno nulla a che vedere con MiniMax, che promettevano un “download ufficiale gratuito” di M3.1-Flash sotto forma di file zip per Windows da “estrarre ed eseguire”. Non esistono file M3.1 da scaricare, e il codice di MiniMax è disponibile solo sul sito ufficiale di MiniMax. Considerate qualsiasi “download di M3.1” come malware fino a prova contraria.
Quando è preferibile utilizzare invece MiniMax M3
Utilizzo M3 se ti serve una delle cose che la versione di anteprima non offre: tariffazione pay-as-you-go, pesi aperti che potresti autoospitare, oppure accesso tramite OpenCode Go, Ollama Cloud o OpenRouter. È anche la scelta più sicura per qualsiasi processo automatizzato, poiché il suo prezzo e il suo funzionamento sono documentati. Se vuoi una panoramica più ampia delle alternative, il mio MiniMax M3 vs Kimi K2.7 Code vs Nemotron 3 Ultra Il confronto abbraccia l'intero settore.
Parte 4 — Configurazione di OpenCode v2 con MiniMax M3.1, passo dopo passo
Questa è la configurazione che consiglierei a un amico. Ci vogliono circa quindici minuti, la maggior parte dei quali trascorsi ad aspettare che i file vengano scaricati.
Fase 0 — Cosa ti serve prima di tutto
- Un Mac con Apple Silicon, se desideri compilare ed eseguire app per iPhone in locale. Xcode 27 (rilasciato il 14 settembre 2026) non supporta più i Mac con processori Intel e richiede macOS Tahoe 26.4 o versioni successive. Se scegliete la strada di Expo nella Parte 7, potrete compilare app iOS nel cloud da Windows o Linux, ma avrete comunque bisogno di un vero iPhone su cui testarle.
- Git. Le istantanee, i rami e la tua stessa sanità mentale dipendono tutti da questo.
- Node.js (LTS) se utilizzerai Expo.
- Un abbonamento al piano MiniMax M (Parte 3).
- Un terminal moderno. Il Terminale di macOS va bene; Ghostty, WezTerm e Kitty sono migliori.
Passaggio 1 — Installare OpenCode v2
bash
curl -fsSL https://opencode.ai/v2/install | bash

opencode --version # dovrebbe visualizzare 2.0.x
opencode service status     # il server in background condiviso dovrebbe essere in esecuzione
Vuoi anche l'app per desktop? Scaricala da opencode.ai/download, oppure su un Mac esegui brew install --cask opencode-desktop. Il terminale e l'app desktop condividono lo stesso server, quindi una sessione avviata su uno dei due viene visualizzata anche sull'altro.
Un aspetto da tenere d’occhio: la guida OpenCode di MiniMax riporta ancora l’URL del programma di installazione della versione 1 (opencode.ai/install). Utilizza il /v2/install quello sopra.
Fase 2 — Ottieni la chiave di abbonamento al piano M
Iscriviti alla piattaforma MiniMax e crea un chiave di abbonamento nella console. Non si tratta di una chiave API a consumo: sono prodotti diversi e solo la chiave di abbonamento ti consente di accedere a M3.1-Flash-Preview.
Considera la chiave come una password. Non inserirla mai in una chat, in uno screenshot o in un repository Git.
Fase 3 — Collegare MiniMax all’interno di OpenCode
bash
cd ~/code/my-app
opencode
Quindi, all'interno di OpenCode:
- Tipo
/connecte cerca Piano MiniMax Token (minimax.io). Il fornitore ha mantenuto il suo vecchio nome; accetta le chiavi M Plan. - Incolla la tua chiave di abbonamento.
- Tipo
/modelse scegliere MiniMax-M3.1-Anteprima Flash.
Ecco fatto. Il catalogo dei modelli di OpenCode (Models.dev) include già il modello con il suo contesto da 1.000.000 di token, gli input di immagini e video e i cinque livelli di sforzo, quindi non serve un file di configurazione per iniziare. Se non compare in /models, aggiorna prima OpenCode; la configurazione descritta al punto 4 lo aggiunge anche manualmente.
Due alternative: Accesso tramite OpenCode fa la stessa cosa dal terminale e la procedura guidata di configurazione di MiniMax (npx -y mmx-cli@latest agent setup) installa e configura OpenCode per te, impostando M3 come impostazione predefinita. Successivamente, passa a M3.1 con /models. Gli account sulla piattaforma cinese di MiniMax utilizzano la versione “(minimax.cn)” del provider.
Passaggio 4 — Aggiungere una configurazione di progetto
Le impostazioni predefinite funzionano, ma un progetto di app merita un file di configurazione che svolga tre funzioni: indirizzi ogni agente al giusto livello di impegno, imposti autorizzazioni che impediscano all’agente di compiere azioni irreversibili e colleghi i tuoi server MCP. Salva questo file come opencode.jsonc nella directory principale del progetto:
jsonc
{
  "$schema": "https://opencode.ai/config.json",

  // Modello predefinito per le nuove sessioni
  "model": "minimax-coding-plan/MiniMax-M3.1-Flash-Preview",

  "providers": {
    "minimax-coding-plan": {
 "models": {
 "MiniMax-M3.1-Flash-Preview": {
 // L'esempio OpenCode di MiniMax limita la finestra a 512K
          "limit": { "context": 524288 },

 // Il ragionamento è sempre attivo e il valore predefinito è "max".
 // Queste varianti inviano il campo output_config.effort documentato da MiniMax.
          "varianti": [
 { "id": "quick", "corpo": { "output_config": { "effort": "low" } } },
            { "id": "steady", "body": { "output_config": { "effort": "medium" } } },
            { "id": "careful", "body": { "output_config": { "effort": "high" } } }
 ]
 }
 }
    }
  },

  "agents": {
    // La pianificazione riceve il massimo sforzo predefinito: un piano sbagliato costa di più in seguito
    "plan":    { "model": "minimax-coding-plan/MiniMax-M3.1-Flash-Preview" },
    // Generazione: approfondita, ma più veloce rispetto a "max"
    "build":   { "model": "minimax-coding-plan/MiniMax-M3.1-Flash-Preview#careful" },
    // Ricerca in sola lettura nel codice sorgente: la velocità conta più della profondità
    "explore": { "model": "minimax-coding-plan/MiniMax-M3.1-Flash-Preview#quick" }
  },

  "permissions": [
    { "action": "shell", "resource": "*", "effect": "ask"   },
    { "action": "shell", "resource": "git status *", "effect": "allow" },
    { "azione": "shell", "risorsa": "git diff *", "effetto": "consenti" },
    { "azione": "shell", "risorsa": "git log *", "effetto": "consenti" },
    { "azione": "shell", "risorsa": "npm test *", "effetto": "consenti" },
    { "azione": "shell", "risorsa": "npx tsc *", "effetto": "consenti" },
    { "azione": "shell", "risorsa": "npx expo lint *",    "effetto": "consenti" },
    { "azione": "shell", "risorsa": "git push *", "effetto": "negare"  },
    { "action": "shell", "resource": "eas submit *", "effect": "deny"  },
    { "azione": "shell", "risorsa": "firebase deploy *",  "effetto": "negare"  }
  ],

  "mcp": {
    "servers": {
 // Server MCP desktop di Figma (Parte 6). Locale, quindi senza OAuth.
      "figma-desktop": {
 "type": "remote",
 "url": "http://127.0.0.1:3845/mcp",
 "oauth": false
 },
      // Server MCP ufficiale di Firebase. Chiede conferma prima di apportare modifiche al progetto.
      "firebase": {
 "type": "local",
 "command": ["npx", "-y", "firebase-tools@latest", "mcp"]
 }
    }
  }
}
Alcune note per farti capire cosa stai incollando:
- Le regole relative ai permessi vengono lette dall'alto verso il basso e prevale l'ultima corrispondenza. Ogni comando della shell richiede prima un'autorizzazione; i comandi innocui come Git e test possono essere eseguiti liberamente, mentre tre operazioni vengono negate categoricamente: il push del codice, l'invio all'App Store e la distribuzione del backend. Queste operazioni le esegui tu stesso, di proposito.
- Sostituisci i comandi consentiti con quelli della tua toolchain. Se stai sviluppando in modo nativo con Xcode anziché con Expo, sostituisci il
npxrighe con i comandi di test e lint. - Se una variante sembra non avere alcun effetto, correre
/modelsper confermare i nomi delle varianti e dare un’occhiata alla richiesta nei log di OpenCode. MiniMax usamaxquando non viene indicato alcun effort, quindi nel caso peggiore ottieni una risposta più lenta, non una rotta. - Gli esempi più vecchi in stile v1 funzionano ancora. Nella guida di MiniMax c’è la chiave
providerdi v1; OpenCode v2 legge le impostazioni v1 supportate senza riscrivere il tuo file.
Fase 5 — Scrivi un AGENTS.md prima di scrivere una riga di codice
OpenCode legge AGENTS.md all’inizio di ogni sessione. È l’abitudine più efficace nello sviluppo assistito dall’IA, e la mia guida al vibe coding entra nell’intero sistema. Per un’app, dovrebbe contenere le regole del prodotto oltre ai comandi di build. Ecco che forma ha un file così per un’app come Stash:
markdown
# Notes for coding agents (example for a Stash-style app)

## What this app is
Stash remembers where things are. Photo of the spot + name + room = found in seconds.
If a change doesn't make saving or finding faster, it doesn't belong.

## Non-negotiables
- Offline first. Every feature works with no network. Sync is a bonus.
- Guest mode never uploads anything.
- No analytics, ads or tracking SDKs. Ask before adding ANY dependency.
- No secrets in the app bundle. Privileged work happens in Cloud Functions.
- Accessibility: Dynamic Type, VoiceOver labels, 44 x 44 pt touch targets.
- Light and dark mode for every screen.

## Design
- Tokens live in src/theme/tokens.ts. Never hard-code a colour or a font size.
- When implementing a Figma frame: get_design_context, then get_variable_defs,
  then get_screenshot to compare your result.

## Commands
- Install: npm install
- Run: npx expo start
- Test: npm test
- Types: npx tsc --noEmit
- Lint: npx expo lint

## Definition of done
- Tests, types and lint pass
- Works in airplane mode
- Works in light and dark mode, at the largest text size
- No new warnings in the console
Fase 6 (facoltativa) — Esegui OpenCode dentro Xcode e dagli l’accesso agli strumenti di Xcode
Xcode ora ha il coding agentico integrato e accetta agenti esterni in due modi diversi. Vale la pena conoscere entrambi se sviluppi in nativo.
OpenCode come agente dentro Xcode (ACP). Xcode può ospitare qualsiasi agente che parla l’Agent Client Protocol, e OpenCode lo fa, tramite opencode acp.
- Prima accedi dal terminale:
Accesso tramite OpenCode. - Esegui
which opencodee copia il percorso assoluto. Xcode non fa l’espansione di~né legge il PATH dell’ambiente della shell. - In Xcode scegli Xcode → Settings → Intelligence, poi sotto Agents clicca Aggiungi un agente.
- Incolla il percorso come comando e aggiungi
acpcome argomento. - Avvia una nuova conversazione nell’Intelligence sidebar di Xcode e scegli OpenCode.
Non puoi cambiare modello dall’interfaccia di Xcode, quindi imposta il tuo modello predefinito all’interno di opencode.jsonc prima.
Gli strumenti di Xcode all’interno di OpenCode (MCP). L’altra direzione è spesso più utile: OpenCode resta nel tuo terminale, ma può compilare il progetto, eseguire i test e mostrare le anteprime SwiftUI attraverso Xcode.
- In Xcode → Settings → Intelligence, in Model Context Protocol, attiva Consenti agli agenti esterni di usare gli strumenti di Xcode.
- Aggiungi il bridge di Xcode all’interno di OpenCode:
opencode mcp add xcode -- xcrun mcpbridge - Apri il progetto in Xcode prima di scrivere il prompt. Il bridge parla con l’istanza di Xcode in esecuzione e Xcode ti dice quando un agente esterno si connette.
Quale livello di effort per quale compito
| Compito | Agente | Effort |
|---|---|---|
| Pianificare una funzionalità, il modello dati o la logica di sincronizzazione | plan | max (il valore predefinito) |
| Implementare una schermata da un frame Figma | build | alto |
| Correggere un bug con un modo chiaro di riprodurlo | build | alto; max se c’è un bug di sincronizzazione o di race condition |
| Scrivere test, rinominare, piccoli refactoring | build | medio |
| Cercare nel codice, leggere la documentazione | explore | basso |
| Modifiche ai testi e traduzioni delle stringhe | build | basso fido medio |
Un effort più alto significa più token di ragionamento e più attesa, per usare le parole di MiniMax. In un ciclo di agente si passa la maggior parte del tempo ad aspettare, quindi allinea l’effort al rischio.
Parte 5 — Progettare la propria app in Figma anche se non si è designer
Non devi essere un designer per progettare una buona prima app. Ti servono poche decisioni, prese una volta e scritte dove l’agente può leggerle.
Parti dalle parole, non dai rettangoli
Prima di aprire Figma, scrivi tre cose in un file di testo semplice:
- La promessa, in una frase. Per Stash: il modo più veloce per ricordare dove hai messo le cose.
- Tre user story. “Ho messo il passaporto nel cassetto della scrivania e voglio ritrovarlo a marzo.” “Sono in garage, non c’è segnale e voglio annotare dove è finito il trapano.” “Voglio che le luci di Natale mi ricordino che esistono a novembre.”
- L’elenco delle schermate. Stash arriva con quattro tab (Home, Search, Rooms e Settings), più una schermata di aggiunta e una vista di dettaglio dell’oggetto. Sei schermate. È un’app intera.
Poi dai quel file all’agente plan e chiedigli di discutere con te: “Leggi questo brief. Elenca i flussi utente, i casi limite a cui non ho pensato e l’elenco delle schermate che mi mancano. Poi dimmi cos’è da tagliare.” È esattamente il tipo di lavoro noioso e minuzioso per cui serve l’effort massimo: la domanda tipo “cosa succede quando l’utente nega l’accesso alla fotocamera?”. Dieci minuti così possono risparmiarti un redesign.
Imposta le variabili prima di disegnare qualsiasi cosa
Figma variabili sono valori con un nome: colori, spaziature, raggi degli angoli, dimensioni. Impostale per prime, con una modalità chiara e una scura per i colori, e la tua app sarà coerente per impostazione predefinita.
Contano il doppio con un agente IA. Quando l’agente implementa una schermata, il server MCP di Figma può passargli le variabili esatte usate in quel frame (lo strumento get_variable_defs ), quindi scrive colors.green invece di indovinare un codice hex da uno screenshot.
Ecco la palette che c’è nel concept di design pubblico di Stash, così com’è:
| Token | Valore | Serve per | Contrasto su Paper |
|---|---|---|---|
| Paper | #F6F4EE | Sfondo dell’app | — |
| Surface | #FFFCF7 | Card e campi | — |
| Ink | #172E2A | Testo primario | 13.1 : 1 |
| Green | #23594C | Pulsanti, stati selezionati, brand | 7.3 : 1 |
| Green soft | #E1EBE4 | Evidenziazioni discrete | — |
| Coral | #D46F4F | Punto d’accento, una parola in un titolo | 3.1 : 1 |
| Coral soft | #F8E8DE | Evidenziazioni calde | — |
| Muted | #6E7D76 | Testo secondario | 3.9 : 1 |
| Line | #DEDFD7 | Separatori e bordi | — |
I titoli usano un serif; per tutto il resto c’è il sans-serif dell’OS. È tutto il sistema tipografico.
La colonna del contrasto è la parte da copiare. Ink e green superano il 4.5 : 1 che WCAG chiede per il testo normale, con molto margine. Coral, intorno a 3 : 1, passa solo per il testo grande, quindi va sulle parole grandi dei titoli e sui piccoli punti d’accento, che è esattamente dove Stash lo usa. Il grigio attenuato sta a 3.9 : 1, quindi va sulle didascalie più grandi e non sul testo piccolo. Verifica tutto questo in Figma prima che l’agente copi un token in cinquanta posti.
Mostra immagine Nove colori, due caratteri, una manciata di componenti. Un design system non dev’essere grande per essere utile; deve essere messo per iscritto.
Costruisci cinque componenti, non cinquanta
Per una prima app servono circa cinque componenti riutilizzabili: un pulsante (primario e tenue), un campo di testo, un scheda, un riga di elenco o riquadro (il riquadro delle stanze dell’app Stash) e la barra delle schede. Costruiscili come componenti Figma con varianti per i loro stati: predefinito, premuto, disattivato, errore.
Apple pubblica risorse di design iOS ufficiali per Figma. Usale come riferimento per gli elementi di sistema come fogli, avvisi e tastiera, invece di ridisegnarli. Tanto il tuo agente userà comunque i componenti di sistema veri.
Progetta le schermate che l’agente dimenticherà
Gli agenti IA sono bravissimi sul percorso felice e silenziosamente disastrosi su tutto quello che gli sta intorno. Progetta queste cose di proposito:
- Stati vuoti. Il primo avvio, una stanza dove non c’è niente (la griglia delle stanze di Stash mostra “Nessun oggetto”), una ricerca senza risultati.
- Testo enorme. Imposta il telefono alla dimensione Dynamic Type più grande e guarda i tuoi layout. I nomi lunghi degli oggetti vanno a capo. I pulsanti crescono.
- Modalità scura, per ogni schermata, non solo per quelle belle.
- Nessuna foto. Che aspetto ha la scheda di un oggetto senza foto?
- Permesso negato. L’utente ha detto no alla fotocamera. E adesso?
- Non connesso. Che aspetto ha “salvato, si sincronizzerà dopo”?
Lascia che l’IA ti aiuti dentro Figma, ma la fonte di verità resta tua
L’IA di Figma è cresciuta in fretta quest’anno. Il Figma Agent è entrato in open beta per tutti i piani a pagamento a Config 2026, ed è gratuito durante la beta per i posti Full. Può generare e rimixare design all’interno del tuo file. Figma Make trasforma i prompt in prototipi cliccabili. Weave , i cui strumenti ora eseguono lavori sulle immagini, come lo scambio dello sfondo, senza uscire dal file di design.
Sono ottimi per esplorare. Genera dieci varianti di una schermata home, ruba l’unica buona idea e poi ricostruiscila con i tuoi componenti e le tue variabili. Se i livelli generati diventano la tua fonte di verità, il design system va alla deriva e il coding agent eredita quella deriva.
C’è una cosa che Stash fa e che consiglierei a chiunque: le sue idee sperimentali vivono in un concept interattivo separato e chiaramente etichettato sul sito, non nell’app. Così esplori in pubblico senza promettere funzionalità che non esistono.
Fai un prototipo, poi guarda tre persone usarlo
Collega le schermate in un prototipo cliccabile, passa il telefono a tre persone e chiedi a ciascuna di salvare qualcosa e di ritrovarlo. Non spiegare niente. Guarda dove esitano. Tre persone troveranno la maggior parte dei problemi che contano, e correggere un frame in Figma richiede minuti, mentre correggerlo dopo che l’agente l’ha costruito richiede una sessione.
Parte 6 — Collegamento di Figma a OpenCode: il problema dell’MCP
Questa è la parte del flusso di lavoro che sembra il futuro quando funziona: selezioni un frame in Figma, dici all’agente di costruirlo e lui legge il layout reale, le variabili reali e i componenti reali invece di strizzare gli occhi su uno screenshot.
È anche la parte in cui la maggior parte delle guide salta un dettaglio che ti costa un’intera serata.
Cosa dà il server MCP di Figma a un agente
MCP, il Model Context Protocol, è il modo standard con cui un agente IA usa strumenti esterni. Il server MCP di Figma espone una serie di strumenti; questi sono quelli che contano per costruire un’app:
| Strumento | Cosa restituisce |
|---|---|
get_design_context | Il contesto di design per il livello o il frame selezionato. Figma lo chiama punto di partenza predefinito |
get_variable_defs | Le variabili e gli stili usati nella selezione: i tuoi colori, le spaziature, la tipografia |
get_screenshot | Un’immagine della selezione, così l’agente può confrontare il suo risultato |
get_metadata | Una struttura XML essenziale della gerarchia dei livelli |
get_code_connect_map | Le corrispondenze tra i componenti Figma e i componenti reali del tuo codice |
create_design_system_rules | Un prompt che scrive un file di regole che descrive il tuo design system per l’agente |
Ci sono anche scrivere strumenti (use_figma per creare e modificare contenuti Figma nativi, generate_figma_design per trasformare una UI web in esecuzione in livelli Figma, e altro), ma quasi tutti sono disponibili solo sul server remoto. Tienilo a mente.
Server remoto vs server desktop
Figma gestisce due versioni del server:
- Il server remoto su
https://mcp.figma.com/mcp. Figma lo consiglia, non richiede l’app desktop, funziona con ogni posto e ogni piano e ha il set completo di strumenti, compresa la scrittura sulla tela. - Il server desktop su
http://127.0.0.1:3845/mcp, che gira dentro l’app desktop di Figma. Richiede un posto Dev o Full su un piano a pagamento, e l’accesso in scrittura è limitato.
L’intoppo: OpenCode non è ancora ammesso sul server remoto
Durante la beta il server remoto accetta solo client approvati. Nell’elenco di Figma ci sono, tra gli altri, Claude Code, Codex, Cursor, VS Code, Gemini CLI, Kiro, Warp e Xcode. OpenCode non c’è. Prova a connetterti e il passaggio di registrazione fallisce con un HTTP 403.
Non c’è nessun bug da parte di OpenCode. A maggio un dipendente Figma ha spiegato sul forum dell’azienda che l’ambito della connessione è “volutamente limitato ai client supportati, mentre l’app è in beta”, e ha indirizzato le persone verso il server desktop, che “aggira del tutto il problema OAuth e la allowlist.” C’è una pull request aperta del team di OpenCode per aggiungere un client Figma registrato, che al momento in cui scrivo aspetta ancora l’approvazione di Figma.
Troverai post che suggeriscono di prendere in prestito l’ID client OAuth di un’altra app per scavalcare l’allowlist. Non farlo. Usa il server desktop e aspetta il supporto ufficiale.
Mostra immagine Tre strade da Figma a OpenCode. Solo una è un vicolo cieco, ed è l’unica che Figma consiglia a tutti gli altri.
Configurare il server desktop con OpenCode
- Installa l’ app desktop Figma e accedi con un account che ha un posto Dev o Full su un piano a pagamento. Sul piano Professional un posto Dev costa $12 al mese e un posto Full $16.
- Apri il tuo file di design e passa a Dev Mode con
Shift + D. - Nel pannello di ispezione, trova la sezione Server MCP e poi clicca Abilita server MCP desktop.
- Aggiungilo a OpenCode. Puoi usare il
figma-desktopblocco della configurazione della Parte 4, oppure esegui:
bash
opencode mcp add figma-desktop --url http://127.0.0.1:3845/mcp
Se OpenCode prova ad avviare un accesso OAuth per quel server, imposta "oauth": false sul server in opencode.jsonc. Il server desktop è locale e non ha bisogno d’altro. 5. Verifica che l’integrazione sia attiva con opencode mcp list.
Tieni aperta l’app desktop di Figma mentre lavori. Se Figma è chiuso, gli strumenti Figma dell’agente semplicemente spariscono.
Occhio ai limiti di frequenza
Sul piano Professional, i posti Dev e Full arrivano a 200 chiamate agli strumenti MCP al giorno e 10 al minuto. I posti Organization ne hanno 15 al minuto; Enterprise 600 al giorno e 20 al minuto. I posti View e Collab sono limitati a una manciata di chiamate al mese. Duecento sembrano tante, finché un agente zelante non chiama get_screenshot dopo ogni piccola modifica, quindi digli, in AGENTS.md, di confrontare con lo screenshot una volta per schermata invece di una volta per modifica.
Lo schema di prompt che funziona
Seleziona un frame in Figma, poi in OpenCode:
Implementa il frame Figma selezionato come schermata Add Item. Prima chiama get_design_context e get_variable_defs. Usa solo token da src/theme/tokens.ts; se manca un valore, aggiungi un token invece di scriverlo a mano. Riusa i nostri componenti Button, TextField e Card già esistenti. Quando hai finito, chiama get_screenshot e fai l’elenco di ogni differenza visibile tra il frame e quello che hai costruito. Poi correggile.
Due abitudini rendono tutto questo molto più affidabile:
- Esegui
create_design_system_rulesuna volta all’inizio del progetto e salva il risultato come sezione del tuo AGENTS.md o come skill in.opencode/skills/. Da quel momento ogni sessione conosce le tue regole di design senza che nessuno gliele dica. - Un frame per richiesta. “Costruisci tutta l’app da questo file” produce un’app intera un po’ sbagliata dappertutto. Una schermata alla volta produce schermate giuste.
Niente posto a pagamento? La strada gratuita
Puoi fare tutto questo senza MCP. M3.1 legge le immagini, quindi esporta ogni frame come PNG a 2x, allegalo al prompt e incolla i valori di colore e spaziatura in un tokens file nel repository. Perdi i dati esatti dei livelli e i riferimenti alle variabili, quindi aspettati un po’ più di andirivieni sulle spaziature. Per una prima app con sei schermate è del tutto fattibile, e non costa niente.
Parte 7 — Come creare un'app da zero, fase per fase
Questa è la parte “da zero”. Sette fasi, nell’ordine in cui le farei io, con i prompt e le trappole.
Fase 0 — Scegli il framework
Nel 2026 hai tre scelte sensate, e quella giusta dipende da dove deve girare la tua app.
| SwiftUI + Xcode 27 | Expo SDK 56 (su React Native) | Flutter | |
|---|---|---|---|
| Gira su | iPhone, iPad, Mac, Apple Watch e Vision Pro | iPhone, iPad, Android e web | iPhone, iPad, Android, web e desktop |
| Linguaggio | Swift 6.4 | TypeScript | Dart |
| Serve un Mac? | Sì | Non serve per compilare o per l’invio: il servizio EAS di Expo compila le app iOS nel cloud | Sì, per le build iOS, a meno che tu non usi una CI cloud |
| Widget | WidgetKit nativo | Stabile per iOS dall’SDK 56 | Tramite plugin più codice WidgetKit nativo |
| Amichevolezza per gli agenti | Molto buona, soprattutto con gli strumenti MCP di Xcode; il compilatore Swift intercetta un bel po’ di errori | Molto buona: tipi TypeScript, ricariche veloci e una quantità enorme di codice di esempio pubblico | Buono |
| Ideale per | App solo per Apple che vogliono ogni funzione nativa | Una sola base di codice per iPhone e Android, creata da una sola persona | Interfaccia identica su ogni piattaforma |
La mia regola pratica:
- Solo Apple, e vuoi l’ultima novità della piattaforma (i framework di IA sul dispositivo di Apple, Live Activities, l’integrazione profonda con il sistema): SwiftUI, con OpenCode che gira all’interno di Xcode o che usa gli strumenti di Xcode (Parte 4).
- iPhone e Android da un’unica base di codice, e sei una persona sola: Expo. L'SDK 56 è uscito il 21 maggio 2026 con React Native 0.85, ha spostato il minimo a iOS 16.4, ha reso pronta per la produzione l'interfaccia SwiftUI e Jetpack Compose e ha promosso a stabile i widget iOS. Il servizio EAS compila e invia app iOS da Windows o Linux, e il piano gratuito include 15 build iOS e 15 Android al mese.
- Flutter se tu o il tuo team lo conoscete già.
La scheda App Store di Stash richiede iOS 16.4, e la sua informativa privacy copre già una build Android, quindi è chiaro che l’app vuole andare oltre l’iPhone.
Fase 1 — Scheletro del progetto, commit, brief
Crea il progetto vuoto e assicurati che parta prima che l'agente lo tocchi.
Expo:
bash
npx create-expo-app@latest my-app
cd my-app
npx expo start        # aprilo sul telefono con Expo Go, o nel simulatore iOS
SwiftUI: in Xcode, scegli File → Nuovo → Progetto → iOS → App, seleziona SwiftUI e avvialo una volta nel simulatore.
Poi aggiungi i file della Parte 4 (AGENTS.md e opencode.jsonc), più altri due:
ROADMAP.md: l'elenco delle slice verticali qui sotto, con le caselle da spuntare. L'agente lo legge, spunta le voci e tu sai sempre a che punto sei.src/theme/tokens.ts(o un equivalente Swift): le tue variabili Figma come codice. Copiale a mano, oppure lascia che l'agente le recuperi conget_variable_defs.
Commit. Se Git non l’hai ancora configurato, git init prima. Da qui in avanti, ogni passo che funziona finisce con un commit.
Fase 2 — Pianifica il modello di dati prima di qualsiasi schermata
Il modello di dati è la decisione più costosa da cambiare in seguito, perché quando gli utenti veri hanno dati veri ogni modifica richiede una migrazione. Usa l’agente plan al massimo dell'impegno:
Stai pianificando un’app “dove l’ho messo?”. Leggi AGENTS.md, ROADMAP.md e il brief. Proponi il modello di dati, l’approccio di archiviazione locale e la struttura delle cartelle. L’app deve funzionare completamente offline e senza account; account e sincronizzazione arrivano dopo e non devono richiedere di riscrivere il livello locale. Elenca i compromessi, le migrazioni che servirebbero se aggiungessimo la sincronizzazione in seguito e qualsiasi punto ambiguo del brief. Non scrivere ancora codice.
Per un’app modellata su Stash, ti ritroverai con qualcosa del genere (un’illustrazione, non lo schema reale di Stash):
ts
type Room = {
  id: string;
  name: string;            // "Corridoio"
  createdAt: number;
  updatedAt: number;
};

type Item = {
  id: string;
  name: string;            // "Chiavi di casa"
  roomId: string;
  spot?: string;           // "Cassetto in alto"
  note?: string;           // "Nel piatto di ceramica a sinistra"
  photoPath?: string;      // prima il file locale; copia nel cloud solo con un account
  voiceNotePath?: string;
  transcript?: string;     // ciò che rende cercabili le note vocali
  remindAt?: number;       // promemoria stagionale
  createdAt: number;
  updatedAt: number;       // usato per risolvere i conflitti di sincronizzazione
  deletedAt?: number;      // eliminazione logica, così anche le cancellazioni possono sincronizzarsi
};
Leggi il piano come si deve. Discutine. È il momento più economico di tutto il progetto per cambiare idea.
Fase 3 — Costruisci a slice verticali
Una slice verticale è una funzione che funziona da un capo all’altro, dalla schermata all’archiviazione e ritorno, prima di passare alla successiva. Questo è l'ordine in cui costruirei un'app come Stash:
- Aggiungi un oggetto: nome, stanza, posto e nota, salvati in locale.
- Foto: fotocamera e libreria foto, salvate come file locali.
- Casa: oggetti salvati di recente e la riga delle stanze.
- Ricerca: per nome, stanza e nota, più un filtro “con foto”.
- Dettaglio dell'oggetto e “Trovato”.
- Camere: la griglia, più aggiunta, rinomina ed eliminazione delle stanze.
- Note vocali: registra, trascrivi, rendi cercabile la trascrizione.
- Promemoria: notifiche locali per gli oggetti stagionali.
- Widget per la schermata Home e la schermata di blocco.
- Impostazioni: aspetto, esportazione e, quando ci saranno gli account, eliminazione dell'account.
- Account e sincronizzazione: materiale da versione due, se hai l’accortezza.
Ogni slice segue lo stesso ciclo:
- Pianifica: l'agente
planscrive un breve piano per la slice. Tu lo correggi. - Design: seleziona il frame Figma, poi usa lo schema di prompt della Parte 6.
- Costruisci: l'agente
buildl'agente implementa, esegue i test e corregge ciò che non funziona. - Provala tu, su un dispositivo, e cerca di romperla.
- Leggi il diff. Ogni riga che finirà nell’app.
- Commit, spunta la casella in ROADMAP.md, apri una sessione nuova per la slice successiva.
Una sessione nuova conta più di quanto sembri. Anche con un milione di token di contesto, una sessione lunga accumula ipotesi superate. Una partenza pulita che rilegge AGENTS.md e ROADMAP.md è spesso più intelligente di una lunga.
Fase 4 — Prima offline, poi la sincronizzazione
Nell’informativa sulla privacy di Stash c’è uno schema che copierei per quasi qualsiasi app personale: senza account tutto resta sul dispositivo; con un account i dati si sincronizzano tramite un backend. Rende la prima versione più semplice, l’App Review più facile e la fiducia dei tuoi utenti più solida.
L'ordine delle operazioni:
- Completa prima il livello locale. SQLite tramite la libreria di Expo, o SwiftData in un’app nativa. Foto e registrazioni vivono come file sul dispositivo.
- Aggiungi gli account con Firebase Authentication. L'accesso via email basta per iniziare. Se aggiungi Google o un altro login di terze parti come modo principale di accesso, la linea guida 4.8 di Apple richiede un’opzione equivalente attenta alla privacy, come Sign in with Apple.
- Sincronizza i record su Cloud Firestore, e foto e note vocali su Cloud Storage, ognuno sotto il percorso dell’utente.
- Fai il lavoro con privilegi sul server. Qualsiasi cosa richieda diritti di amministrazione, come cancellare ogni file quando un account viene eliminato, va in Cloud Functions, mai nel bundle dell'app.
- Blindalo con le regole di sicurezza così che ogni utente possa leggere e scrivere solo i propri dati:
// ogni utente legge e scrive solo i propri dati
rules_version = '2';
service cloud.firestore {
  match /databases/{database}/documents {
    match /users/{uid}/{document=**} {
      allow read, write: if request.auth != null && request.auth.uid == uid;
    }
  }
}
Scrivi la regola equivalente per Cloud Storage e fai scrivere all’agente test che provano a leggere i dati di un altro utente e falliscono. Il server MCP ufficiale di Firebase (c’è nella configurazione della Parte 4) permette all’agente di capire e validare le tue regole, e chiede la tua approvazione prima di cambiare qualsiasi cosa nel progetto. Il deploy resta compito tuo, ed è per questo che firebase deploy è vietato nei permessi.
Due note sui costi. Il piano Spark gratuito di Firebase copre l’autenticazione (50.000 utenti al mese) e le quote gratuite di Firestore (1 GiB d’archivio, 50.000 letture e 20.000 scritture al giorno), ma Cloud Storage e Cloud Functions richiedono il piano Blaze con pagamento a consumo. Blaze mantiene quote generose senza costi, tra cui 5 GB di spazio e 2 milioni di invocazioni di funzioni al mese, quindi un'app piccola può comunque non costare nulla. Imposta comunque un avviso di budget dal primo giorno.
Se vuoi il “perché” più profondo dietro il design local-first, ne ho scritto in Perché il software "local-first" sta tornando in auge.
Fase 5 — I dettagli specifici dell'iPhone
Questi sono i dettagli che separano “funziona sul mio telefono” da “passa la revisione”:
- Le richieste di permesso hanno bisogno di motivi onesti. Fotocamera, libreria foto, microfono e, se usi il framework vocale di Apple, il riconoscimento vocale: ognuno ha bisogno di una stringa di motivazione che dica esattamente perché. “Per fotografare dove metti una cosa” va bene. “Questa app richiede l’accesso” è un motivo di rifiuto classico.
- Chiedi al momento giusto. Chiedi le notifiche quando qualcuno imposta il primo promemoria, non al primo avvio. Le persone dicono sì quando il motivo è ovvio.
- Preferisci il riconoscimento vocale sul dispositivo dove il telefono lo supporta, e scrivi nella tua informativa sulla privacy che il servizio vocale della piattaforma può elaborare l’audio. L’informativa di Stash fa esattamente questo.
- I widget sono una piccola app a parte. Hanno un ciclo di vita proprio, limiti di memoria propri e un modo tutto loro di leggere i tuoi dati. Metti in conto una slice intera per loro.
- Privacy manifest. Da maggio 2024 le app (compresi gli SDK che contengono) devono dichiarare motivi approvati per l’accesso a certe API di sistema. Gli SDK di Firebase portano i propri manifest; assicurati che ci sia anche il tuo.
- Modalità scura, Dynamic Type, VoiceOver. Controlla tutti e tre su ogni schermata. Gli agenti sono molto più affidabili con le etichette di accessibilità quando AGENTS.md le pretende, quindi fai in modo che le pretenda.
Fase 6 — Testa come uno scettico
L’agente ti dirà che ha finito. Spesso sbaglierà in piccolo, e a volte in grande. Gli agenti di Xcode 27 ora possono eseguire i test e controllare le anteprime SwiftUI da soli, il che è d’aiuto, ma niente sostituisce una persona con un telefono.
Automatico: unit test per la ricerca, il modello di dati e soprattutto la logica di fusione della sincronizzazione. Sono i bug che fanno perdere i dati all’utente.
A mano, prima di ogni rilascio:
- Un dispositivo vero, non solo il simulatore
- Modalità aereo: salva, cerca, modifica, poi riconnettiti e controlla che si sincronizzi
- Modalità scura e la dimensione del testo massima su ogni schermata
- VoiceOver: riesci a salvare e trovare un oggetto a occhi chiusi?
- Ogni permesso negato, uno alla volta
- Un'installazione pulita e un aggiornamento dalla versione precedente (i dati devono sopravvivere)
- Elimina account: è davvero sparito tutto?
Quando qualcosa si rompe, registralo. Usa la registrazione dello schermo dell’iPhone, allega il video e chiedi a M3.1 cos’è che non va. Accetta video in input, e “guarda questo” batte tre paragrafi di descrizione.
Modelli di prompt per questo tipo di app
Adattali invece di copiarli alla cieca.
Una slice:
Implementa la slice 4 di ROADMAP.md (ricerca). Leggi prima AGENTS.md. La ricerca deve corrispondere a nomi degli oggetti, nomi delle stanze, note e trascrizioni delle note vocali, senza distinguere maiuscole e minuscole, mentre l'utente digita. Aggiungi un filtro “Con foto”. Scrivi prima gli unit test, poi l'implementazione. Esegui i test e il controllo dei tipi. Mostrami il diff e un elenco di tutte le ipotesi che hai fatto.
Un bug:
Allegata c'è una registrazione dello schermo. Su un iPhone con la dimensione del testo massima, la tastiera copre il pulsante Salva nella schermata Aggiungi. Trova la causa, spiega in due frasi, correggi e controlla gli altri moduli dell'app per lo stesso problema.
Una revisione:
Rivedi ogni modifica dall’ultimo commit come un revisore iOS senior e scettico. Cerca crash, perdita di dati, fughe di privacy, etichette di accessibilità mancanti, colori scritti a mano e qualsiasi cosa che rompa l'uso offline. Non correggere ancora niente; dammi un elenco numerato, dal più grave.
Vale la pena eseguire quell’ultimo prompt prima di ogni singolo commit. Costa un minuto e intercetta i problemi che costano un fine settimana.
Parte 8 — Come pubblicare un'app sull'App Store nel 2026
Costruire l’app è la parte divertente. Pubblicarla è burocrazia, e la burocrazia è dove gli sviluppatori alle prime armi perdono una settimana. Ecco tutto in un unico posto.
Cosa richiede Apple a partire da ottobre 2026
| Requisiti | Dettagli | In vigore da |
|---|---|---|
| Apple Developer Program | $99 all'anno (99 € in Germania). Le aziende si iscrivono come organizzazione, che richiede un numero D-U-N-S | — |
| Strumenti di build | I caricamenti devono essere compilati con Xcode 26 o successivo usando l'SDK iOS 26 | 28 aprile 2026 |
| Target minimo | Le app devono puntare a iOS 13 o successivo | 9 settembre 2026 |
| Classificazione per età | Rispondi alle domande aggiornate di Apple sulla classificazione d’età | 31 gennaio 2026 |
| Privacy manifest | Motivi approvati per le API “required reason”, anche negli SDK di terze parti | 1 maggio 2024 |
| Informativa sulla privacy | Collegata in App Store Connect e raggiungibile dentro l'app (linea guida 5.1.1(i)) | — |
| Eliminazione dell'account | “Se la tua app permette di creare un account, devi anche offrire l'eliminazione dell'account all'interno dell'app” (5.1.1(v)) | — |
| Stato di commerciante UE | Ogni sviluppatore lo dichiara. Indirizzo, telefono ed email dei commercianti sono mostrati nella pagina del prodotto in tutti i 27 paesi dell’UE | — |
Le versioni attuali di Apple sono Xcode 27 e iOS 27, entrambe uscite il 14 settembre 2026. Non c’è ancora l’obbligo di compilare con Xcode 27, ma non puoi più caricare nulla compilato con Xcode 16 o precedenti (Apple è passata direttamente da Xcode 16 a 26 quando ha adottato i numeri di versione basati sull'anno).
Una nota per gli sviluppatori tedeschi e dell'UE: se pubblichi come azienda, sei un commerciante secondo il Digital Services Act dell’UE, e Apple verifica i tuoi dati di contatto prima di mostrarli nella pagina del prodotto. A febbraio 2025 Apple ha rimosso migliaia di app dalle vetrine dell’UE perché mancavano queste informazioni. Non finire nell’elenco.
App Store Connect, campo per campo
Crea il record dell'app in App Store Connect, poi compila:
- Bundle ID. L’identificatore in dominio inverso che non cambia mai, come quello di Stash
network.grahammiranda.stash. Sceglilo con attenzione. - Nome (30 caratteri) e sottotitolo (30). Stash usa Stash — Trovalo subito e Trova tutto quello che hai messo via: il marchio più il beneficio, poi il beneficio in parole semplici.
- Parole chiave (100 caratteri), separate da virgole senza spazi. Non c’è bisogno di ripetere parole già presenti nel nome o nel sottotitolo; contano comunque.
- Testo promozionale (170 caratteri), che puoi cambiare senza una nuova revisione, e la descrizione (4,000).
- Screenshot. Da uno a dieci per dimensione dello schermo, PNG o JPEG, senza trasparenza. Per iPhone la dimensione da 6,9 pollici (1320 × 2868) o quella da 6,5 pollici (1284 × 2778); per l’iPad quella da 13 pollici (2064 × 2752). Il set di Stash usa le dimensioni da 6,5 e 13 pollici.
- Categoria. Una primaria e una secondaria facoltativa. Stash è Produttività, con Utility come seconda.
- URL. Supporto, marketing e informativa sulla privacy. Ognuno deve funzionare.
- App Privacy, la “etichetta nutrizionale”. Ne parlo più sotto, perché è qui che anche l’utente onesto sbaglia.
- Classificazione per età questionario.
- Informazioni per App Review: dati di contatto, note per il revisore e, se l’app richiede l’accesso, un account demo. Una modalità ospite come quella di Stash alleggerisce il lavoro del revisore.
- Conformità all'esportazione. Se la tua app usa solo la crittografia integrata nel sistema operativo, come HTTPS, di solito ha diritto a un’esenzione. Controlla le indicazioni di Apple, poi imposta
ITSAppUsesNonExemptEncryptionnell’Info.plist così non ti viene chiesto a ogni caricamento.
Anche i campi di testo sono un buon lavoro per l'agente: “Scrivi una bozza del sottotitolo, delle parole chiave, del testo promozionale e della descrizione per l'App Store. Usa solo funzioni che esistono nel codice; elenca il file in cui si trova ogni funzione.” Quell'ultima istruzione gli impedisce di inventare funzioni.
TestFlight prima di tutto
Carica una build (dall’Organizer di Xcode, o con eas build --platform ios --auto-submit su Expo) e provala prima tramite TestFlight:
- Tester interni: fino a 100 persone del tuo team, senza bisogno di revisione.
- Tester esterni: fino a 10.000, invitati via email o con un link pubblico. La prima build esterna passa da una breve Beta App Review.
- Le build restano testabili per 90 giorni.
Fai provare l’app a cinque amici con telefoni diversi per un’intera settimana. Troveranno il crash che tu non hai trovato.
Cosa fa davvero rifiutare le app
Apple dice che “in media, il 90% delle proposte viene esaminato in meno di 24 ore”, e che “oltre il 40% dei problemi irrisolti riguarda la linea guida 2.1: Completezza dell'app”: crash, contenuti segnaposto, informazioni incomplete e link rotti. I soliti sospetti per una prima app:
| Linea guida | Cosa significa in pratica |
|---|---|
| 2.1 Completezza dell'app | Nessun crash, nessun “Lorem ipsum”, nessun link morto, dati dell'account demo se serve l'accesso |
| 4.2 Funzionalità minima | “La tua app dovrebbe includere funzioni, contenuti e interfaccia che la elevino oltre un sito web riconfezionato” |
| 4.8 Servizi di login | Un login di terze parti come accesso principale significa che devi offrire anche un'opzione attenta alla privacy, come Sign in with Apple |
| 5.1.1(i) Informativa sulla privacy | Collegata in App Store Connect e dentro l'app; dice cosa raccogli, chi lo tratta e come funziona l'eliminazione |
| 5.1.1(v) Eliminazione dell'account | Se le persone possono creare un account, possono eliminarlo nell'app |
| Metadati accurati | Screenshot e descrizioni mostrano quello che il binario fa davvero, non la roadmap |
Stash tiene le esplorazioni di design sul sito web, chiaramente etichettate, e fuori dalla pagina dell'App Store: è dalla parte giusta di quell'ultima riga.
Etichette privacy: rendile giuste, non solo plausibili
Apple l’ha definita con precisione: “‘Raccogliere’ significa trasmettere dati fuori dal dispositivo in modo che tu e/o i tuoi partner di terze parti possiate accedervi per un periodo più lungo di quello necessario a servire in tempo reale la richiesta trasmessa.” I dati elaborati solo all’interno del dispositivo non vengono raccolti.
In pratica, per un'app come Stash:
- Solo modalità ospite (niente esce dal telefono): non c’è raccolta di dati.
- Account con sincronizzazione: l'indirizzo email, le foto, le registrazioni vocali e le note archiviate sul tuo backend sono raccolti, perché lasciano il dispositivo e restano su un server, anche se solo l'utente può vederli. Nell'etichetta vanno come dati collegati all'utente, usati per la funzionalità dell'app e non per il tracciamento.
Qui l'agente è un ottimo revisore, perché può leggere ogni chiamata di rete nel codice:
Analizza questo codice per ogni dato che lascia il dispositivo: cos’è, dove va (quale SDK o endpoint), se viene archiviato, per quanto tempo e se è collegato all’utente. Includi i dati inviati dagli SDK di terze parti. Produci una tabella che posso usare per compilare le domande dell’App Privacy di Apple e il modulo Data safety di Google Play.
Poi assicurati che tre documenti raccontino la stessa storia: la tua informativa sulla privacy, l'etichetta privacy dell'App Store e, se pubblichi su Android, il modulo Data safety di Google Play. L’informativa sulla privacy di Stash dice che la tabella dei dati è scritta per corrispondere a entrambe le dichiarazioni degli store, ed è lo standard giusto a cui tenerti.
Mostra immagine Stampalo, attaccalo accanto allo schermo, spuntalo prima del primo invio di ogni app.
Come è arrivato Stash
Stash 1.0 è uscito il 23 settembre 2026. La versione 1.0.1, con “Nuovo design e correzioni di bug”, arrivata il 2 ottobre, nove giorni dopo. Pubblica la versione che funziona, poi migliorala in pubblico: per una prima app non c’è ritmo più sano.
Parte 9 — “E altro”: Il kit di lancio relativo all’app
Un’app sull'App Store senza niente intorno è un negozio senza insegna. Ecco il resto del kit, sempre con Stash come esempio.
Una landing page con una demo che si può toccare
Il sito dell’app Stash fa alcune cose che copierei anch’io per qualsiasi prima app:
- Una promessa nella parte alta della pagina. “Mettilo via. Sappi dove.” Poi una frase e due pulsanti: scarica l'app o provala nel browser.
- Un'anteprima dal vivo nella sezione iniziale. Il telefono a destra non è un’immagine. Puoi toccarlo e navigarci dentro.
- Una demo vera nel browser. A casa di esempio dove puoi cercare le chiavi, sfogliare le stanze e aggiungere un oggetto di prova. La demo “gira nella scheda del browser”, non tocca i dati dell’app e dimentica tutto quando ricarichi la pagina. Ti permette di provare l’idea prima di decidere di installarla.
- Tre passi, quattro funzioni, niente gergo. Fotografa il posto. Dagli un nome e una stanza. Ritrovalo quando ti serve.
- Le esplorazioni di design, etichettate chiaramente come concetti e non come funzioni.
- Dieci lingue (inglese, tedesco, francese, spagnolo, italiano, olandese, portoghese brasiliano, polacco, svedese e danese), ognuna con i corretti
hreflangtag, così i motori di ricerca mostrano quella giusta, più un selettore per il tema chiaro e scuro. - Dati strutturati che descrivono l’app come una
MobileApplication, con prezzo, piattaforme e link all’App Store, così i motori di ricerca capiscono che la pagina riguarda un’app. - Niente di inquietante. Il codice del sito non ha analytics, né pixel pubblicitari, né embed social, né font esterni, né login, né modulo di contatto. Salva nel browser soltanto la lingua e l’aspetto che scegli.
Mostra immagine La landing page di Stash. Il telefono a destra è una demo funzionante, non uno screenshot.
Una pagina statica come questa è anche un primo progetto perfetto per la stessa configurazione con OpenCode e M3.1: HTML, CSS e un po’ di JavaScript, senza framework, e vedi ogni modifica subito nel browser.
Le pagine legali, se sei in Germania o nell’UE
Queste sono informazioni generali di chi ci è già passato, non consulenza legale. Nel dubbio, rivolgiti a un avvocato.
Pubblicare dalla Germania comporta qualche pagina in più rispetto a quanto ti dirà un tutorial americano:
- Un Impressum (note legali) ai sensi del § 5 della Digitale-Dienste-Gesetz (DDG), la legge tedesca che nel 2024 ha sostituito il vecchio Telemediengesetz: ragione sociale, indirizzo, amministratore delegato, iscrizione al registro, recapiti e, se ne hai una, la partita IVA.
- Due testi privacy separati. Uno per il sito e uno per l’app, perché trattano dati diversi. Stash li ha entrambi e ognuno dice chiaramente quale stai leggendo.
- Un’informativa privacy per l’app con contenuti concreti. Quella di Stash copre il titolare del trattamento, una tabella con esattamente quali dati sono raccolti e perché, la base giuridica di ogni finalità ai sensi dell’articolo 6 GDPR, i responsabili del trattamento coinvolti (Firebase, di Google), come sono coperti i trasferimenti internazionali (l’EU-U.S. Data Privacy Framework e le clausole contrattuali standard), conservazione e cancellazione, i diritti degli utenti, l’autorità di controllo competente, i minori, la sicurezza e come vengono annunciate le modifiche.
- Un modo per cancellare un account anche fuori dall’app. Stash offre un modulo web oltre all’opzione dentro l’app. Google Play richiede un link web per la cancellazione dell’account se la tua app permette di creare account, quindi ti servirà comunque il giorno in cui pubblichi su Android.
- I termini sul trattamento dei dati con il tuo fornitore di backend, accettati nella sua console prima che arrivino dati reali degli utenti.
I cookie sono l’altra classica seccatura. Il sito di Stash evita gran parte del problema perché non ha nulla per cui chiedere consenso: niente analytics, niente pixel pubblicitari, niente tracciamento, solo lingua e tema memorizzati. Il banner dei consensi più economico è quello di cui non hai mai bisogno.
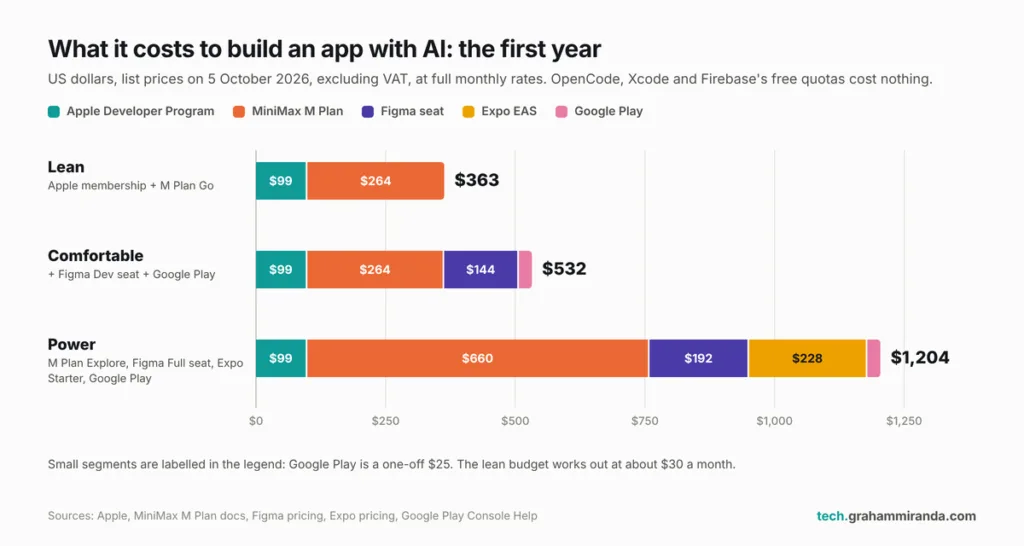
L’ottimizzazione per l’App Store senza fuffa
La ricerca sull’App Store si basa su nome, sottotitolo e keyword, e le persone decidono in pochi secondi guardando l’icona e le prime schermate. Alcune regole che funzionano:
- Nome: marchio più vantaggio. “Stash — Find It Fast” dice a uno sconosciuto a cosa serve l’app.
- Gli screenshot raccontano una storia, in ordine. I sei screenshot dell’app si leggono come un breve spot: Ogni cosa ha il suo posto. Trovalo. In pochi secondi. Conserva quel posto. La tua casa. Stanza per stanza. Ricorda i piccoli dettagli. Chiaro. Con qualsiasi luce. Molte persone non scorrono mai oltre le prime due o tre, quindi metti lì il ciclo principale.
- Localizza la scheda in tutte le lingue che la tua app supporta davvero.
- Chiedi la valutazione quando l’utente è contento. La richiesta di recensione di Apple può comparire al massimo tre volte all’anno per utente, quindi non sprecarla al primo avvio. In un’app come Stash, il momento ovvio è subito dopo che qualcuno tocca “Trovato”.
- Usa il testo promozionale per le stagioni. Pulizie di primavera, trasloco, riporre le cose invernali. Cambia senza una nuova revisione.
Android, quand’è il momento
Se hai costruito con Expo o Flutter, per Android basta più che altro una build. Le pratiche sono più leggere ma diverse:
- Google Play chiede $25 una volta sola per aprire un account sviluppatore.
- I nuovi account personali (creati dopo il 13 novembre 2023) devono fare un test chiuso con almeno 12 tester, iscritti per 14 giorni consecutivi, prima di poter pubblicare. Gli account aziendali sono esenti, che è un motivo in più per pubblicare tramite una società, se ne hai una.
- Il modulo Sicurezza dei dati è la versione Google dell’etichetta privacy. Mantienilo coerente con la tua informativa privacy e con le risposte che dai all’App Store.
Parte 10 — Quanto costa sviluppare un'app con l'IA nel 2026
Il software di questa configurazione è in gran parte gratuito. Quello che paghi è il modello, l’abbonamento Apple e, se vuoi, una licenza Figma migliore.
| Voce | Prezzo di listino | Quando ti serve |
|---|---|---|
| Apple Developer Program | $99 all’anno (€99 in Germania) | Per poter pubblicare sull’App Store |
| OpenCode v2 | Gratuito, licenza MIT | Sempre |
| MiniMax M Plan | Go $22, Explore $55, Build $132 al mese (50% di sconto sul primo mese con fatturazione mensile fino al 14 ottobre) | Per usare M3.1-Flash-Preview |
| Figma | Starter gratuito; licenza Professional Dev $12 al mese, licenza Full $16 | Una licenza a pagamento solo per il server MCP desktop |
| Xcode | Free | Build native, su un Mac con Apple silicon |
| Expo EAS | Piano gratuito con 15 build iOS e 15 Android al mese; Starter $19 al mese | Se costruisci con Expo |
| Firebase | Piano Spark gratuito; Blaze è a consumo, con quote senza costi | Account e sincronizzazione; Storage e Functions richiedono Blaze |
| Google Play | $25, una volta sola | Solo se pubblichi su Android |
| Landing page | Quello che spendi per hosting e dominio | Consigliato vivamente |
Tre budget realistici per il primo anno
| Budget | Che cosa c’è dentro | Primo anno |
|---|---|---|
| Essenziale | Abbonamento Apple + M Plan Go; Figma Starter con frame esportati; Expo, Firebase e OpenCode nei piani gratuiti | $363 |
| Comodo | Essenziale + una licenza Figma Dev per il server MCP desktop + Google Play | $532 |
| Massimo | Apple + M Plan Explore + una licenza Figma Full + Expo Starter + Google Play | $1,204 |
Mostra immagine L’abbonamento al modello è la voce più grossa di ogni budget. La tassa Apple è l’unica che non puoi evitare.
Prezzi di listino in dollari USA al 5 ottobre 2026, IVA esclusa, alle tariffe mensili piene (niente sconti di lancio). La spesa per il backend dipende dai tuoi utenti; su piccola scala, le quote senza costi di Firebase di solito la coprono. Imposta comunque un’allerta sul budget.
Il budget essenziale arriva a circa $30 al mese. Il costo vero del progetto però non compare nell’elenco: sono le tue serate. L’IA accorcia la digitazione, non il pensiero, e il pensiero è la parte più grossa.
Parte 11 — Dieci errori da evitare quando si sviluppa la propria prima app con l'IA
- Partire dal codice invece che da un brief. L’agente costruirà volentieri l’app sbagliata molto in fretta.
- Costruire tutto in una volta. “Fai tutta l’app” ti dà un’app intera che è rotta un po’ dappertutto. Costruisci a fette verticali.
- Saltare AGENTS.md. Senza quel file, ogni sessione riparte da zero e l’agente ridecide cose che hai già deciso.
- Lasciare che l’agente aggiunga dipendenze a piacere. Ogni pacchetto è codice che non hai letto, peso extra per l’app e un aggiornamento futuro da gestire. Fagli chiedere prima.
- Codificare a mano colori e dimensioni. Poi cambiare il design significa modificare 140 file. Token, sempre.
- Credere a “fatto”. Gli agenti dichiarano il successo con ottimismo. Provala su un telefono vero, in modalità aereo, in modalità scura, alla dimensione di testo più grande.
- Mettere segreti dentro l’app. Qualunque cosa dentro un bundle dell’app può essere estratta. Le chiavi API che costano soldi, o che danno accesso da amministratore, stanno su un server.
- Un’etichetta privacy plausibile invece che accurata. Se i dati lasciano il dispositivo e restano su un server, sono raccolti, anche quando solo l’utente può vederli.
- Dimenticare la cancellazione dell’account. Apple la richiede dentro l’app se permetti la registrazione; Google Play richiede anche un link web.
- Promettere la tua roadmap. Screenshot e descrizioni mostrano quello che l’app fa oggi. I concetti stanno sul tuo sito, etichettati come concetti.
E uno in più, per scaramanzia: non leggere il diff. Vibe coding significa non scrivere ogni riga. Non vuol dire non leggere le righe che finiscono nell’app. I numeri sulla sicurezza del mio State of AI 2026 round-up sono il motivo.
Parte 12 — È consigliabile utilizzare proprio questa combinazione? Sei scenari
1. “Non c’è una sola riga di codice che abbia scritto io.”
Expo, l’app desktop di OpenCode, M3.1 sul piano Go dell’M Plan e il piano gratuito di Figma con i frame esportati. Tieni la tua prima app su un solo ciclo principale, come il salva-e-ritrova dell’app Stash. Lascia i comandi shell su ask, fai commit dopo ogni passo funzionante e usa /undo senza sensi di colpa.
2. “Mi interessa solo l’iPhone e lo voglio completamente nativo.”
SwiftUI in Xcode 27, con OpenCode all’interno di Xcode via ACP oppure nel terminale con gli strumenti MCP di Xcode. M3.1 per pianificare e costruire. Avrai per primo l’accesso ai framework più recenti di Apple e all’integrazione più stretta con il sistema.
3. “Pago già Claude o ChatGPT.”
Usa quello che hai e riconosci dove vince. Claude Code, Codex e Cursor sono oggi nell’elenco approvato di Figma per il server MCP remoto, compresi gli strumenti di scrittura sulla canvas che OpenCode non riesce ancora a usare. OpenCode può accedere direttamente con ChatGPT Plus o Pro. Aggiungi M3.1 tramite OpenCode per i lavori in cui il suo contesto da un milione di token e l’input video fanno la differenza.
4. “Voglio partire spendendo il meno possibile.”
MiniMax M3 invece di M3.1 (tramite OpenCode Go a $10 al mese, oppure pagando all’uso), Figma Starter, le build gratuite di Expo e il piano gratuito di Firebase. L’abbonamento Apple da $99 è l’unico costo che non puoi evitare per un’app per iPhone. Se non te la senti, costruisci prima la versione web.
5. “La mia app tratta dati sensibili.”
Progetta prima per la modalità ospite, tieni al minimo gli SDK di terze parti e pensa anche a dove finisce il tuo codice. I tuoi prompt e il codice sorgente vanno al fornitore del modello. Per progetti molto sensibili, i modelli locali tramite Ollama tengono tutto sulla tua macchina (il mio articolo su OpenCode v2 copre quella configurazione) e fai rivedere l’app da un esperto di privacy prima del lancio.
6. “Costruisco app per clienti.”
Un piano Figma Organization con Code Connect, le policy di OpenCode per controllare quali fornitori può usare ogni progetto cliente, un livello dell’M Plan con spazio per più agenti in parallelo e build EAS a pagamento. Metti le regole di design di ogni cliente in una skill versionata o nell’AGENTS.md, così ogni sessione e ogni collega partono dalle stesse regole.
Parte 13 — Cosa tenere d’occhio nei prossimi mesi
- L’intera versione M3.1 di MiniMax. Se arriverà sul mercato, se avrà un prezzo per token, benchmark pubblicati e pesi aperti come M3, e se la preview Flash arriverà su OpenRouter, OpenCode Go o Ollama Cloud.
- OpenCode nell’elenco consentito di Figma. La pull request di OpenCode per un client Figma registrato è in attesa dell’approvazione di Figma. Quando arriva, gli strumenti di scrittura del server remoto aprono l’accesso anche agli utenti di OpenCode.
- Il prezzo dell’uso della scrittura su canvas di Figma. Figma dice che quelle funzioni sono gratuite durante la beta e diventeranno a consumo più avanti.
- Figma Code Layers, presentato in anteprima a Config, che promette design e codice sulla stessa canvas.
- OpenCode v2 che matura: la condivisione delle sessioni che torna, i plugin che si allineano e le release 2.0.x che si stabilizzano.
- La prossima scadenza dell’SDK di Apple. Se Apple segue il suo solito schema, le build fatte con Xcode 27 diventeranno obbligatorie per gli upload intorno alla prossima primavera.
- Stash stessa. Le tre esplorazioni di design sul suo sito (fissare il punto esatto, Quick Move, scatole ed etichette) mostrano dove stanno andando le idee.
Domande frequenti
Posso costruire un’app da zero senza esperienza di programmazione?
Sì. Nel 2026 un agente di coding IA come OpenCode, abbinato a un modello forte come MiniMax M3.1, scrive il codice mentre tu prendi le decisioni: cosa fa l’app, che aspetto ha, quali dati conserva e come la testi. Devi comunque imparare a leggere un piano, rivedere un diff, testare su un dispositivo reale e gestire App Store Connect. Parti da un’app con un solo ciclo principale e senza pagamenti.
Quanto tempo serve per costruire un’app con l’IA?
Dipende molto più dall’ambito che dagli strumenti. Un’app piccola con un solo ciclo principale, come un’app salva-e-ritrova, richiede settimane di serate più che mesi, se costruisci a fette verticali e testi man mano. La pubblicazione aggiunge qualche giorno per TestFlight e le pratiche dell’App Store; Apple dice che il 90% delle proposte viene esaminato in meno di 24 ore.
Che cos’è MiniMax M3.1?
MiniMax M3.1 è la nuova generazione della famiglia di modelli M3 di MiniMax. A ottobre 2026 l’unica versione utilizzabile è MiniMax-M3.1-Flash-Preview, lanciata il 27 settembre 2026: un modello di coding multimodale con una finestra di contesto da 1.000.000 di token, input di testo, immagini e video, pensiero sempre attivo e cinque livelli di sforzo da basso a massimo. È disponibile solo tramite l’abbonamento M Plan di MiniMax e l’app MiniMax Code.
MiniMax M3.1 è disponibile tramite API?
Solo con una chiave di abbonamento. M3.1-Flash-Preview funziona sugli endpoint compatibili con OpenAI e con Anthropic di MiniMax, ma solo con una chiave dell’abbonamento M Plan. Non c’è un prezzo a consumo, non ci sono pesi aperti e non è ancora nell’elenco di OpenRouter, Ollama Cloud o OpenCode Go. MiniMax M3 resta disponibile a consumo a $0,30 per milione di token in input e $1,20 per milione di token in output.
Come uso MiniMax M3.1 in OpenCode?
Installa OpenCode v2, avvialo nella cartella del progetto ed esegui /connect, scegli “MiniMax Token Plan (minimax.io)” e incolla la chiave del tuo abbonamento M Plan. Poi esegui /models e seleziona MiniMax-M3.1-Flash-Preview. Non serve alcun file di configurazione, anche se un progetto opencode.jsonc ti permette di impostare i livelli di sforzo per agente e aggiungere permessi.
Il server MCP di Figma funziona con OpenCode?
In parte. Il server MCP remoto di Figma accetta solo client approvati durante la beta, e OpenCode non è ancora nell’elenco, quindi la connessione fallisce con un HTTP 403. Il server MCP desktop di Figma funziona: abilitalo in Dev Mode nell’app desktop di Figma e punta OpenCode all’indirizzo http://127.0.0.1:3845/mcp. Richiede una licenza Dev o Full su un piano a pagamento e offre strumenti per lo più in sola lettura.
Serve un Mac per costruire un’app per iPhone?
Non necessariamente. Lo sviluppo nativo con Xcode richiede un Mac, e Xcode 27 richiede Apple silicon. Con Expo, EAS costruisce la tua app iOS nel cloud ed EAS Submit la carica su App Store Connect da macOS, Windows o Linux. Ti servirà comunque un iPhone per i test, e per pubblicare ti serve un’iscrizione all’Apple Developer Program.
Quanto costa pubblicare un’app sull’App Store?
L’Apple Developer Program costa $99 all’anno, o l’equivalente locale (€99 in Germania). Apple non addebita nulla per app o per invio. I costi di sviluppo dipendono dai tuoi strumenti; la configurazione essenziale di questa guida arriva a circa $363 il primo anno, abbonamento MiniMax M Plan compreso, con piani gratuiti per OpenCode, Figma, Expo e Firebase.
Quanto dura la revisione dell’App Store?
Apple dice che in media il 90% delle proposte viene esaminato in meno di 24 ore. Il motivo più comune per cui le app si bloccano è la linea guida 2.1, App Completeness: crash, contenuti segnaposto, informazioni di revisione incomplete e link rotti, compresi gli URL dell’assistenza e dell’informativa privacy.
Devo usare SwiftUI, React Native (Expo) o Flutter?
Usa SwiftUI con Xcode 27 se la tua app è solo per Apple e vuoi le funzioni più recenti della piattaforma. Usa Expo (React Native) se vuoi un’unica base di codice per iPhone e Android e lavori da solo: l’SDK 56 supporta iOS 16.4 e successivi, ha widget iOS stabili e può compilare nel cloud. Usa Flutter se tu o il tuo team conoscete già Dart.
Che differenza c’è tra MiniMax M3 e M3.1?
MiniMax M3, pubblicato il 1° giugno 2026, è disponibile per tutti con pesi aperti, benchmark pubblicati e prezzo per token, e gira su molti fornitori. M3.1-Flash-Preview, pubblicato il 27 settembre 2026, è una preview solo in abbonamento, senza pesi, prezzo o benchmark per ora, con pensiero sempre attivo e cinque livelli di sforzo. Entrambi hanno un contesto da 1M di token e accettano testo, immagini e video.
Che cos’è Stash?
Stash — Find It Fast è un’app gratuita per iPhone e iPad di Graham Miranda UG che ricorda dove metti le cose. Fotografi il posto, dai all’oggetto un nome e una stanza, e più tardi lo cerchi per nome, stanza, nota o nota vocale trascritta. Offre anche promemoria per gli oggetti stagionali, widget, uso offline e sincronizzazione tra iPhone e iPad. È uscita sull’App Store il 23 settembre 2026.
Stash raccoglie i miei dati?
Stash non ha pubblicità, non fa tracciamento analytics e non vende dati. In modalità ospite, senza account, le tue stanze, i tuoi oggetti, le foto e le note vocali restano sul tuo dispositivo. Se crei un account, si sincronizzano tramite Google Firebase, così sono disponibili sul tuo iPhone e iPad, isolati dagli altri utenti, e puoi cancellare l’account e i dati dalle impostazioni dell’app o tramite un modulo web.
In sintesi
Costruire un’app da zero nel 2026 non è più una questione di saper scrivere il codice. Un agente come OpenCode v2, con un modello come MiniMax M3.1, scrive in un pomeriggio più codice di quanto ne leggeresti in una settimana. Il lavoro vero si è spostato ai bordi: decidere che cos’è l’app, progettarla con abbastanza cura perché un agente non possa fraintenderla, testarla come farebbe uno scettico e sbrigare le pratiche poco glamour che trasformano una cartella di progetto in qualcosa che uno sconosciuto può scaricare.
La configurazione di questa guida è quella che consiglierei oggi. Figma per le decisioni che puoi vedere. OpenCode v2 perché è aperto, scriptabile, attento all’uso dei permessi e fedele a nessun modello in particolare. MiniMax M3.1 perché un milione di token di contesto e l’input video si adattano insolitamente bene a costruire un’app, purché tu tratti una preview come una preview. E la “roba” (Firebase, TestFlight, etichette privacy, una landing page, pagine legali) perché è quello che gli utenti incontrano davvero.
Stash è come appare tutto questo quando arriva sul mercato: una piccola promessa, mantenuta bene. Scarica Stash sull’App Store, o prova la demo nel browser prima. Poi vai e costruisci la tua.
Stai costruendo la tua prima app con l’IA? Mi piacerebbe sapere quale framework hai scelto, se sei riuscito a far parlare l’agente con il server MCP di Figma e come ti sta trattando MiniMax M3.1. Correzioni e prove contrarie sono benvenute; l’articolo si aggiorna quando il quadro cambia.
Informativa: Stash è un’app mia, pubblicata dalla mia società, Graham Miranda UG. È gratuita, senza pubblicità e senza acquisti in-app. In questo articolo non ci sono link affiliati, e nessuna delle aziende citate ha sponsorizzato o revisionato l’articolo prima della pubblicazione.
Ultimo aggiornamento: 5 ottobre 2026.